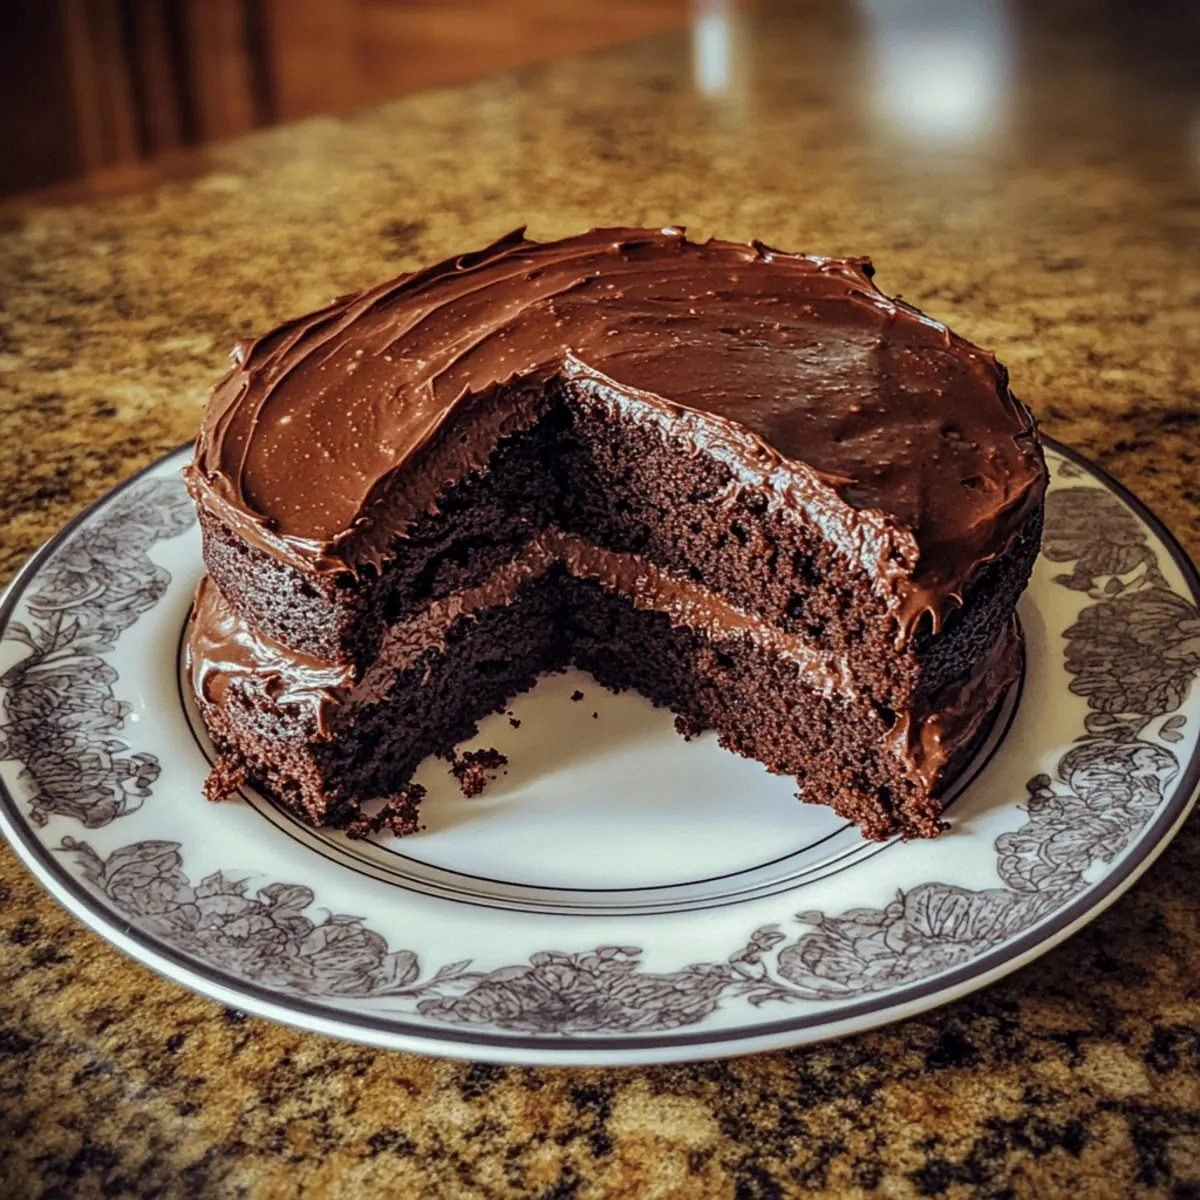
I was in the middle of a kitchen chaos that could have been a disaster—an accidental over‑sifted cake batter that turned into a sticky, crumbly mess. I had been craving chocolate cake for days, but the last time I tried a gluten‑free version, it was dry and flavorless. That night, after a frantic scramble of almond flour, cocoa, and a dash of honey, the oven door opened to reveal a dark, glossy slab that looked like it could melt on a summer afternoon. The moment the aroma hit my nose, I knew I’d stumbled on something extraordinary. I dare you to taste this and not go back for seconds.
Picture yourself pulling this out of the oven, the whole kitchen smelling incredible, the steam curling like a sweet cloud. The batter, thick and glossy, has a deep, almost metallic chocolate hue that promises a bite that’s both rich and velvety. The first bite feels like a chocolate‑coated biscuit that melts into a silky sauce, followed by a subtle nutty crunch from the almond flour. The subtle sweetness from the honey or maple syrup is balanced perfectly by the dark chocolate chips that melt into pockets of molten goodness. The almond flour gives a delicate, almost buttery crumb that stays moist, while the yogurt or sour cream adds a tang that cuts through the sweetness. If you’ve ever struggled with gluten‑free desserts that taste like cardboard, you’re not alone — and I’ve got the fix.
This version stands out because it takes a classic chocolate cake and transforms it into a gluten‑free masterpiece that feels like a treat from a fancy bakery. I used a blend of almond flour and unsweetened cocoa powder that creates a dense, chocolatey base, while the honey or maple syrup keeps it moist without the need for added fats. The addition of plain yogurt or sour cream brings a tangy brightness that balances the sweetness, and the sliced almonds give a crunchy texture that pops in every bite. The dark chocolate chips, added at the end, provide pockets of molten chocolate that ooze out as you bite. Most recipes get this completely wrong by using too much flour or too little liquid, resulting in a dry, crumbly cake. Here’s what actually works.
And now the fun part: the secret ingredient that most people overlook is the baking soda. It reacts with the acidic yogurt to create tiny air pockets that give the cake a light, airy interior without the need for a leavening agent like baking powder. The result? A cake that rises beautifully and has a mouth‑watering crumb that feels like a chocolate sponge. I’ll be honest — I ate half the batch before anyone else got to try it. If you’re ready to experience the best gluten‑free almond flour cake you’ll ever make at home, let me walk you through every single step — by the end, you’ll wonder how you ever made it any other way.
What Makes This Version Stand Out
- Flavor: The deep, almost metallic chocolate taste comes from high‑quality unsweetened cocoa powder that’s ground fine enough to dissolve completely into the batter. It’s like drinking a thick hot chocolate, but solidified into a cake.
- Texture: The combination of almond flour and yogurt creates a moist, tender crumb that feels almost like a sponge cake, yet it retains a subtle nutty bite that’s unique to almond flour.
- Simplicity: No more complicated dry mixes or specialty flours. All you need is almond flour, cocoa, honey, and a handful of pantry staples. This is hands down the best version you'll ever make at home.
- Uniqueness: The sliced almonds and dark chocolate chips are folded in at the end, giving the cake a multi‑textural experience that feels both crunchy and silky.
- Crowd Reaction: Friends who are gluten‑sensitive or even just curious about gluten‑free desserts rave about how it tastes like a regular chocolate cake but with a healthier twist.
- Ingredient Quality: Using organic, non‑GMO almond flour and fair‑trade cocoa ensures that the final product is not only delicious but also ethically sourced.
- Cooking Method: The batter is mixed at room temperature, then baked at a moderate heat, which allows the cake to rise evenly without cracking.
- Make‑Ahead Potential: The cake can be prepared a day in advance and stored in the fridge, making it perfect for last‑minute gatherings.
Alright, let’s break down exactly what goes into this masterpiece…
Inside the Ingredient List
The Flavor Base
The unsweetened cocoa powder is the heart of this cake. It’s not just a flavoring; it’s a structural component that binds the batter together. A high‑quality cocoa powder, such as Dutch‑processed, will give the cake a darker hue and a smoother finish. If you use a regular cocoa powder, the cake may taste slightly bitter. Swap it for a dark chocolate‑infused cocoa for an extra depth of flavor. The cocoa also reacts with the baking soda to create tiny bubbles that lift the cake.
The Texture Crew
Almond flour is the star of the show. Its fine texture mimics the feel of traditional cake flour, but with a subtle nutty undertone. Use a 100% almond flour that’s finely ground; a coarser grind will leave the cake gritty. The yogurt or sour cream is crucial for moisture and acidity. It keeps the batter from drying out and provides the perfect pH for the baking soda reaction. If you’re dairy‑free, switch to a plant‑based yogurt that’s thick and neutral in flavor.
The Unexpected Star
The honey or maple syrup is the sweetener that brings everything together. It’s natural, adds a slight floral note, and keeps the cake moist. The ratio of sweetener to flour is key; too much and the cake will be overly sweet, too little and it will be dry. If you prefer a lower glycemic index, opt for maple syrup over honey. The vanilla extract adds a subtle warmth that balances the chocolate.
The Final Flourish
Sliced almonds and dark chocolate chips are folded into the batter just before baking. The almonds give a satisfying crunch that contrasts with the soft crumb, while the chocolate chips melt into pockets of molten chocolate. If you like a more intense chocolate flavor, increase the dark chocolate chips to 3/4 cup. The baking soda and salt are essential for leavening and flavor balance. Without them, the cake would be flat and bland.
Everything's prepped? Good. Let's get into the real action...
The Method — Step by Step
- Preheat your oven to 350°F (175°C). Line a 9‑inch round cake pan with parchment paper, then lightly grease the paper with a neutral oil. This ensures the cake slides out cleanly. Let me walk you through the first part: the dry mix.
- In a separate bowl, whisk together the eggs, honey or maple syrup, vanilla extract, and yogurt until the mixture is glossy and slightly frothy. The eggs act as a binder, while the honey keeps the cake moist. This is the moment of truth; you’ll notice the batter thickening as the liquids combine. Watch the color change—it should be a deep chocolate hue.
- Pour the wet mixture into the dry ingredients and stir until just combined. Don’t overmix; a few lumps are okay. Overmixing will develop gluten‑free protein and make the cake dense. The batter should be thick but pourable. If it’s too thick, add a tablespoon of water or almond milk.
- Fold in the dark chocolate chips. They’ll melt slightly during baking, creating pockets of chocolate that burst in your mouth. The batter should have visible chocolate chips, adding texture and visual appeal.
- Pour the batter into the prepared pan, smoothing the top with a spatula. Tap the pan lightly on the counter to release any air bubbles. This step ensures a uniform rise and prevents cracks.
- Bake for 28–32 minutes, or until a toothpick inserted in the center comes out clean or with a few moist crumbs. The cake should have a slight sheen on top, indicating it’s perfectly baked. Let the cake cool in the pan for 10 minutes before transferring to a wire rack.
- Once cooled, dust the top with powdered sugar or drizzle a simple glaze made from melted dark chocolate and a splash of almond milk. The glaze adds shine and an extra layer of chocolate flavor. Slice and serve immediately, or store in an airtight container.
That's it — you did it. But hold on, I've got a few more tricks that'll take this to another level. Stay with me here — this is worth it.
Insider Tricks for Flawless Results
The Temperature Rule Nobody Follows
Baking at the right temperature is crucial. If the oven is too hot, the cake will rise too quickly and then collapse. I always preheat to 350°F and then turn the oven down to 325°F halfway through the bake. This gentle finish keeps the cake moist and prevents a dry crust.
Why Your Nose Knows Best
The aroma is a reliable indicator of doneness. When the cake starts to smell like toasted chocolate and almonds, it’s almost ready. Don’t rely solely on the toothpick; the scent can tell you if the cake needs a few more minutes.
The 5‑Minute Rest That Changes Everything
Letting the cake rest for exactly five minutes after baking allows the structure to set. During this time, the crumb stabilizes, preventing it from falling apart when you slice. A friend once tried cutting the cake immediately, and the result was a soggy mess. I’ve learned that patience pays off.
The Quick Chill for Extra Moisture
After the initial cooling period, wrap the cake in parchment and place it in the fridge for 20 minutes. This chill locks in moisture and enhances the chocolate flavor. When you’re ready to serve, let it sit at room temperature for 10 minutes to soften the glaze.
The No‑Mess Mixing Trick
Mix the batter in a single bowl using a silicone spatula. The silicone is flexible and doesn’t cling to the batter, making it easier to scrape the sides. This keeps the batter smooth and ensures even distribution of chocolate chips.
The Quick Clean‑Up Method
After mixing, rinse the bowl and spatula with warm water and a drop of dish soap. The mixture will dissolve, leaving no residue. This trick saves time and keeps your kitchen sparkling.
Creative Twists and Variations
This recipe is a playground. Here are some of my favorite ways to switch things up:
Nutty Espresso Swirl
Fold in a tablespoon of instant espresso powder into the batter before adding the chocolate chips. The espresso intensifies the chocolate flavor and adds a subtle coffee kick that pairs wonderfully with the almonds.
Citrus Zest Surprise
Add a teaspoon of orange zest to the wet mixture. The citrus adds brightness that cuts through the richness, making it perfect for a summer dessert.
Salted Caramel Drizzle
Drizzle a caramel sauce made from brown butter and sea salt over the cooled cake. The caramel’s sweetness balances the chocolate, while the salt enhances the nutty undertones.
Almond Butter Frosting
Replace the glaze with a rich almond butter frosting. Mix almond butter, powdered sugar, a splash of almond milk, and a pinch of sea salt. This frosting adds a creamy, nutty layer that complements the cake.
Raspberry Compote Topping
Top the cake with a spoonful of raspberry compote for a tart, fruity contrast. The berries’ acidity balances the sweetness and adds a pop of color.
Chocolate‑Infused Almond Flour
Use chocolate‑infused almond flour for an extra depth of flavor. This flour has a subtle cocoa undertone that pairs beautifully with the dark chocolate chips.
Storing and Bringing It Back to Life
Fridge Storage
Wrap the cooled cake tightly in plastic wrap and store it in an airtight container in the refrigerator for up to 5 days. The cake stays moist and fresh, and the chocolate chips remain melty.
Freezer Friendly
Slice the cake into portions, then wrap each slice individually in parchment paper and place them in a freezer bag. Freeze for up to 3 months. When you’re ready, thaw at room temperature for 30 minutes before serving.
Best Reheating Method
To revive a frozen slice, microwave on low for 15–20 seconds. Add a tiny splash of water before reheating to create steam, which brings back the cake’s moist texture. Finish with a quick dusting of powdered sugar.