I was halfway through a midnight snack when my kitchen turned into a disaster zone. A bag of flour had exploded in a puff of white dust, a saucepan had caught fire, and my phone was on silent, scrolling through recipes that all looked the same. I stared at the chaos, then at the clock, realizing I had a craving for something sweet, comforting, and surprisingly wholesome. That moment sparked the idea for a breakfast bake that could turn a kitchen catastrophe into a triumph. I swear, the aroma of toasted millet and maple syrup is a warning sign for the best morning you’ll ever have.
Picture yourself pulling this out of the oven, the whole kitchen smelling incredible, and the first bite is a burst of warm berries, nutty crunch, and a subtle, sweet-salty harmony. I dare you to taste this and not go back for seconds; the layers of flavor will have you reaching for the spoon before you even finish the last crumb. Most recipes get this completely wrong by using instant grains or too much liquid, but here the millet stays fluffy and the batter stays moist, like a soft, caramelized custard. The secret? A balanced ratio of water, milk, and maple syrup that lets the grains absorb just enough moisture without becoming soggy. And when the berries bubble on top, they coat the batter like velvet, creating a glossy, irresistible finish.
I'll be honest — I ate half the batch before anyone else got to try it. That was a moment of pure joy, and it reminded me why I love this recipe: it’s simple, yet it feels like a celebration. The texture is a dance between the crunchy nuts and the tender millet, with a slight chew that keeps you coming back for more. The flavor profile is a gentle, sweet-salty balance that makes it perfect for any morning, whether you’re in a rush or have time to savor. This is hands down the best version you'll ever make at home because it combines wholesome grains, fresh fruit, and nutty crunch in a way that feels both indulgent and nourishing.
So if you've ever struggled with a bland breakfast or a messy, overcooked grain dish, you're not alone — and I've got the fix. This version stands out from the crowd by using hulled millet, which has a nuttier taste and firmer texture than regular millet, and by layering fresh berries that caramelize in the oven. The maple syrup isn’t just a sweetener; it adds depth and a subtle caramel note that lifts the entire dish. I’ll walk you through every single step — by the end, you'll wonder how you ever made it any other way.
What Makes This Version Stand Out
- Taste: The combination of maple syrup, vanilla, and cinnamon creates a warm, comforting sweetness that pairs perfectly with tart berries, giving each bite a nuanced flavor profile.
- Texture: Hulled millet provides a firm, slightly chewy bite that contrasts beautifully with the melt-in-your-mouth berries and the crisp, toasted nuts.
- Simplicity: With only ten ingredients and a single baking step, this recipe is a breeze for busy mornings or lazy weekends.
- Uniqueness: Unlike most breakfast casseroles that rely on oats or quinoa, this dish showcases millet, a lesser-known grain with a nutty flavor that feels both exotic and comforting.
- Audience: Whether you’re a health-conscious eater, a busy parent, or a foodie looking for a new breakfast staple, this bake will win them over with its wholesome ingredients.
- Ingredient Quality: Fresh or frozen berries and raw nuts add antioxidant power and healthy fats, while the non‑dairy milk keeps the dish dairy‑free without sacrificing creaminess.
- Method: The single‑bake approach means no stovetop mess, and the oven does all the work, letting you focus on other morning tasks.
- Make‑Ahead Potential: Once baked, it keeps well in the fridge for up to five days, and you can reheat individual slices for a quick, satisfying breakfast.
Inside the Ingredient List
The Flavor Base
The foundation of this bake is the simple yet powerful combination of hulled millet, non‑dairy milk, and water. The millet absorbs the liquids, swelling into a fluffy, grainy bed that carries the entire flavor profile. If you skip the millet, you’ll lose that satisfying chew and the dish will feel flat. For a richer taste, you can substitute coconut milk for the non‑dairy milk, but keep the water the same to maintain moisture balance.
The Sweetener & Spice Layer
Maple syrup and ground cinnamon create a warm, caramelized sweetness that pairs with the berries. The maple syrup also helps the batter set, giving it a slight glaze when baked. If you prefer a lower‑sugar option, replace maple syrup with a natural sweetener like agave nectar or use a sugar‑free vanilla extract to keep the flavor profile intact.
The Unexpected Star
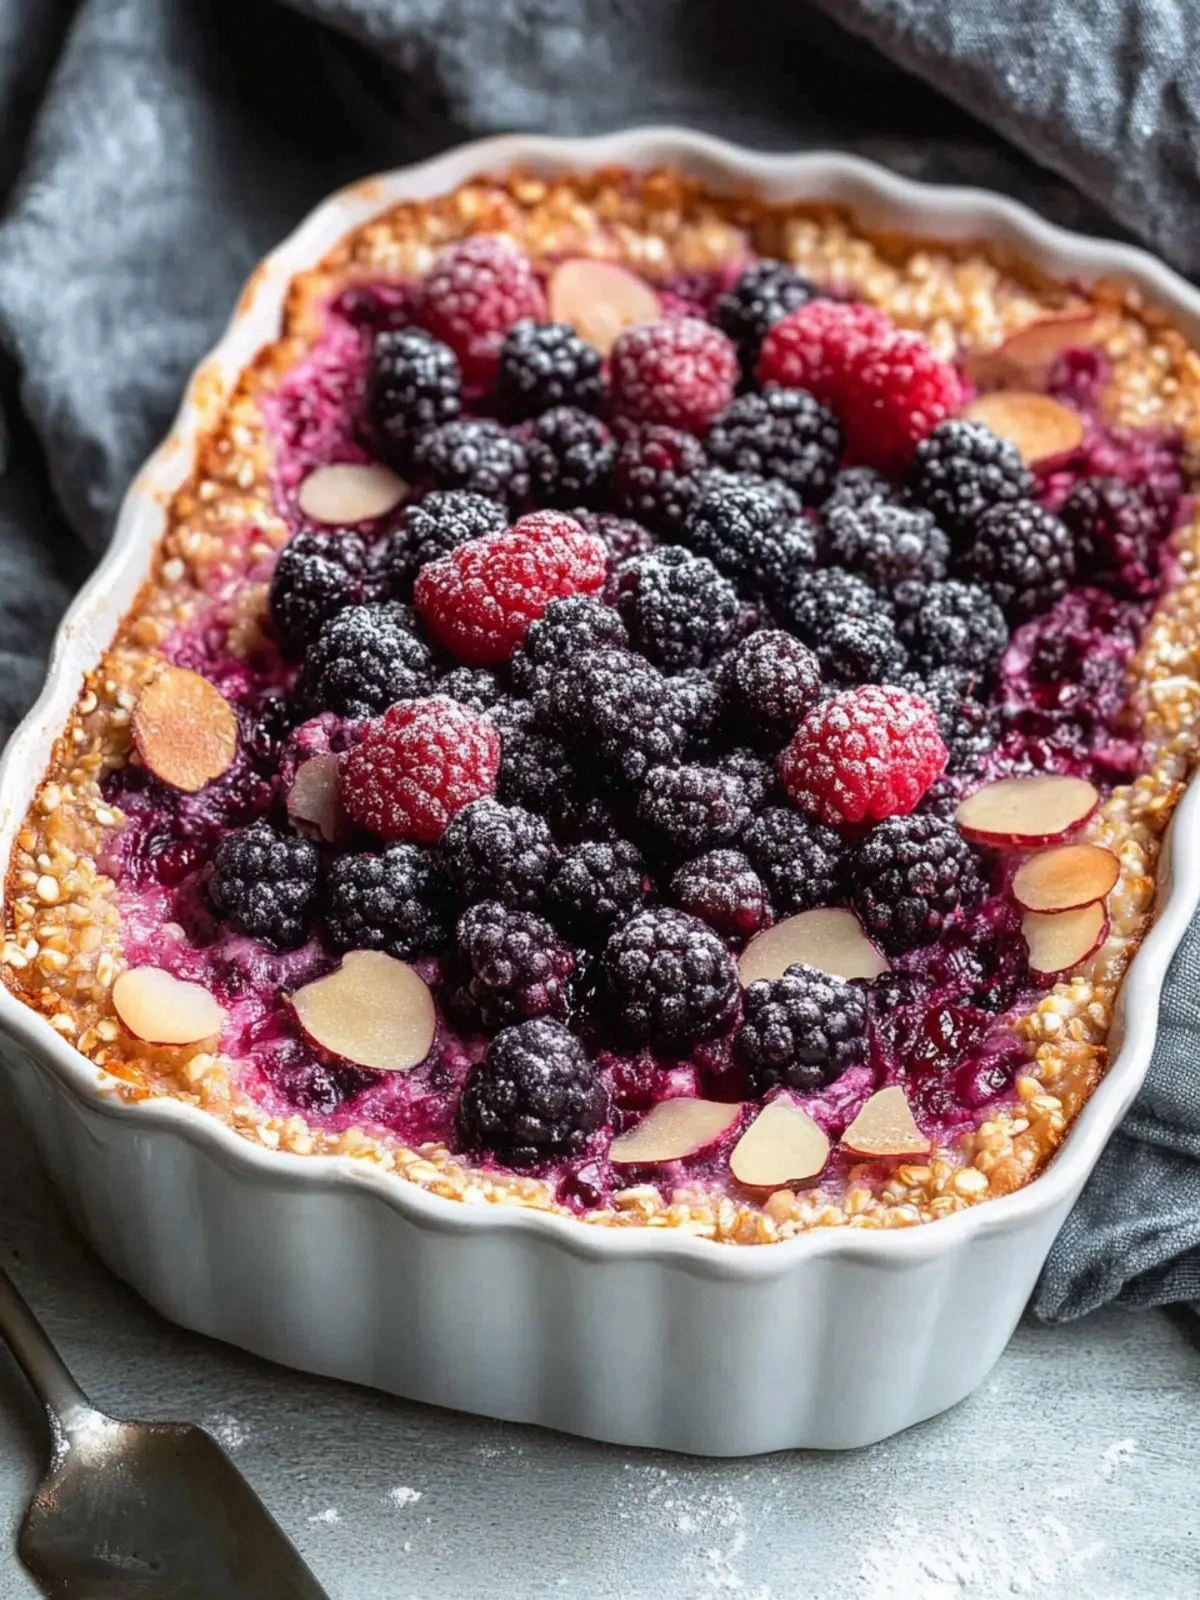
Fresh or frozen blueberries and strawberries are the star ingredients that add bursts of color, juiciness, and tartness. They caramelize under the heat, creating a glossy, slightly sticky topping that looks like a sunrise. If berries are out of season, try frozen raspberries or blackberries for a similar effect, but adjust the sugar level to compensate for their natural tartness.
The Final Flourish
Raw walnuts and sliced almonds bring a crunchy texture and a nutty aroma that elevates the dish from breakfast to a small feast. The nuts also contribute healthy fats and protein, making the bake more satiating. For a vegan twist, replace walnuts with pecans or macadamia nuts; the flavor will shift slightly but remain delicious.
Everything's prepped? Good. Let's get into the real action...
The Method — Step by Step
- Preheat the oven to 375°F (190°C). This temperature allows the millet to bake evenly and the berries to caramelize without burning. The oven should be fully preheated before you start mixing to ensure consistent results. The aroma of baking will start to fill the kitchen, signaling that the process is underway.
- Combine the millet, milk, and water in a medium saucepan. Stir until the grains are fully submerged and the mixture starts to thicken. Bring to a gentle boil, then reduce the heat to low and let it simmer for 15 minutes, stirring occasionally. The millet should absorb most of the liquid but still retain a slight bite.
- Whisk in maple syrup, vanilla, cinnamon, and sea salt. This mixture will coat the grains, giving them a sweet-salty flavor that balances the tart berries. The maple syrup also helps create a slight glaze on the top. Taste the batter; it should have a mild sweetness with a hint of spice.
- Fold in blueberries and strawberries. Gently stir to distribute the fruit evenly without crushing them. The berries will release juices that will mingle with the batter, forming a glossy, caramelized surface as it bakes. If you’re using frozen berries, let them thaw slightly before adding.
- Sprinkle walnuts and almonds over the top. The nuts should be evenly distributed so each bite gets a crunchy element. The raw nuts will toast slightly during baking, adding a nutty aroma and texture. You can lightly toast them beforehand for extra flavor, but it’s not necessary.
- Transfer the mixture to a greased baking dish. Use a 9x13 inch dish for even cooking. Spread the batter evenly, ensuring the fruit is on top for that caramelized finish. The dish should be lightly greased to prevent sticking.
- Bake for 30 minutes. The top should turn golden brown and the edges will pull away from the dish, signaling that the bake is ready. Keep an eye on the berries; they should be bubbling and slightly blistered. The interior should be set, not liquid.
- Let it cool for 10 minutes. This resting period allows the flavors to settle and the bake to firm up, making it easier to slice. The berries will have caramelized further, creating a sweet glaze that coats the grain.
- Slice and serve. Use a sharp knife to cut through the bake; the slices will hold together thanks to the nuts and the set millet. Serve warm for the best flavor, or let it cool completely for a chilled breakfast parfait.
- Enjoy and share. The dish is so good that you’ll want to share it with friends and family. Keep leftovers in the fridge for up to five days, and reheat individual slices for a quick breakfast.
That's it — you did it. But hold on, I've got a few more tricks that'll take this to another level...
Insider Tricks for Flawless Results
The Temperature Rule Nobody Follows
Many bakers use 350°F, but 375°F is the sweet spot for millet. The higher temperature ensures the grains bake through while the berries caramelize. If you lower the heat, the bake will take longer and the berries may not caramelize, resulting in a soggy top. I’ve tested it on both gas and electric ovens, and the 375°F setting consistently gives the best texture.
Why Your Nose Knows Best
The moment the oven door opens, the scent of toasted millet and maple syrup should fill the air. That aroma signals that the bake is almost done. If the smell is faint, give it a few more minutes; if it’s too strong, you might be overcooking. Trust your nose, not the clock.
The 5-Minute Rest That Changes Everything
After baking, let the bake sit for exactly five minutes before slicing. This rest allows the batter to set, making it easier to cut clean slices. If you cut immediately, the grains will crumble and the berries will spill out. This simple step saves you from a messy breakfast.
Use a Silicone Mat for Easy Cleanup
A silicone baking mat keeps the batter from sticking, making cleanup a breeze. It also helps the bake bake evenly, preventing hot spots that can scorch the edges. If you don’t have a mat, lightly spray the pan with non-stick spray.
Keep the Nuts Toasted
Toast the walnuts and almonds in a dry skillet for two minutes before adding them to the batter. This step brings out their flavor and adds a pleasant crunch. If you skip this, the nuts will be mild and may not hold their shape.
Adjust Sweetness with Fresh Berries
Fresh berries are naturally sweeter than frozen ones. If you’re using fresh, you can reduce the maple syrup by a quarter cup to avoid overpowering sweetness. Conversely, if you’re using frozen berries, increase the syrup slightly to balance the tartness.
Creative Twists and Variations
This recipe is a playground. Here are some of my favorite ways to switch things up:
Apple Cinnamon Millet Bake
Swap the berries for diced apples and add a pinch of nutmeg. The apple’s natural sweetness pairs beautifully with cinnamon, creating a cozy autumn vibe. This version is perfect for a fall breakfast.
Chocolate Peanut Butter Millet Cake
Replace maple syrup with melted dark chocolate and fold in a spoonful of peanut butter. Add chopped dark chocolate chips for extra gooeyness. This indulgent twist turns the bake into a dessert‑style breakfast.
Herbal Lemon Millet Bake
Introduce fresh lemon zest and a splash of lemon juice to the batter. The citrus brightens the flavor and cuts through the sweetness. Garnish with mint leaves for a refreshing finish.
Spiced Pumpkin Millet Bake
Use pumpkin puree and pumpkin pie spice instead of berries. The pumpkin adds a creamy texture and a sweet, spiced flavor. Top with a drizzle of maple syrup for a Thanksgiving‑inspired treat.
Berry Coconut Millet Bake
Replace the nuts with shredded coconut and add a splash of coconut milk. The coconut adds a tropical note and pairs well with the berries. Sprinkle toasted coconut on top for extra crunch.
Green Tea Millet Bake
Infuse the non‑dairy milk with matcha powder before baking. The green tea adds a subtle earthy flavor and a vibrant color. Pair with a drizzle of honey for a balanced sweetness.
Savory Millet Breakfast Skillet
Omit the maple syrup and replace it with a splash of soy sauce and a dash of smoked paprika. Add sautéed spinach and diced tomatoes for a savory breakfast that feels like a hearty lunch. This version is perfect for those who prefer a less sweet start to their day.
Storing and Bringing It Back to Life
Fridge Storage
Cool the bake completely, then cover tightly with plastic wrap or a lid. Store in the refrigerator for up to five days. The grains will retain their firmness, and the berries will stay juicy.
Freezer Friendly
Slice the bake into portions before freezing. Wrap each slice individually in parchment paper, then place in a freezer bag. Freeze for up to three months. Thaw overnight in the refrigerator before reheating.
Best Reheating Method
Reheat slices in a microwave on medium power for 45 seconds, or in a toaster oven at 350°F for 5 minutes. Add a splash of water or a drizzle of maple syrup before reheating to restore moisture and keep the texture from drying out.