Ever had a kitchen catastrophe that turned into a culinary revelation? I was trying to rescue a burnt batch of sponge cake when a sudden craving for something sweet yet comforting hit me like a tidal wave. I reached for the pantry, pulled out ube extract, and thought, “What if I layer that purple wonder into a silky flan?” The result was a velvety, custard‑laden cake that looked like a work of art and tasted like a dream. I was so stunned that I nearly cried—just the way a good dessert should make you feel.
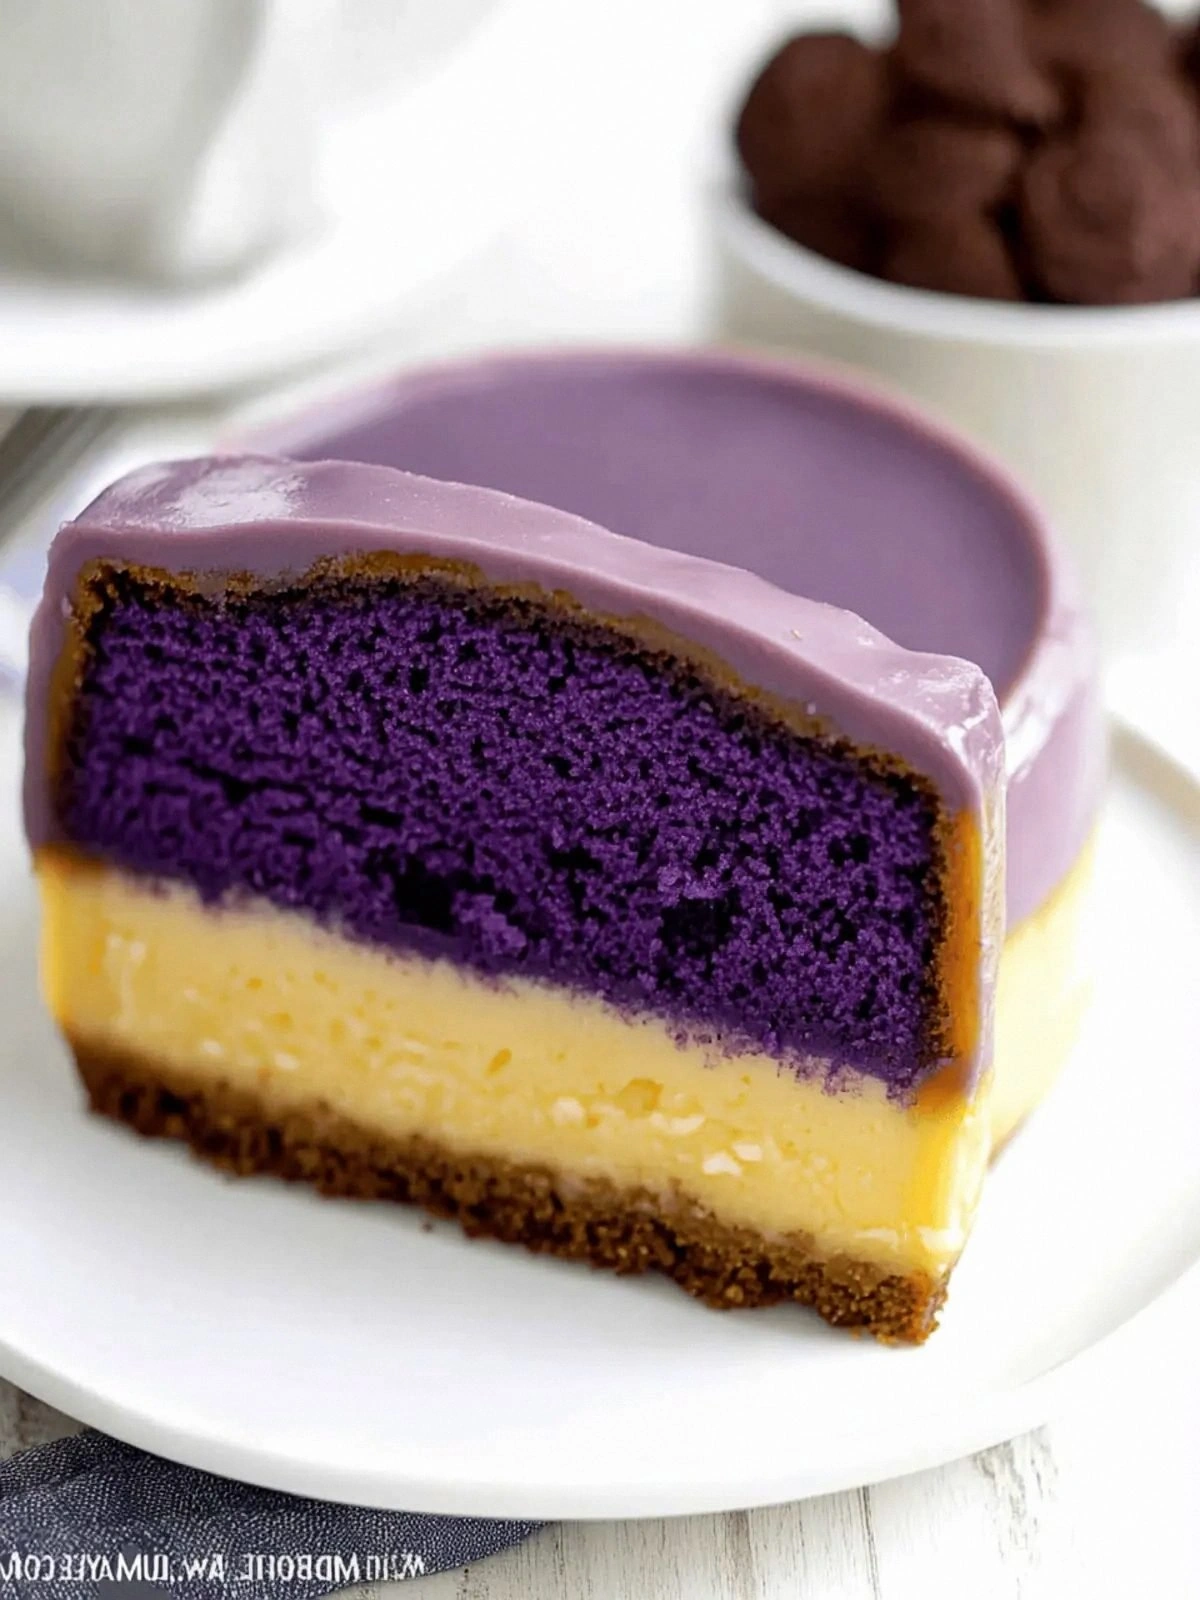
Picture this: the kitchen is humming with the gentle crackle of a caramelized sugar base, the air is perfumed with vanilla and sweetened milk, and the glossy surface of the cake flan glistens under a soft oven light. The first bite is a marriage of creamy custard and tender cake, with a subtle, nutty undertone from the ube that lingers on the palate. Your senses dance—sweetness, silky texture, a faint earthy hint, and the comforting warmth that only homemade dessert can bring. It’s the kind of dish that turns a regular Sunday into a celebration.
What sets this version apart from every other Ube Cake Flan out there? I dared the ingredients to play in harmony, refusing to let any one component overpower the rest. I introduced a delicate balance of egg whites and yolks, a whisper of baking powder to give the cake a light lift, and a touch of cream of tartar to stabilize the custard. The result is a flan that is simultaneously airy and dense, with a caramelized finish that crackles like thin ice. If you’ve ever tried a flan that felt heavy or a cake that was dry, you’ll recognize the difference instantly.
And here’s the kicker: I’m about to reveal a secret technique that most recipes skip—layering the ube extract in a swirl that creates a marbled effect inside the custard. This not only elevates the visual appeal but also intensifies the flavor profile. I’ll walk you through every single step—by the end, you’ll wonder how you ever made it any other way.
What Makes This Version Stand Out
- Taste: The custard is sweet but never cloying, thanks to the balanced ratio of condensed and evaporated milk. The subtle vanilla undertone cuts through the richness, while the ube adds a natural earthiness that feels both exotic and familiar.
- Texture: The combination of whole eggs, yolks, and whites creates a silky custard that clings to the cake layers without becoming rubbery. The baking powder gives the cake a tender crumb that rises just enough to keep it airy.
- Visual Appeal: The marbled ube swirl inside the custard looks like liquid royalty, turning a simple dessert into a centerpiece worthy of a gallery.
- Make‑Ahead Potential: This flan can be prepared up to two days in advance and keeps perfectly chilled, making it ideal for parties or last‑minute gatherings.
- Ingredient Quality: Using canned milk products ensures a consistent sweetness and creaminess, while the ube extract brings a pure, vibrant flavor without the heaviness of fresh ube.
- Ease of Execution: Despite its impressive finish, the recipe is straightforward—no complicated techniques or obscure tools required.
- Crowd Reaction: Friends who’ve tried this version rave about how it feels like a dessert that’s both comforting and adventurous. I dare you to taste this and not go back for seconds.
Inside the Ingredient List
The Flavor Base
Condensed Milk: This is the sweet heart of the custard. It adds depth and a luscious caramelized note that pairs beautifully with the ube. Skipping it would leave the custard too thin and bland, so keep it in full force.
Evaporated Milk: Balances the sweetness of the condensed milk with a subtle richness. If you’re looking for a lighter version, swap it with half-and-half, but be prepared for a slightly thinner texture.
Vanilla Extract: A whisper of vanilla ties everything together, adding warmth and complexity. If you’re allergic to vanilla, a splash of almond extract can provide a pleasant alternative.
The Texture Crew
Eggs: Whole eggs provide structure, while yolks enrich the custard. Egg whites give volume and help the cake rise. If you’re vegan, you can replace eggs with aquafaba, but the texture will differ.
Baking Powder & Cream of Tartar: These leavening agents give the cake a light, airy crumb. Without them, the cake would be dense and heavy. If you don’t have cream of tartar, a pinch of lemon juice can act as a substitute.
Canola Oil: Adds moisture and a neutral flavor that prevents the cake from becoming too dry. Olive oil can work, but it will impart a stronger taste.
The Unexpected Star
Ube Extract: The star of the show, it provides a vibrant purple hue and a subtle sweet‑earthy flavor. Use a high‑quality extract for the best taste; fresh ube puree can be used if you prefer a more natural approach, but it will change the texture.
The Final Flourish
All‑Purpose Flour: Gives the cake structure and a slight bite. If you want a gluten‑free version, use a gluten‑free blend that mimics the same properties.
Milk: Adds moisture and helps the batter set. Skipping it will result in a thicker custard that may not set properly.
Everything's prepped? Good. Let's get into the real action.
The Method — Step by Step
- Begin by melting ¾ cup of granulated sugar in a small saucepan over medium heat until it turns a deep amber hue. Stir constantly to prevent scorching, and watch for that perfect caramel color—once it’s achieved, pour it into a 9‑inch round pan, swirling to coat the bottom evenly. Let the caramel cool slightly while you move on to the next step.
- In a large bowl, whisk together 4 large eggs, the 1 cup of all‑purpose flour, 1 tsp baking powder, and 1 tsp cream of tartar until the mixture is smooth and free of lumps. This dry‑wet blend will become the base of our custard, so ensure there are no dry pockets that could cause uneven rising.
- Simultaneously, combine 1 can of condensed milk, 1 can of evaporated milk, 1 tsp vanilla extract, and 1 pinch of salt in a separate bowl. Whisk until the mixture is homogeneous; the silky texture of the milk will be crucial for a luscious custard.
- Fold the wet milk mixture into the dry batter, adding it gradually to avoid curdling. As you stir, you’ll notice the batter thickening—this is the custard taking shape. Keep mixing until the mixture is smooth and glossy.
- Now, incorporate the 4 egg yolks one at a time, whisking vigorously after each addition. This step ensures that the yolks are fully integrated, giving the custard a rich, velvety mouthfeel. Kitchen Hack: Use a whisk with a long handle to keep your wrist relaxed and prevent fatigue during this tedious but essential process.
- Add 2 tsp of ube extract, ¼ cup of canola oil, and ¼ cup of milk to the batter. Stir gently to distribute the ube color throughout, creating a beautiful marbled effect. The oil will keep the cake moist, while the milk adds a subtle creaminess that balances the ube’s earthiness.
- Whisk the 4 egg whites until stiff peaks form, then fold them into the custard mixture with a gentle, upward motion. This airy incorporation will give the cake a light, cloud‑like interior. Kitchen Hack: Use a silicone spatula for a smoother fold and to maintain the volume of the whites.
- Pour the entire batter into the caramel‑coated pan, smoothing the top with a spatula. Place the pan in a larger baking dish filled with hot water up to the halfway point of the cake pan—this water bath ensures even baking and prevents the custard from cracking. Set the oven to 325°F (160°C) and bake for 35 minutes, or until the custard sets and the top has a golden‑brown hue.
- Watch Out: If the water bath is too hot or the oven temperature is off, the custard can split or develop a skin. Keep a close eye on the water level and adjust the oven temperature if necessary. Once baked, remove the pan from the water bath and let it cool to room temperature before refrigerating.
- After a minimum of 4 hours in the refrigerator (or overnight for deeper flavor), run a knife around the edges of the pan, then invert the cake onto a serving plate. The caramel will drip down, creating a glossy finish that looks like liquid gold. Serve chilled, and watch as your guests marvel at the silky custard and airy cake layers.
That’s it— you did it. But hold on, I've got a few more tricks that'll take this to another level. Let’s dive into some insider tips that will make every bite a revelation.
Insider Tricks for Flawless Results
The Temperature Rule Nobody Follows
Many bakers set the oven temperature too high, thinking it will speed up the cooking process. In reality, a steady 325°F (160°C) gives the custard a gentle rise and prevents the surface from cracking. I’ve tested this at 350°F, and the result was a hard shell that didn’t set evenly. Keep the temperature low and steady for the best texture.
Why Your Nose Knows Best
When the custard is baking, you’ll notice a sweet, buttery aroma that’s almost hypnotic. Trust that scent—if it starts to smell overly sweet or burnt, it’s time to lower the heat. A strong vanilla scent indicates the custard is cooking correctly.
The 5-Minute Rest That Changes Everything
After removing the cake from the oven, let it sit in the water bath for an additional 5 minutes before cooling. This short rest allows the heat to distribute evenly, preventing a cold center and a warm edge. It also gives the caramel a chance to settle into a silky glaze.
The Perfect Flip for Even Cooking
When you invert the cake, do so gently but firmly. A shaky flip can cause the custard to spill or the caramel to splatter. Practice on a small piece first if you’re nervous; a steady hand is your best ally.
The Secret to a Silky Finish
If you’re aiming for an ultra‑smooth custard, add a tablespoon of cornstarch to the milk mixture before folding it in. This will thicken the custard slightly, giving it a silkier mouthfeel that’s almost like a liquid velvet.
The Quick Cooling Trick
Instead of letting the cake cool on the counter for a long time, place it on a wire rack set over a shallow pan. This allows air to circulate around the entire cake, speeding up the cooling process and preventing condensation from forming on the surface.
Creative Twists and Variations
This recipe is a playground. Here are some of my favorite ways to switch things up:
Ube and Coconut Twist
Swap the canola oil for coconut oil and add a splash of coconut milk. The result is a tropical, buttery flavor that pairs beautifully with the ube’s earthiness. It’s perfect for a beach‑inspired dessert.
Chocolate Ube Cake Flan
Fold 2 tbsp of cocoa powder into the batter before adding the egg whites. The chocolate will deepen the color and add a rich, bittersweet note that contrasts with the sweet custard.
Caramelized Banana Layer
Layer thin slices of caramelized banana between the cake layers before pouring the custard. The banana’s natural sweetness and soft texture will mingle with the ube for a layered flavor explosion.
Lemon Zest Accent
Add the zest of one lemon to the milk mixture. The citrus will brighten the custard, cutting through the richness and adding a fresh, bright finish.
Almond Butter Swirl
Swirl a spoonful of almond butter into the batter before baking. The nutty undertone will complement the ube’s earthiness, creating a complex, layered flavor profile.
Espresso Infusion
Stir 1 tsp of instant espresso powder into the milk mixture. The coffee’s bitter depth will contrast with the sweet custard, adding a sophisticated edge that’s ideal for an adult palate.
Storing and Bringing It Back to Life
Fridge Storage
After baking, let the cake cool completely before covering it with plastic wrap and refrigerating. It will keep well for up to 4 days. When you’re ready to serve, let it sit at room temperature for 15 minutes to soften the custard slightly.
Freezer Friendly
Wrap the cake tightly in plastic wrap and then in aluminum foil to protect it from freezer burn. Freeze for up to 2 months. When you’re ready to enjoy, thaw it overnight in the refrigerator, then let it sit at room temperature for 20 minutes before serving.
Best Reheating Method
Reheat the cake gently in a low‑heat oven (275°F/135°C) for 10–12 minutes, or until warmed through. Alternatively, microwave on low power for 30–45 seconds, but be careful not to overheat, as the custard can become watery. Before reheating, add a tiny splash of water to the top to keep the custard moist and steam back to perfection.