I still remember the first time I tried to make chicken pot pie the traditional way. The crust cracked like the surface of Mars, the filling was basically soup wearing a soggy hat, and I ended up eating it with a spoon while my roommate politely asked if this was supposed to be "deconstructed cuisine." Fast forward through three failed attempts, one minor smoke alarm incident, and a very patient neighbor who tasted every version, I finally cracked the code. The moment I swapped that temperamental pastry lid for pillowy gnocchi, everything clicked into place like the final piece of a jigsaw puzzle.
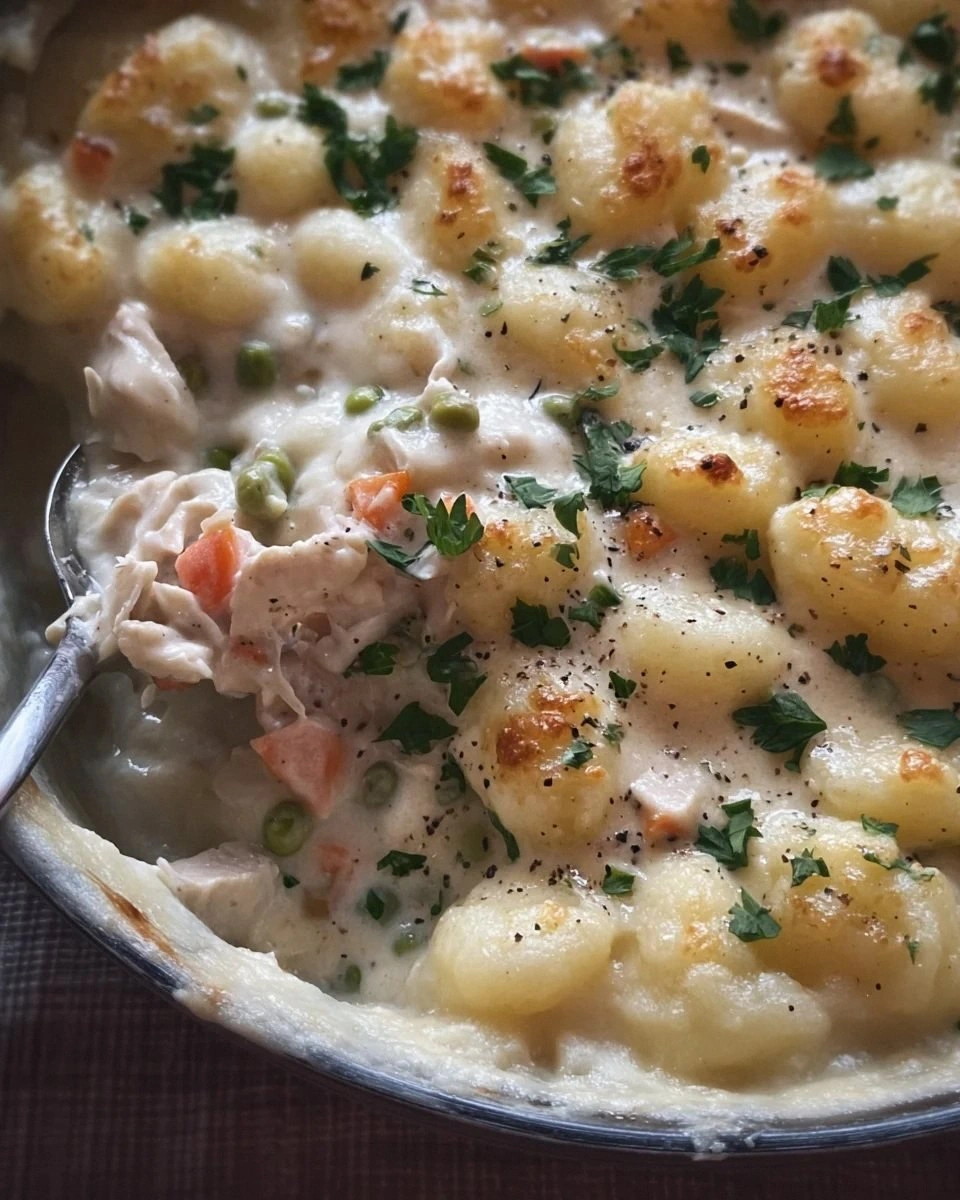
Picture this: it's Sunday afternoon, the kind of day where the light hits your kitchen just right and you can hear the neighbor's wind chimes through the window. The smell of butter and onions dances through the air while chicken simmers away, and you're about to create something that'll make your future self write thank-you notes. This gnocchi topped chicken pot pie isn't just dinner — it's a warm hug that happens to be edible. The way those little potato dumplings soak up the creamy sauce while getting crispy on top? Pure kitchen sorcery.
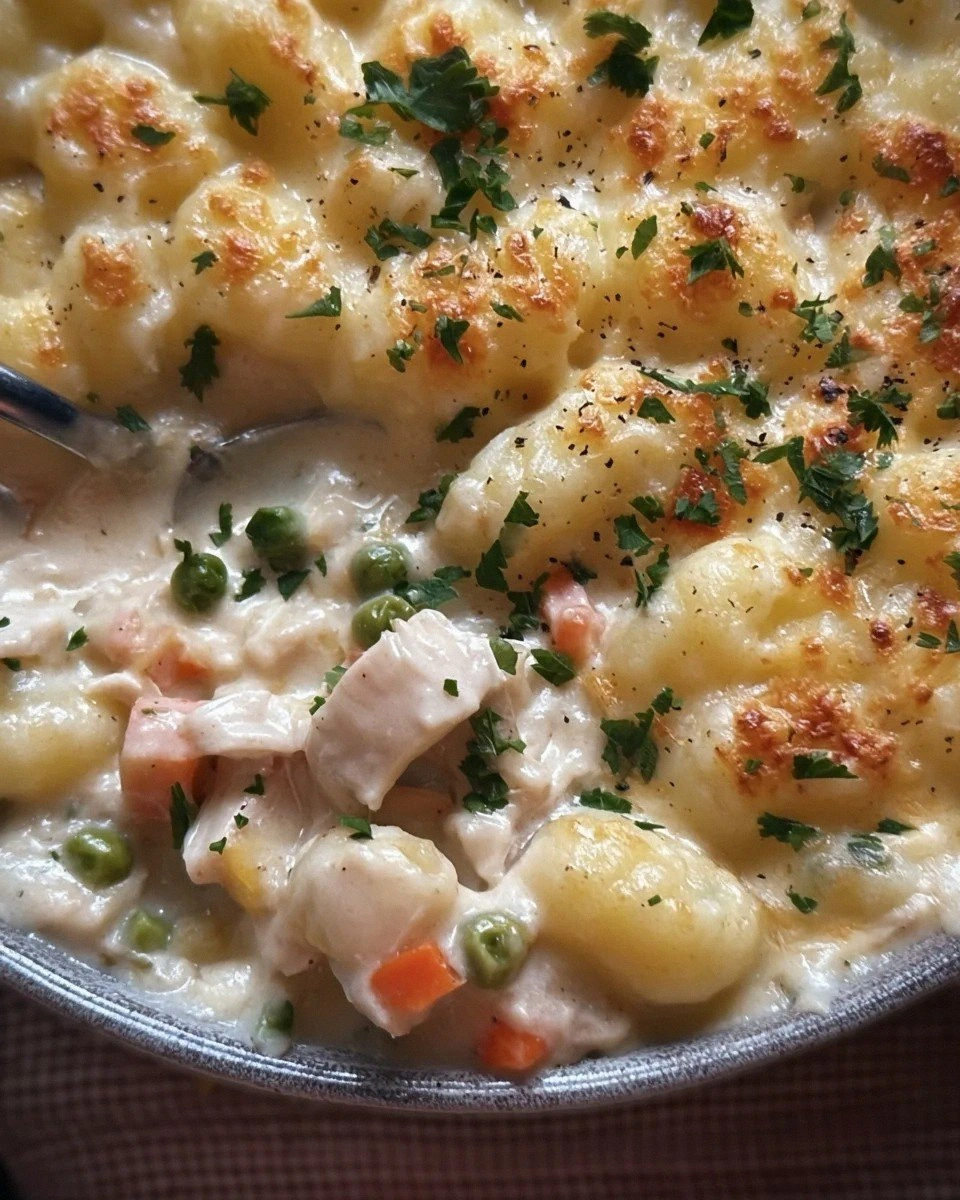
Here's the thing most recipes get completely wrong: they treat the topping as an afterthought. But the topping is where the magic lives, folks. Those gnocchi aren't just sitting there looking pretty — they're working overtime, creating little pockets of crispy edges while maintaining that tender center that makes you close your eyes involuntarily when you bite into them. The sauce below is thick enough to coat your spoon but never gloopy, packed with vegetables that still have a bit of bite and chicken so tender it practically waves at you.
I'm about to show you how to make what is hands down the best version you'll ever produce in your home kitchen. We're talking about a pot pie that'll have your family fighting over the corners where the gnocchi get extra crispy, the kind of dish that makes you wish for leftovers just so you can eat it again tomorrow. The secret ingredient? Well, you'll have to stick around for that plot twist. Let me walk you through every single step — by the end, you'll wonder how you ever made it any other way.
What Makes This Version Stand Out
Velvet Revolution: The sauce coats every ingredient like liquid velvet, but here's the kicker — it stays creamy even after reheating. No more sad, separated pot pie filling that looks like it gave up on life. We're creating an emulsion so stable it could run for office.
Texture Symphony: While traditional pot pies give you one texture (mushy), this beauty delivers a full orchestra — creamy sauce, tender chicken, al dente vegetables, and gnocchi that are crispy on top and cloud-soft underneath. It's like your mouth won the lottery.
Weeknight Wizardry: Despite tasting like you spent all day in the kitchen, this whole operation takes under an hour from start to finish. I dare you to find another comfort food that delivers this much payoff for this little effort. Most recipes get this completely wrong, making you babysit a roux for twenty minutes like it's a newborn.
Leftover Legend: This pot pie actually improves overnight, unlike its pastry-topped cousin that turns into a sad, soggy mess. The flavors meld and deepen, creating tomorrow's lunch that'll make your coworkers jealous. I've honestly considered making a double batch just for the leftovers.
Pantry Hero: Uses ingredients you probably already have lurking in your kitchen right now. No specialty store runs required, no obscure herbs you'll use once and forget. Just honest, real food that transforms into something extraordinary.
Flexibility Master: Vegetarian? Swap the chicken for mushrooms and use veggie broth. Gluten-free? There's a simple swap for the flour. Picky eaters? Hide extra veggies in the sauce. This recipe bends to your will like a culinary genie.
Comfort Factor: Picture yourself pulling this out of the oven, the whole kitchen smelling like a warm blanket on a cold day. The gnocchi are golden and puffed, the filling bubbles up around the edges, and suddenly everything feels right with the world. If you've ever struggled with getting that restaurant-quality comfort at home, you're not alone — and I've got the fix.
Inside the Ingredient List
The Flavor Base
Let's start with the aromatic trinity that'll make your neighbors wonder what you're cooking. Onions, carrots, and celery aren't just filler vegetables — they're the flavor foundation that makes everything else sing. Dice them small enough that they cook evenly but not so tiny they disappear into mush. The onion should still have some body when you bite into it, creating these little bursts of sweetness throughout the creamy filling.
Garlic enters the chat like a confident friend who knows they belong. Don't you dare use that pre-minced stuff from a jar — we're building flavors here, not cutting corners. Fresh garlic, minced so fine it practically dissolves, adds this sharp, bright note that cuts through all the richness. It's like the bass line in your favorite song — you might not focus on it, but take it away and everything falls flat.
Fresh thyme is non-negotiable here. Dried thyme tastes like someone described the flavor to you over a bad phone connection. Fresh thyme brings this lemony, slightly minty quality that makes the chicken taste more chicken-y and the vegetables taste like they were kissed by a garden fairy. Strip those tiny leaves off the stems — it's meditative, like popping bubble wrap but more sophisticated.
The Texture Crew
Chicken thighs are where it's at, and I'll fight anyone who says otherwise. Breast meat dries out faster than a conversation about cryptocurrency, while thighs stay juicy and flavorful even if you accidentally overcook them slightly. Cut them into generous chunks — nobody wants to hunt for chicken like it's buried treasure. Season them well before they hit the pan; this is your only chance to get flavor into the meat itself.
Potatoes in gnocchi are the unexpected heroes here. When they hit that hot oven, something magical happens. The outside gets golden and slightly crisp while the inside stays tender and fluffy. They soak up the sauce like tiny edible sponges, so each gnocchi becomes a flavor bomb. If you've ever struggled with soggy pot pie crust, watch how these little potato dumplings solve that problem while adding their own personality.
Frozen peas might seem boring, but they're little green pearls of sweetness that pop in your mouth. Don't bother with fresh peas unless it's spring and you've got a farmer's market nearby — frozen are picked at peak ripeness and actually taste better than most "fresh" supermarket peas. Plus they add that classic pot pie color that makes the whole dish look like comfort food royalty.
The Unexpected Star
Here's where things get interesting. Instead of the usual heavy cream, we're using a combination of whole milk and Greek yogurt. This creates a sauce that's rich but not cloying, creamy but still bright-tasting. The yogurt adds this subtle tang that makes people ask "what's in this?" in the best possible way. It's the secret ingredient that takes this from good to "can I have the recipe?" territory.
White wine isn't just for drinking while you cook (though that's certainly encouraged). A splash added to the vegetables after they've softened deglazes the pan and lifts all those beautiful browned bits. But here's the key — let it cook down until it's almost gone. You're not making drunk pot pie; you're adding complexity and depth that makes people wonder if you went to culinary school.
Nutmet might seem old-fashioned, but just a whisper transforms the whole dish. It's like adding a filter to a photo — everything looks warmer and more appealing. Use fresh-grated if you've got it; the pre-ground stuff works but it's like comparing instant coffee to a perfect espresso. Just a few passes across the microplane and suddenly your kitchen smells like grandma's house, assuming your grandma was an amazing cook.
The Final Flourish
Good butter makes good everything better. Don't use that pale, flavorless stuff that's been sitting in your fridge since the Clinton administration. Real butter, preferably European-style with higher fat content, creates the most beautiful golden color on those gnocchi. When it melts and mingles with the flour to thicken our sauce, it creates this nutty, rich flavor that makes you want to lick the spoon.
Parmesan cheese on top isn't just showing off — it creates this savory, crispy layer that contrasts beautifully with the soft gnocchi underneath. Use the real stuff, aged properly, not the powder in the green can. A light sprinkle right before serving melts into the hot gnocchi and creates these little umami bombs that make your taste buds do a happy dance.
Fresh parsley at the end isn't optional garnish — it's essential brightness. All that richness needs something to cut through it, and parsley brings this clean, green flavor that wakes everything up. Chop it just before serving so it stays vibrant and doesn't wilt into sad green specks. Plus it makes the whole dish look like it belongs on a magazine cover.
The Method — Step by Step
- Start by patting your chicken thighs absolutely dry with paper towels. This isn't just busy work — moisture is the enemy of browning, and we want these beauties to develop a gorgeous golden crust. Heat a heavy-bottomed pot over medium-high heat until a drop of water sizzles away instantly. Add just enough oil to coat the bottom, then lay in your chicken pieces like you're sending them off to a spa day. Don't crowd them or they'll steam instead of sear; work in batches if necessary. Let them cook undisturbed for about 4 minutes until they release easily from the pan and have that perfect caramel color that makes you want to break out into applause.
- While the chicken works its magic, prep your vegetables. Dice the onion into pieces no larger than your thumbnail — any bigger and they won't cook through properly. The carrots should be cut slightly smaller since they take longer to soften. Celery needs to match the carrot size for even cooking. Keep them separate because they hit the pot at different times. That sizzle when the onions hit the pan? Absolute perfection, and it means your pan is at the right temperature.
- Remove the chicken to a plate — don't worry if it's not cooked through yet, it's going back in later. Add the onions first with a pinch of salt, stirring until they turn translucent and start to pick up the beautiful browned bits from the chicken. This is where flavor lives, folks. After about 3 minutes, add the carrots and celery, continuing to stir and scrape up all those gorgeous fond bits. Your kitchen should smell like a French bistro by now.
- Clear a space in the center of your vegetables and add the garlic and thyme. Let them toast for about 30 seconds — this releases their oils and prevents that harsh raw garlic bite. Stir everything together and add the flour. This next part? Pure magic. The flour needs to cook for at least 2 minutes, stirring constantly, to eliminate that raw flour taste. It should start to smell slightly nutty and turn a light golden color. If you've ever wondered why your white sauces taste like paste, this is the step you skipped.
- Slowly pour in the wine while stirring like your life depends on it. It'll seize up immediately — don't panic, this is exactly what we want. Keep stirring and it'll smooth out into a beautiful paste. Let the wine cook down until it's almost completely absorbed; you'll know it's ready when you drag your spoon through and it leaves a clean trail. This concentrates the flavor and cooks off the harsh alcohol, leaving behind just the fruity, complex notes.
- Now for the moment of truth: add your warm stock in a slow stream, whisking constantly. Warm stock prevents lumps — cold stock will make your sauce seize up like it's having an identity crisis. Add it gradually, letting each addition incorporate before adding more. The sauce should start to thicken immediately, coating the back of a spoon like heavy cream. If it's too thick, add more stock; too thin, let it simmer a bit longer. You're looking for the consistency of a thick milkshake.
- Time to build the flavor bomb. Stir in the milk and bring it to a gentle simmer — don't let it boil or the yogurt will curdle later. Add the chicken back in, along with any juices from the plate. The peas go in now too. Season with salt, pepper, and that whisper of nutmeg. Let everything bubble away gently while you prep the gnocchi. The sauce should coat the chicken and vegetables luxuriously, like they're wearing velvet coats.
- Preheat your oven to 425°F now — don't wait until the last minute. While it heats, arrange your gnocchi on top of the filling, starting from the outside and working in. They should be snug but not crowded; think of them as people at a cocktail party who need room to mingle. Brush them lightly with melted butter — this helps them brown and adds another layer of flavor. Don't press them down; they need to sit on top to get those crispy edges we crave.
- Bake for 20-25 minutes until the gnocchi are puffed and golden, and the filling is bubbling up around the edges. The tops should be slightly crispy, like little potato pillows that got a perfect tan. If they're not browning fast enough, switch to broil for the last 2-3 minutes, but watch them like a hawk — they go from perfect to burnt faster than you can say "dinner's ready."
Insider Tricks for Flawless Results
The Temperature Rule Nobody Follows
Here's where most home cooks go wrong: they don't control their temperatures. Starting with a cold pan is like trying to sprint in flip-flops — technically possible but why would you? Your pan should be hot enough that a drop of water dances across the surface before evaporating. But here's the kicker — once you add the vegetables, drop that heat to medium. High heat will brown them too fast, leaving you with burnt garlic and raw onions. A friend tried skipping this step once; let's just say her pot pie tasted like it had been through a house fire.
The same rule applies when you add the dairy. Warm milk incorporates better and prevents curdling. Cold milk hitting a hot roux is like throwing ice water on a sauna — shocking and potentially disastrous. Keep your milk on the counter while you prep everything else. And that yogurt? Let it come to room temperature and whisk it in off the heat. These tiny temperature adjustments are what separate good cooks from great ones.
Why Your Nose Knows Best
Your sense of smell is your most underutilized kitchen tool. When the flour is cooking, it should smell like baking cookies, not like raw dough. If you can't smell anything, it's not ready. When the wine cooks down, the harsh alcohol smell should disappear, replaced by something fruity and complex. Don't trust the clock here — trust your nose. It's like having a built-in kitchen timer that never needs batteries.
The same goes for the final dish. When it's perfectly done, your kitchen should smell like the best Sunday dinner you've ever had. If you catch a whiff of something burning, those gnocchi are telling you they're ready to come out. I'll be honest — I ate half the batch before anyone else got to try it, just based on how incredible it smelled. My neighbors actually knocked on my door to ask what I was making.
The 5-Minute Rest That Changes Everything
Listen up, because this might be the most important tip here. After you pull this beauty from the oven, let it rest for exactly 5 minutes. Not 10, not 2 — 5. This allows the sauce to thicken slightly and the gnocchi to set. Cut into it too soon and you'll have molten lava filling that burns your tongue and runs all over the plate. Wait too long and it starts to congeal into something that looks like it's been sitting in a cafeteria warmer.
During this rest, the gnocchi finish cooking from residual heat, achieving that perfect texture contrast. The sauce settles, the flavors meld, and suddenly you have a cohesive dish instead of separate components. Use this time to set the table, pour yourself a glass of wine, and bask in the glory of what you've just created. Future you will thank present you for this patience.
Creative Twists and Variations
This recipe is a playground. Here are some of my favorite ways to switch things up:
The Mediterranean Escape
Swap the thyme for oregano and add a handful of sun-dried tomatoes to the vegetable mix. Use white beans instead of peas, and finish with a sprinkle of feta cheese and fresh basil. The briny tomatoes and salty feta transport you straight to a Greek island, even if you're eating this in your apartment during a snowstorm.
The Spicy Southwest Version
Add a diced jalapeño with the onions, swap the thyme for cilantro, and use pepper jack cheese on top. A teaspoon of smoked paprika in the roux gives everything this gorgeous color and depth. If you've ever struggled with bland pot pie, this version slaps your taste buds awake in the best possible way.
The Autumn Harvest
Replace half the carrots with diced butternut squash and add some fresh sage. Use apple cider instead of wine for a subtle sweetness that pairs beautifully with the chicken. This version tastes like fall in a bowl and makes your kitchen smell like you've been baking apple pie all day.
The Seafood Spectacular
Use shrimp and scallops instead of chicken, swap the stock for fish stock, and add some fresh dill. The gnocchi still work beautifully here, creating this luxurious surf-and-turf vibe that impresses dinner guests without any extra effort. Just add the seafood during the last few minutes so it doesn't overcook.
The Veggie Powerhouse
Load it up with mushrooms, leeks, and artichoke hearts. Use vegetable stock and add some white beans for protein. The umami from the mushrooms makes this so satisfying that even dedicated carnivores won't miss the meat. Plus it reheats like a dream for weekday lunches.
The Breakfast-for-Dinner Edition
Add some breakfast sausage, use hash browns instead of gnocchi, and crack a few eggs right on top during the last 5 minutes of baking. The eggs cook to perfect runny-yolk doneness, creating this insane sauce when you break them open. It's like the best parts of breakfast and dinner had a beautiful baby.
Storing and Bringing It Back to Life
Fridge Storage
This pot pie keeps beautifully in the fridge for up to 4 days, which is basically an invitation to make a double batch. Store it in an airtight container, but here's the key — don't cover it while it's still hot. Let it cool completely first, otherwise condensation turns your crispy gnocchi into sad, soggy lumps. If you're storing individual portions, layer some parchment paper between the gnocchi and the lid to absorb excess moisture.
When reheating, add a splash of stock or milk to loosen the sauce. Microwave works in a pinch, but the oven is your friend here. Cover with foil and reheat at 350°F for about 15-20 minutes until heated through, then uncover for the last 5 minutes to re-crisp those gnocchi tops. It's almost as good as fresh, and sometimes the flavors are even better after they've had time to mingle.
Freezer Friendly
Here's where this recipe really shines — it freezes like a champion. Assemble everything but don't bake it. Wrap tightly with plastic wrap, then foil, and freeze for up to 3 months. When you're ready to eat, thaw overnight in the fridge, then bake as directed, adding an extra 10-15 minutes since it'll be cold. The gnocchi might not get quite as crispy, but they still deliver that satisfying texture contrast.
For best results, freeze the filling and gnocchi separately. The filling freezes rock-solid and thaws beautifully, while the gnocchi maintain their texture better when added fresh. This makes for a perfect emergency dinner — just thaw the filling, top with fresh gnocchi, and bake. It's like having a homemade TV dinner that actually tastes good.
Best Reheating Method
The oven is undeniably the best way to bring this back to life, but here's a pro tip: add a tiny splash of water to the dish before reheating. It creates steam that rehydrates the gnocchi without making them soggy. Cover with foil for the first 15 minutes, then remove it to let the tops crisp up again. You'll end up with something that's honestly almost indistinguishable from fresh.
If you're using the microwave (no judgment, we've all been there), add a damp paper towel over the top and heat in 30-second bursts, stirring between each. It's not ideal, but it'll get the job done without turning everything into rubber. Just know that the gnocchi won't regain their crispiness — they'll be more like tender potato clouds, which honestly isn't the worst thing in the world.