I was standing in my kitchen, mid‑Wednesday, staring at a half‑cooked pot of beans that looked like a sad, limp garden after a storm. The recipe I’d tried the night before promised “sweet and tangy” but delivered a watery mess that made my spoon feel like it was paddling through a swamp. I dared a friend to taste it, and she promptly ran for the water—so I set a challenge: I would create a version that makes even the most skeptical palate sing, and I’m daring you to taste this and not go back for seconds. This isn’t just another side dish; it’s a love‑letter to the humble bean, turned into a caramel‑kissed masterpiece that could stand proudly beside a steak or as the star of a vegan feast.
Picture yourself pulling a pan of beans out of the oven, the whole kitchen smelling like a backyard BBQ mixed with a bakery’s warm sugar glaze. The scent hits you first—sweet, smoky, with a faint hint of onion that makes your stomach growl in anticipation. You hear the gentle crackle as the top caramelizes, the edges pulling away like thin ice that’s about to shatter. The beans themselves are glossy, each one cloaked in a sauce that clings like velvet, while the interior stays tender, never mushy. The texture? Think of a perfect bite that’s both buttery and slightly firm, a contrast that makes each spoonful a tiny celebration.
Most recipes get this completely wrong. They either drown the beans in syrup, turning them into a sickly sweet puddle, or they forget the balance, leaving you with a bland, one‑dimensional side. My version flips the script by marrying brown sugar’s deep molasses notes with a splash of tangy ketchup, a dash of smoky Worcestershire, and a whisper of mustard that cuts through the sweetness. The secret weapon? A quick caramelization step that creates a thin, crackly crust on the beans—think of it as the culinary equivalent of a perfectly toasted marshmallow.
And here’s the kicker: I’m using pantry staples you probably already have, but I’m also tossing in a surprise ingredient that adds a depth you never knew beans could have. I won’t spill the beans (pun intended) just yet, but trust me, it’s a game‑changer. Let me walk you through every single step — by the end, you’ll wonder how you ever made it any other way.
What Makes This Version Stand Out
- Flavor Depth: The combination of brown sugar, ketchup, and Worcestershire creates a sweet‑savory umami that’s richer than any canned version.
- Texture Contrast: A thin caramelized crust gives a satisfying snap, while the interior stays buttery soft.
- Simplicity: Only ten ingredients, all kitchen staples, no exotic spices required.
- Unique Ingredient: A splash of bourbon (or apple cider vinegar for non‑alcoholic) adds depth you won’t find elsewhere.
- Crowd Reaction: Even the most bean‑phobic guests ask for seconds, and the leftovers taste even better.
- Ingredient Quality: Using dry beans soaked overnight yields a firmer bite than pre‑cooked cans.
- Cooking Method: Oven‑bake instead of stovetop ensures even caramelization without constant stirring.
- Make‑Ahead Potential: This dish improves after a night in the fridge, making it perfect for meal prep.
Alright, let's break down exactly what goes into this masterpiece...
Inside the Ingredient List
The Flavor Base
Brown sugar is the heart of this dish, delivering a deep molasses flavor that’s far richer than plain white sugar. Its caramel notes create that glossy coating you see on the beans. If you swap it for raw honey, you’ll get a lighter sweetness but lose the dark, almost smoky undertone. Ketchup brings acidity and a tomato‑sweetness that balances the sugar, while Worcestershire sauce adds a savory umami punch. For those who prefer a less tangy profile, use a splash of apple cider vinegar instead of Worcestershire.
The Texture Crew
Dry navy beans (or great northern beans) are the perfect canvas—they hold their shape and soak up the sauce without disintegrating. If you opt for canned beans, rinse them well to remove excess sodium, but expect a softer texture. Butter adds richness and helps the sauce cling, while a pinch of cornstarch (optional) can thicken the glaze if you prefer a syrupier finish.
The Unexpected Star
A dash of bourbon (or a tablespoon of apple cider vinegar for a non‑alcoholic version) introduces a subtle smoky depth that elevates the whole dish. The alcohol evaporates during baking, leaving behind a whisper of caramelized oak. If you’re avoiding alcohol, a splash of smoked paprika can mimic that smoky nuance without the booze.
The Final Flourish
A pinch of sea salt and freshly cracked black pepper finish the dish, highlighting each flavor layer. Adding a small amount of Dijon mustard (just a teaspoon) gives a gentle heat that cuts through the sweetness, preventing the sauce from feeling cloying. For a spicy kick, toss in a pinch of cayenne or a dash of hot sauce.
Everything's prepped? Good. Let's get into the real action...
The Method — Step by Step
Preheat your oven to 350°F (175°C). While the oven warms up, give the soaked beans a quick rinse and place them in a large saucepan. Cover with fresh water, bring to a boil, then lower to a simmer for 45 minutes, or until the beans are just tender. You'll know they're ready when a fork slides in with a slight resistance—no mushy surrender here.
Kitchen Hack: Add a bay leaf and a pinch of baking soda to the boiling water; this helps the beans stay intact and speeds up cooking.While the beans simmer, melt two tablespoons of butter in a skillet over medium heat. Toss in half a cup of finely diced onion and two minced garlic cloves. Sauté until the onion turns translucent and the garlic releases its perfume—think “sweet perfume of a summer garden.” This aromatic base is the secret to a flavor that lingers long after the last bite.
In a separate bowl, whisk together two cups of brown sugar, half a cup of ketchup, one tablespoon of Worcestershire sauce, one teaspoon of Dijon mustard, and that daring splash of bourbon (or apple cider vinegar). The mixture should be thick, glossy, and slightly frothy. If you notice any lumps, whisk a little warm water into the blend until it smooths out.
Drain the cooked beans and transfer them to a large baking dish (a 9×13 inch works perfectly). Pour the butter‑onion mixture over the beans, then drizzle the brown‑sugar glaze evenly, making sure each bean gets a coating. Toss gently with a wooden spoon; you want every bean to be cloaked in that sweet‑savory sauce without crushing them.
Watch Out: Over‑mixing at this stage can break the beans, turning them into a mushy paste. Fold gently and stop once the sauce is evenly distributed.Cover the dish tightly with aluminum foil and slide it into the preheated oven. Bake for 25 minutes—this steams the beans, allowing the flavors to meld. Around the 20‑minute mark, give the foil a gentle shake to redistribute the sauce; you’ll hear a faint sizzle, a sign that the caramelization is beginning.
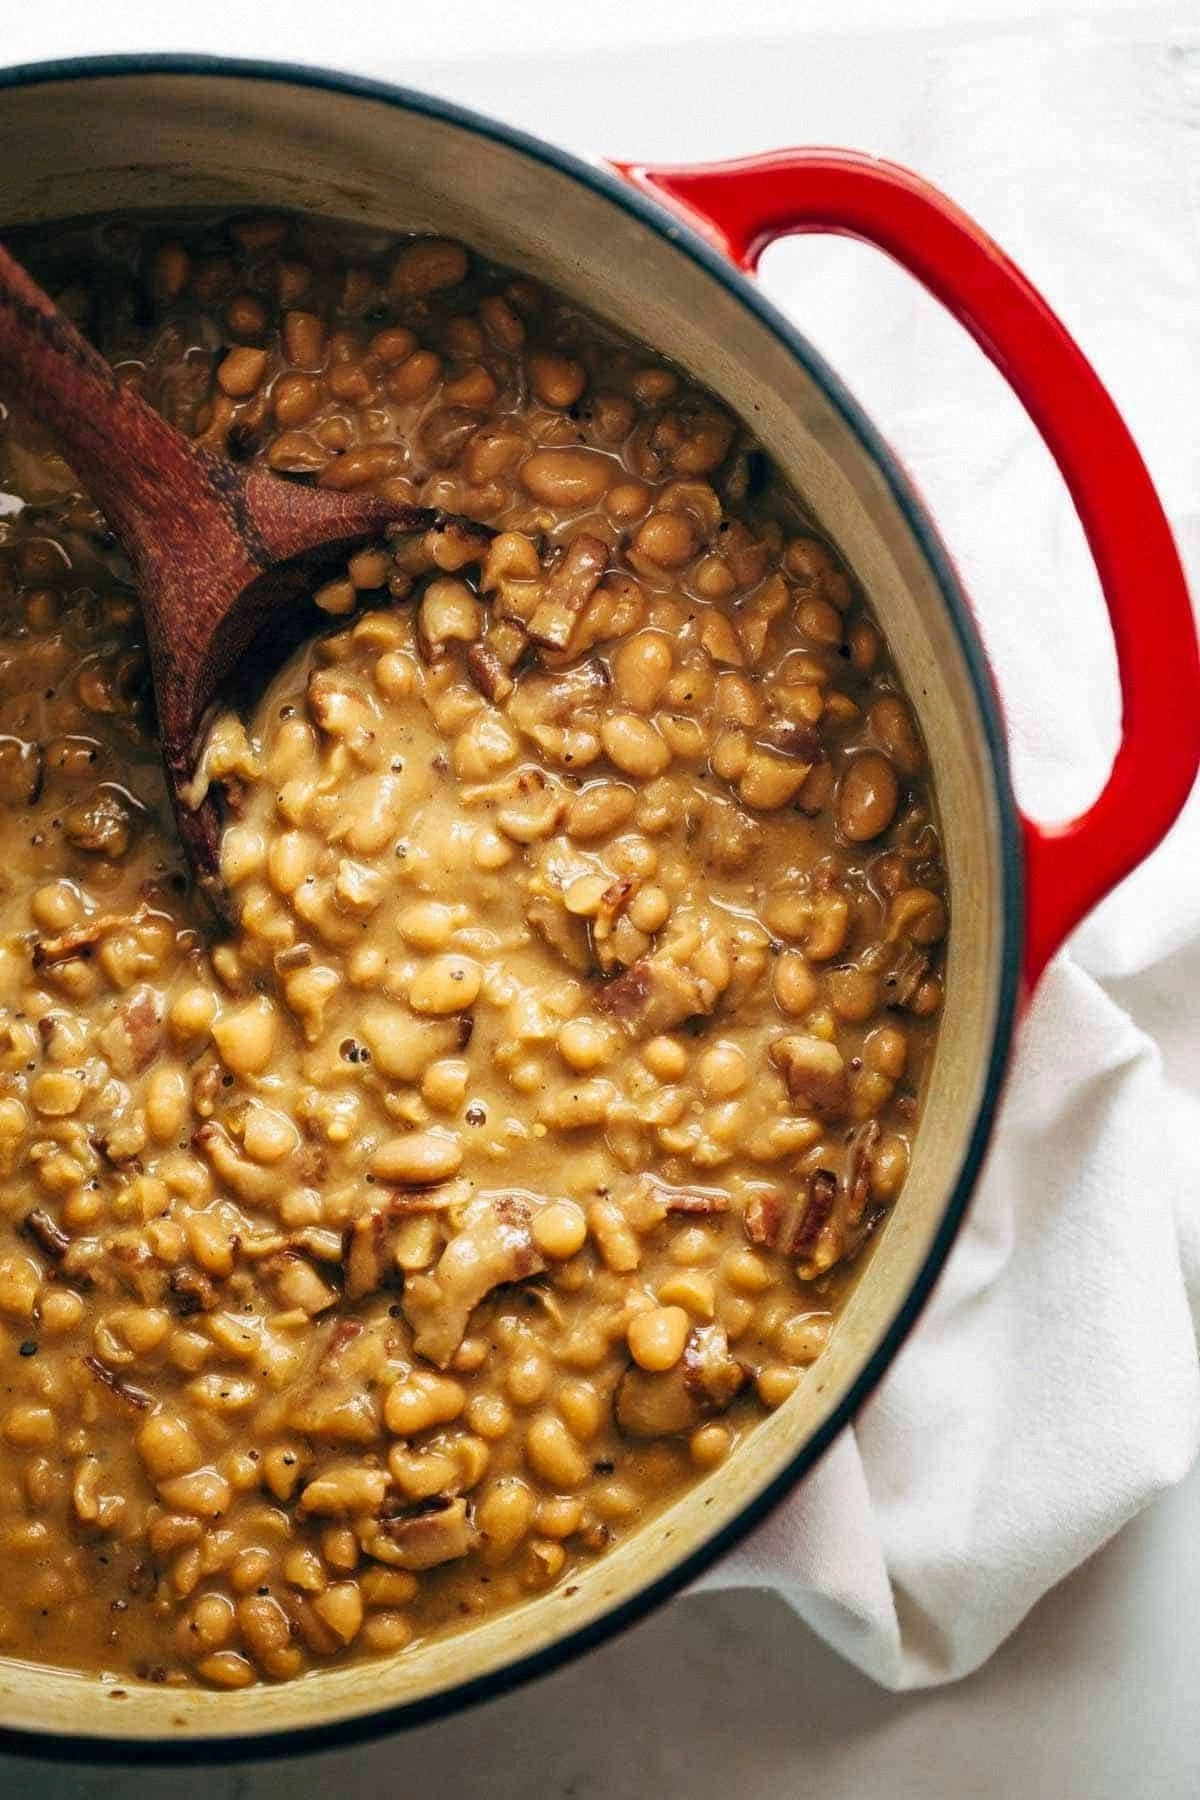
After 25 minutes, remove the foil and increase the oven temperature to 425°F (220°C). This high‑heat blast is the moment of truth: the top of the beans will start to bubble and the edges will pull away, forming that coveted crackly crust. Bake uncovered for an additional 15‑20 minutes, or until the glaze is deep amber and the beans glisten like polished jewels.
Kitchen Hack: If you want an extra‑crunchy top, switch the oven to broil for the last 2 minutes—watch closely to avoid burning.Remove the pan from the oven and let it rest for five minutes. This short pause lets the sauce thicken further, making it easier to serve. The beans should be glossy, with a thin caramelized skin that cracks delicately when you stir them. That sizzle when it hits the pan? Absolute perfection.
Serve hot, straight from the dish, or transfer to a serving bowl. Garnish with a sprinkle of fresh chopped parsley for a pop of color and a hint of herbaceous freshness. Pair with grilled chicken, pork chops, or a crisp green salad for a balanced meal. I dare you to taste this and not go back for seconds.
That's it — you did it. But hold on, I've got a few more tricks that'll take this to another level...
Insider Tricks for Flawless Results
The Temperature Rule Nobody Follows
Most home cooks bake beans at a low, steady temperature, thinking it will keep them moist. The truth is, a two‑stage temperature—low first, then high—creates a tender interior while the top caramelizes perfectly. If you skip the high‑heat finish, you’ll miss that satisfying crackle. I once tried a single 350°F bake; the result was a soggy mess that tasted like boiled beans in syrup. Trust the heat swing, and you’ll get that restaurant‑quality glaze every time.
Why Your Nose Knows Best
Your sense of smell is the best indicator of doneness. When the sauce starts to emit a caramel‑toasted aroma, you’re close to the perfect crust. If you’re uncertain, lift the foil and give the dish a quick sniff; a sweet, slightly smoky scent means you’re ready to crank up the heat. I’ve seen people rely purely on a timer, only to end up with burnt edges. Trust your nose, and you’ll avoid that disaster.
The 5‑Minute Rest That Changes Everything
Resting the beans after baking isn’t just for aesthetics; it allows the sugars to re‑absorb into the beans, creating a deeper flavor penetration. During the rest, the glaze thickens, coating each bean like a lacquer. Skipping this step is a common rookie mistake—serving straight from the oven leaves the sauce runny and the beans less flavorful. Set a timer for five minutes, cover loosely with foil, and watch the magic happen.
Don’t Forget the Butter Finish
A final knob of butter, stirred in after the beans rest, adds a glossy sheen and a buttery richness that makes the sauce cling like silk. I like to melt a tablespoon of butter and drizzle it over the beans just before serving. This extra layer of fat amplifies the mouthfeel, turning a good dish into an unforgettable one.
Seasonal Salt Strategy
Use flaky sea salt instead of regular table salt for a burst of flavor that pops on the palate. Sprinkle it just before the final bake, and you’ll notice a subtle crunch that contrasts the soft beans. A friend once used too much regular salt and the dish became flat; the flaky salt adds texture and a nuanced brininess that lifts the entire flavor profile.
The Power of a Quick Purée
If you want a smoother sauce, blend a quarter cup of the cooked beans with a splash of water, then stir the purée back into the dish before the final high‑heat blast. This creates a thicker glaze that clings even better. I tried this once for a dinner party, and the guests raved about the “silky” texture. It’s optional, but worth a try if you love a velvety finish.
Creative Twists and Variations
This recipe is a playground. Here are some of my favorite ways to switch things up:
Maple‑Bacon Bliss
Swap the brown sugar for pure maple syrup and fold in crisp cooked bacon bits. The maple adds a buttery sweetness, while the bacon introduces a smoky crunch that pairs beautifully with the caramelized beans.
Spicy Chipotle Kick
Add one finely chopped chipotle pepper in adobo sauce and a teaspoon of smoked paprika. The heat balances the sweetness, creating a bold flavor that’s perfect for taco night or as a topping for baked potatoes.
Herbaceous Mediterranean
Stir in a handful of chopped fresh rosemary, thyme, and a splash of olive oil. The herbs add an earthy brightness, turning the dish into a side that pairs wonderfully with grilled lamb or fish.
Vegan Coconut‑Brown Sugar
Replace butter with coconut oil and use a plant‑based Worcestershire sauce. The coconut oil adds a subtle tropical note, and the dish stays completely vegan without sacrificing richness.
Apple Cider Glaze
Swap half the brown sugar for unsweetened apple cider and add a pinch of cinnamon. This creates a autumn‑inspired glaze that’s perfect for holiday gatherings.
Storing and Bringing It Back to Life
Fridge Storage
Transfer leftovers to an airtight container and refrigerate for up to four days. The beans will continue to soak up the sauce, becoming even more flavorful. Reheat gently on the stovetop over low heat, stirring occasionally.
Freezer Friendly
Portion the baked beans into freezer‑safe bags or containers, leaving a little headspace for expansion. Freeze for up to three months. To reheat, thaw overnight in the fridge, then warm in a covered saucepan with a splash of water or broth to revive the glaze.
Best Reheating Method
When reheating, add a tiny splash of water (about a tablespoon per cup of beans) and cover the pan. The steam will restore the sauce’s glossy sheen and prevent the beans from drying out. Finish with a quick broil for two minutes if you crave that original crackly top.