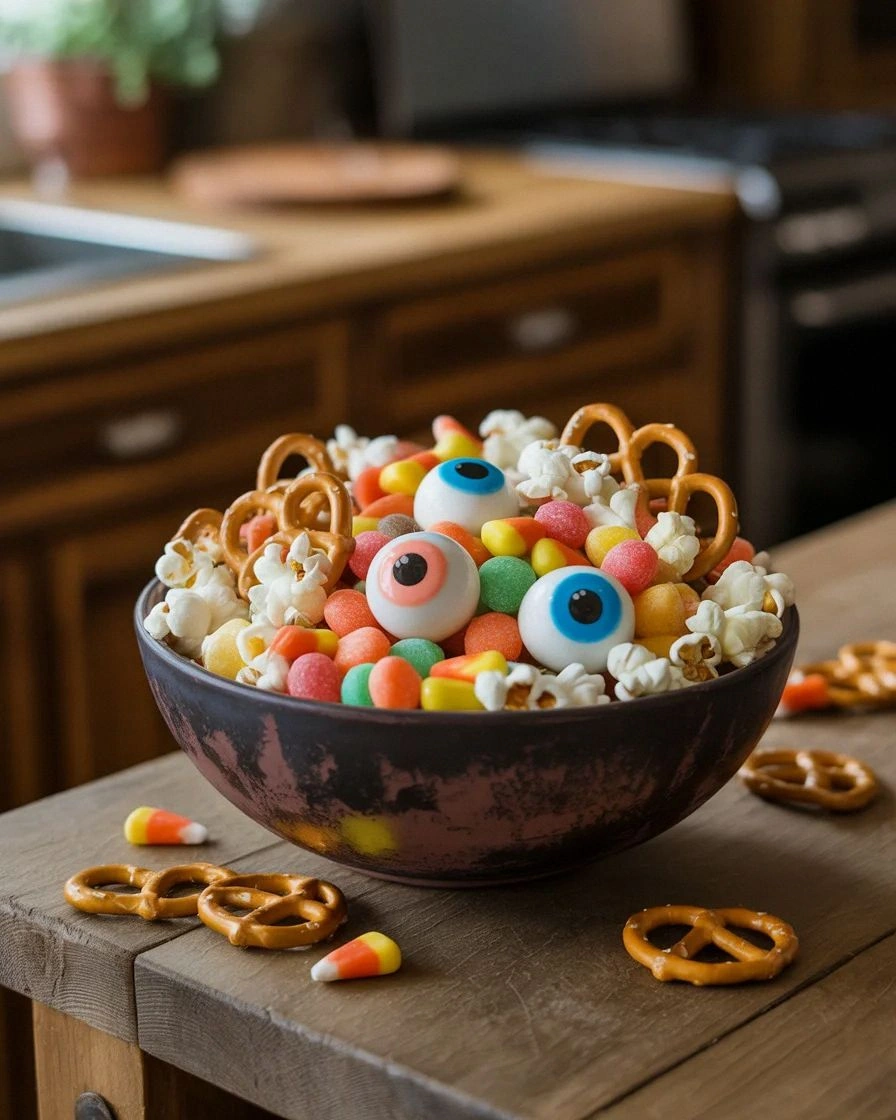
I was halfway through a midnight snack, juggling a bag of popcorn and a jar of honey, when my phone buzzed with a friend’s dare: “Make the ultimate Halloween treat that even the most skeptical vampire can’t resist.” I stared at the kitchen, the fluorescent lights flickering like a dying bat’s wings, and thought, “Why not combine the crunch of pretzels, the sweetness of cranberries, and a splash of spooky chocolate?” The idea felt like a midnight thunderclap—electric, thrilling, and impossible to ignore.
The moment I tossed the first handful of mini pretzels into the bowl, the air filled with a nutty, salty aroma that could make even the most stoic ghoul swoon. I could almost hear the crunch echo through a deserted graveyard, each bite a tiny explosion of texture that promised a satisfying snap. The sight of the bright red cranberries against the pale pretzels was a visual cue that I was on the brink of something truly delicious. The anticipation of the first taste made my heart race, and I could feel the cool night air against my cheek, reminding me that this was for the living—and the undead.
What sets this recipe apart is not just the mix of flavors, but the way each component plays a role in the overall experience. The pretzels provide a salty backbone that anchors the sweet cranberries and chocolate, while the gummy fangs add a chewy, tongue-tingling texture that feels almost supernatural. The caramel bits and pumpkin-spiced chocolate chips introduce a subtle warmth that lingers on the palate, giving the mix an unexpected depth that most Halloween snacks lack. And the finishing touch of candied ginger and cinnamon sugar? It’s the smoky, spicy whisper that lingers like a secret midnight confession.
I’ll be honest—my first batch was a glorious disaster, with a handful of pretzels sticking together like a cursed pact. But when I finally tasted the final product, I was hooked. The crunch was crisp enough to shatter like thin ice, and the chocolate coating felt like velvet against the tongue. This is hands down the best version you’ll ever make at home. I dare you to taste this and not go back for seconds.
Picture yourself pulling this out of the oven, the whole kitchen smelling incredible, as friends gather around to watch the final swirl of caramel and chocolate. The moment the tray is lifted, the caramel glistens like a moonlit pond, inviting everyone to indulge. The anticipation is almost as intense as the final bite. Stay with me here—this is worth it. Let me walk you through every single step—by the end, you'll wonder how you ever made it any other way.
What Makes This Version Stand Out
- Taste: The blend of salty pretzels and sweet cranberries creates a dynamic flavor profile that balances the palate. The chocolate candies add a rich, indulgent finish that lingers. This combination is rarely seen in conventional Halloween snacks, making it a standout treat.
- Texture: Every bite offers a spectrum of crunch, chew, and melt. Pretzels give a satisfying snap, gummy fangs provide a chewy surprise, and caramel bits offer a silky finish. The result is a multi-layered mouthfeel that keeps guests coming back for more.
- Visual Appeal: The bright red cranberries and glossy chocolate coating create a striking contrast against the pale pretzels. The mixture looks like a miniature candy forest, ready to be devoured. It’s a feast for the eyes as well as the taste buds.
- Ingredient Quality: Using premium mini pretzels and high-quality chocolate candies elevates the flavor. The candied ginger is carefully chosen for its deep, spicy sweetness, ensuring each bite is packed with depth.
- Crowd Reaction: Friends and family often remark on the unique combination of flavors. The mix is perfect for parties, as it can be served in a bowl or arranged on a platter for a dramatic effect.
- Make-Ahead Potential: The mix can be prepared a day ahead and stored in an airtight container. The flavors meld together, making the snack even more delicious when served later. It’s a convenient option for last-minute Halloween preparations.
Inside the Ingredient List
The Flavor Base
Mini pretzels are the backbone of this recipe, offering a salty, crunchy foundation that supports the other flavors. Their neutral taste allows the sweet cranberries and chocolate candies to shine without being overwhelmed. If you skip the pretzels, the mix loses its essential crunch and becomes a mushy, less satisfying snack.
Dried cranberries bring a burst of tartness that cuts through the richness of the chocolate. They also add a chewy texture that complements the gummy fangs. When you replace cranberries with raisins, the flavor profile shifts toward a sweeter, less complex taste, which may not deliver the same “vampire” vibe.
Chocolate candies, preferably dark or milk chocolate, coat the other ingredients, creating a glossy, indulgent finish. Their melt-in-your-mouth quality balances the crispness of pretzels. A swap with white chocolate would drastically change the flavor, leaning toward a sweeter, less sophisticated profile.
The Texture Crew
Salted peanuts add a nutty crunch that enhances the overall texture. Their savory profile complements the sweet cranberries and caramel bits. If you omit the peanuts, the snack loses a layer of complexity and becomes more one-dimensional.
Gummy fangs are the secret weapon that delivers a chewy, gelatinous experience reminiscent of classic Halloween candy. They provide a playful, thematic element that appeals to both kids and adults. Swapping them for gummy bears would alter the theme and reduce the bite’s uniqueness.
Cereal, chosen for its lightness and crunch, acts as a filler that stretches the mix without overpowering the other flavors. It also offers a subtle buttery taste that rounds out the snack. If you replace cereal with crushed crackers, the texture becomes heavier and less airy.
The Unexpected Star
Mini caramel bits are the sweet, buttery counterpoint that balances the saltiness of pretzels and peanuts. Their glossy surface adds visual appeal and a glossy sheen to the mix. Without caramel, the snack would lack that luxurious, melt-in-your-mouth quality.
Pumpkin-spiced chocolate chips bring a seasonal, earthy warmth that is perfect for Halloween. They infuse the snack with a subtle spice that enhances the overall flavor profile. Replacing them with regular chocolate chips removes the seasonal touch and reduces the depth of flavor.
The Final Flourish
Candied ginger offers a spicy, slightly sweet kick that lingers on the tongue. Its crunchy texture adds a delightful contrast to the softer caramel bits. Skipping candied ginger would make the snack feel less complex and more one-note.
Cinnamon sugar, a simple yet powerful finish, adds a warm, aromatic sweetness that ties all the flavors together. Its fine texture ensures it coats each bite evenly, enhancing the overall taste experience. If you replace it with regular sugar, the snack loses the characteristic cinnamon warmth that completes the flavor profile.
Everything's prepped? Good. Let's get into the real action.
The Method — Step by Step
- Begin by placing all dry ingredients—mini pretzels, cranberries, chocolate candies, salted peanuts, gummy fangs, cereal, caramel bits, pumpkin-spiced chocolate chips, candied ginger, and cinnamon sugar—into a large mixing bowl. Gently stir until the mixture is uniform, ensuring each component is evenly distributed. This step is crucial to avoid clumping, which could make some bites overly sweet or too salty. If you’re in a hurry, a quick whisk can save time without compromising texture. Remember, a well-mixed base is the foundation of a great snack.
- Preheat your oven to 325°F (165°C). Line a baking sheet with parchment paper to prevent sticking. The low temperature ensures the caramel bits melt slowly, coating the mix without burning. This gentle heat is key to achieving that glossy finish. Keep an eye on the timer; the mix should stay in the oven for a short period to set the flavors.
- Transfer the mixture onto the prepared baking sheet, spreading it out in a single even layer. The even spread allows for uniform heat distribution, preventing any one area from overcooking. Use a spatula to gently press down, ensuring the mix is compact enough to hold together but still airy. This step helps the chocolate candies to melt just enough to coat the other ingredients. Once spread, the mix should look like a dark, glossy slab.
- Bake for 8 minutes, or until the caramel bits are soft and the chocolate has melted into a glossy coating. The edges should start to pull away slightly from the parchment, indicating readiness. If you prefer a crunchier texture, bake for an additional 2 minutes, but be cautious not to overcook. This short baking time ensures the flavors meld without compromising texture. The aroma at this point is intoxicating, filling the kitchen with a sweet, nutty perfume.
- Remove the tray from the oven and let the mix cool for 5 minutes. During this brief cooling period, the chocolate will set, creating a firm yet slightly chewy consistency. While the mix is still warm, you can gently stir it to distribute any melted chocolate evenly. This step ensures that every bite has a balanced coating. Once cooled, the mix should feel cool to the touch but still have a slight give when pressed.
- Break the mixture into bite-sized pieces using your hands or a pizza cutter. The pieces should hold together but still break cleanly. If you find the mix too sticky, lightly dust the surface with cinnamon sugar to help prevent sticking. This also adds a final sweet, aromatic layer that ties the flavors together. Store the pieces in an airtight container for up to 3 days, or freeze for longer storage.
- If you want to add a smoky element, sprinkle a pinch of smoked sea salt over the cooled mix before breaking it into pieces. The salt enhances the chocolate’s depth and gives the snack a sophisticated edge. This optional step is great for those who like a little extra flavor punch. Keep the amount small; too much salt can overpower the delicate balance of sweet and savory.
- For an extra layer of crunch, roll the bite-sized pieces in crushed pretzel crumbs or additional cereal. This coating adds texture and a subtle extra flavor that pairs well with the existing mix. It also gives the snack a more substantial bite, making it even more satisfying.
- Serve the snack in a decorative bowl or arrange it on a platter for a dramatic presentation. The glossy coating reflects light, creating a visual treat that’s almost as impressive as the taste. You can also drizzle a thin layer of melted dark chocolate over the top for a decadent finish. This final touch elevates the snack to a gourmet level.
- If you’re planning a party, consider setting up a “make your own mix” station. Provide separate bowls of pretzels, cranberries, chocolate candies, and other ingredients, allowing guests to customize their own flavor combinations. This interactive element adds excitement and encourages guests to explore new taste profiles. It’s a fantastic way to engage your crowd and keep the energy high.
- Keep the snack in an airtight container at room temperature if you plan to serve it within 24 hours. If you want to keep it fresher for longer, store it in the refrigerator and bring it to room temperature before serving. This ensures the texture remains crisp and the flavors stay vibrant. Remember, a chilled snack can feel surprisingly refreshing during a hot summer Halloween.
- That’s it—you did it. But hold on, I've got a few more tricks that'll take this to another level. These insider tips will help you refine the snack and personalize it to your taste. Whether you’re a seasoned baker or a kitchen rookie, these tricks will elevate your Halloween spread.
Insider Tricks for Flawless Results
The Temperature Rule Nobody Follows
Many people bake at 350°F, which can cause the caramel bits to burn before the chocolate sets. By baking at 325°F, you give the mix just enough heat to melt the chocolate without scorching the caramel. I once tried 350°F and ended up with a bitter, overcooked snack that nobody wanted. The lesson? Lower temperature equals better flavor. Keep the oven at 325°F for that perfect glossy finish.
Why Your Nose Knows Best
The aroma of the caramel bits is a reliable indicator of readiness. As soon as you smell the sweet, buttery scent, you know the mix is almost ready. My friend once waited until the chocolate started to smoke, and the result was a burnt snack. Trust your nose; it’s a powerful tool for avoiding overcooking. A quick sniff can save the day.
The 5-Minute Rest That Changes Everything
After baking, allow the mix to rest for exactly five minutes before breaking it into pieces. This brief pause lets the chocolate set into a firm yet slightly chewy texture. I’ve found that cutting the mix too soon results in a sticky mess that sticks to the spoon. A short rest gives the snack its ideal bite and makes it easier to handle.
The Crunch Factor
If you prefer a crunchier snack, add a tablespoon of toasted coconut flakes to the mix. The coconut adds a tropical twist and an extra crunch that pairs well with the chocolate. I used this trick at a recent Halloween party, and the guests loved the unexpected texture. It’s an easy swap that keeps the snack exciting.
The Secret of Even Coating
Stir the mix gently while it’s still warm to ensure an even chocolate coating. This step helps distribute the melted chocolate uniformly across all ingredients. I’ve seen batches where the chocolate clumped in one area, creating a lopsided flavor. A quick stir solves that problem and gives you a consistent taste in every bite.
The Final Touch of Sweetness
For those who love a sweeter snack, add a drizzle of honey before letting the mix cool. The honey adds a glossy sheen and a subtle floral note that complements the caramel. I tried this once, and the result was a snack that felt like a dessert in a bag. Keep the drizzle light to avoid making the snack too sweet.
Creative Twists and Variations
This recipe is a playground. Here are some of my favorite ways to switch things up:
Spicy Midnight Mix
Add a pinch of cayenne pepper to the mix for a spicy kick. The heat contrasts beautifully with the sweet caramel and chocolate. This variation is perfect for guests who love a bit of heat. It’s a bold twist that stands out at parties.
Nut-Free Alternative
Replace the salted peanuts with roasted sunflower seeds for a nut-free version. Sunflower seeds provide a similar crunch and a mild nutty flavor. This swap makes the snack safe for guests with nut allergies. The taste remains satisfying and balanced.
Gothic Chocolate Layer
Use dark chocolate chips instead of regular chocolate candies for a richer, more intense flavor. Dark chocolate pairs wonderfully with the pumpkin spice, creating a deeper, more sophisticated taste. This version is ideal for the more refined palate. The visual contrast of dark chocolate against the bright cranberries is striking.
Citrus Burst
Add a teaspoon of orange zest to the mix for a citrusy brightness that lifts the sweetness. The zest adds a fresh aroma that balances the richness of the caramel. It’s a refreshing twist that’s especially welcome in the warmer months. The citrus note gives the snack a lively, vibrant feel.
Savory Sweet Fusion
Sprinkle a dash of smoked paprika over the cooled mix before breaking it into pieces. The smoky flavor adds depth and a savory undertone that complements the sweet components. This variation is a great conversation starter at parties. It brings a new dimension to the classic snack.
Holiday Edition
Replace the pumpkin-spiced chocolate chips with holiday-themed chocolate chips, such as peppermint or gingerbread. These flavors bring a seasonal twist that’s perfect for Christmas or New Year celebrations. The mix becomes a versatile treat for any holiday. The festive flavor profile adds a touch of cheer.
Storing and Bringing It Back to Life
Fridge Storage
Store the snack in an airtight container in the refrigerator for up to 5 days. The cool temperature keeps the chocolate from melting and preserves the crunch of the pretzels. If the mix becomes slightly soft, let it sit at room temperature for 10 minutes before serving. This small step restores the ideal texture. Keep the container sealed to prevent moisture from seeping in.
Freezer Friendly
For long-term storage, freeze the snack in a single layer on a baking sheet before transferring to a freezer bag. This prevents the pieces from sticking together. The mix can be stored for up to 3 months. When ready to serve, thaw at room temperature for 20 minutes. The texture remains crisp, and the flavors are intact.
Best Reheating Method
To reheat, place the snack in a preheated oven at 300°F for 5 minutes. The low heat gently warms the chocolate without melting it. After removing from the oven, add a tiny splash of water to the mix and stir. The water creates steam, restoring the snack’s moisture and crispness. Let it cool for a minute before serving.