Picture this: it’s a blustery December evening, the kitchen lights flicker, and I’ve just discovered that the only thing missing from my holiday spread is a sweet, crunchy, festive treat that will make everyone gasp. I’ve tried every bark recipe I could find—some were too greasy, others too sweet, a few even tasted like the kitchen was on fire. I was about to give up when a friend dared me to create a white chocolate bark that would outshine all the others. I accepted the challenge, and what followed was a culinary revelation that turned my kitchen into a holiday wonderland.
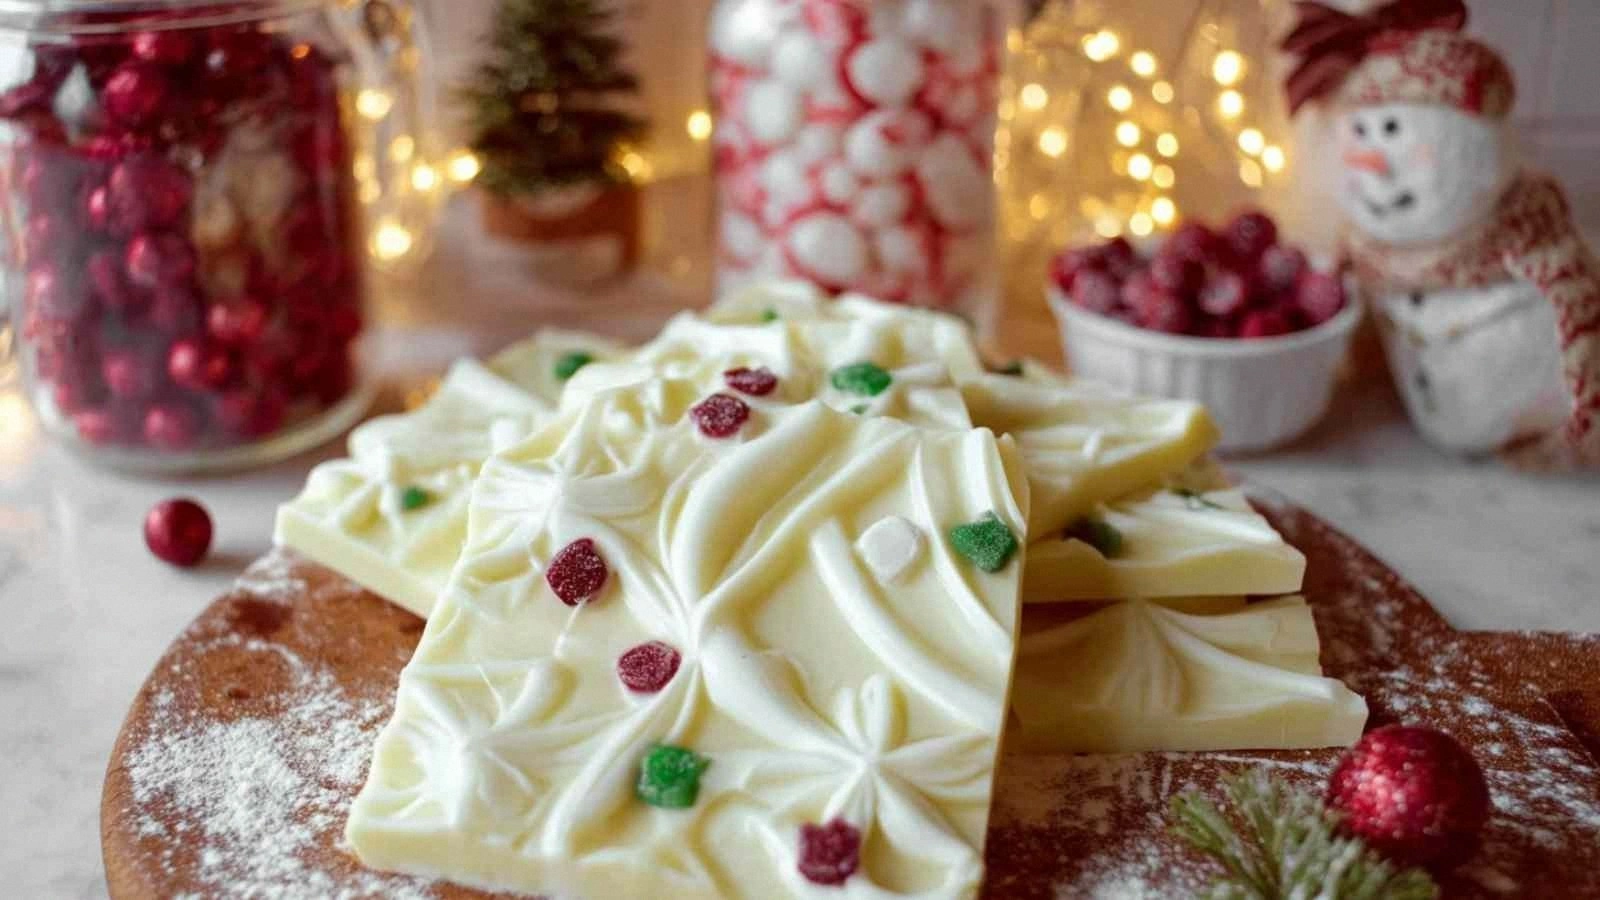
From the moment the white chocolate chips hit the saucepan, the room filled with a creamy, buttery aroma that felt like a hug from the inside out. The sound of the chocolate bubbling was a gentle, comforting whisper, while the sight of it turning a pale ivory was a promise of indulgence. The first bite was a symphony of textures: a silky melt that glides across the tongue, a subtle crunch from the sprinkles, and a burst of festive color from the M&M’s. The flavor profile is a delicate balance—sweet but not cloying, with a hint of vanilla that lingers like a secret. It’s the kind of treat that makes your taste buds dance, your eyes widen, and your heart feel a little lighter.
What sets this version apart is not just the ingredients but the method. I’ve refined the process to eliminate common pitfalls—overheating, uneven coating, and brittle edges. By tempering the chocolate just right, I’ve achieved a bark that snaps with a satisfying crack, yet remains smooth enough to melt in your mouth. The addition of green and red candy melts gives it a playful, holiday vibe that’s impossible to resist. I dare you to taste this and not go back for seconds. Trust me, the first bite will have you planning the next batch before you even finish the first piece.
Let me walk you through every single step—by the end, you’ll wonder how you ever made it any other way. This is hands down the best version you’ll ever make at home, and I promise you’ll be proud to serve it to friends and family. If you’ve ever struggled with bark that turns out too soft or too hard, you’re not alone—this recipe is the fix. Picture yourself pulling this out of the fridge, the whole kitchen smelling incredible, and everyone rushing to get a piece. Ready? Let’s dive in.
What Makes This Version Stand Out
- Flavor: The combination of white chocolate, green, and red candy melts creates a layered sweetness that’s both classic and unexpected.
- Texture: The bark snaps cleanly, offering a satisfying crunch that contrasts with the smooth chocolate base.
- Ease: No boiling, no baking—just melt, mix, and chill. Perfect for a last-minute holiday treat.
- Presentation: The vibrant colors of the candy melts and sprinkles turn each piece into a holiday ornament.
- Versatility: Works as a gift, party favor, or dessert centerpiece.
- Ingredient Quality: Using premium white chocolate chips ensures a richer taste and smoother melt.
- Make‑ahead: Once set, the bark can be stored in an airtight container for up to two weeks.
- Kid‑Friendly: No baking required, making it safe and easy for children to help.
Alright, let’s break down exactly what goes into this masterpiece…
Inside the Ingredient List
The Flavor Base
White chocolate chips are the star of this recipe. They provide a velvety sweetness that is the perfect canvas for the festive additions. If you skip them, the bark loses its smooth foundation and becomes a jumble of flavors. When choosing your chips, look for a brand that lists cocoa butter as the first ingredient; this ensures a richer melt and a more buttery finish. A subtle vanilla extract can be added for a deeper aroma, but it’s optional.
The Texture Crew
Green and red candy melts are not just decorative; they add a chewy, slightly crunchy texture that plays against the silky white chocolate. These melts melt faster than regular chocolate, so add them at the last minute to preserve their shape. If you’re allergic to dairy, look for dairy‑free candy melts that still retain the bright colors.
The Unexpected Star
Christmas sprinkles and M&M’s bring a pop of color and a burst of crunch. The sprinkles are tiny, but they’re the ones that give the bark its signature sparkle. The M&M’s add a familiar candy crunch that many people love. If you want a different crunch, substitute them with crushed nuts or dried fruit.
The Final Flourish
Everything you need is already in the bag—no pantry hunt required. However, if you want to elevate the bark, drizzle a thin line of dark chocolate on top for a contrast of flavors. Another option is to sprinkle a pinch of sea salt on top; the salt will enhance the sweetness and add a savory note.
Everything's prepped? Good. Let's get into the real action…
The Method — Step by Step
- Gather your ingredients and tools. Make sure you have a heat‑proof bowl, a saucepan, a spatula, parchment paper, and a silicone mat. The silicone mat is optional but helps keep the bark from sticking.
- Set the stage. Line a baking sheet with parchment paper and lay the silicone mat on top. This double layer ensures a clean release and adds a subtle texture to the bark.
- Melt the white chocolate. Place the white chocolate chips in a heat‑proof bowl over a pot of simmering water. Stir constantly until the chocolate is fully melted and glossy. If you’re worried about burning, use a double boiler or a microwave in short bursts.
- Temper the chocolate. Once melted, let the chocolate sit for 30 seconds. This slight cooling allows the cocoa butter to crystallize properly, giving the bark a shiny finish and a crisp snap.
- Add the candy melts. Stir in the green candy melts first, then the red, until they’re fully incorporated. The color should be even and the mixture should look like a molten rainbow.
- Decorate. Sprinkle the Christmas sprinkles and M&M’s evenly over the chocolate. Use a spoon to distribute them evenly—this ensures each bite has a balanced mix of crunch and flavor.
- Pour and spread. Pour the mixture onto the prepared baking sheet and spread it into a thin, even layer about 1/4 inch thick. A spatula works best; keep the surface smooth for a uniform snap.
- Set the bark. Place the sheet in the refrigerator for 20 minutes or until the chocolate has hardened completely. The bark should feel firm to the touch but not overly hard.
- Cut into pieces. Remove from the fridge and cut into squares or bars using a sharp knife. If you prefer irregular shapes, use cookie cutters for a festive look.
- Store. Keep the bark in an airtight container at room temperature for up to two weeks. If you’re storing in the fridge, let it come to room temperature before serving to prevent condensation.
That's it — you did it. But hold on, I've got a few more tricks that'll take this to another level…
Insider Tricks for Flawless Results
The Temperature Rule Nobody Follows
Most people think any melt will work, but temperature is everything. Aim for 86°F to 88°F for white chocolate. If you’re using a thermometer, keep it in the water bath, not the chocolate itself. This subtle difference ensures the chocolate sets with a glossy finish instead of a dull, chalky look. A friend once tried a quick microwave melt and ended up with a rubbery bark that snapped too hard—don’t repeat that mistake.
Why Your Nose Knows Best
Before you even taste the bark, inhale deeply. The aroma should be sweet and buttery, with a hint of vanilla. If it smells burnt or metallic, it’s likely over‑heated. Trust your nose; it’s a reliable quality control tool that no recipe book can replace.
The 5‑Minute Rest That Changes Everything
After the bark has cooled, let it rest for 5 minutes before cutting. This brief pause allows the chocolate to set fully, reducing the risk of jagged edges and ensuring each piece snaps cleanly. A quick slice right out of the fridge can result in a sticky mess.
Use a Silicone Mat for Easy Release
Even with parchment paper, the bark can cling if the chocolate is too hot. A silicone mat creates a non‑stick surface that also adds a subtle texture to the bark’s underside—perfect for a more rustic look.
Keep It Cool, Keep It Fresh
Store the bark in a cool, dry place. If you live in a humid area, place a small silica gel packet in the container to absorb moisture and keep the bark crisp.
Creative Twists and Variations
This recipe is a playground. Here are some of my favorite ways to switch things up:
Nutty Crunch
Add chopped pecans or walnuts for an earthy crunch. The nuts pair wonderfully with the sweet chocolate and add a nutty aroma that’s both comforting and festive.
Minty Fresh
Replace the green candy melts with a splash of peppermint extract and a few drops of green food coloring. The result is a cool, minty bark that’s perfect for winter.
Chocolate‑Covered Caramel
Drizzle caramel sauce over the bark before it sets. The caramel will soak into the chocolate, creating a gooey center that’s a treat for caramel lovers.
Sea‑Salted Sweetness
Sprinkle a pinch of flaky sea salt on top after the bark has set. The salt enhances the sweetness and adds a savory counterpoint that elevates the flavor.
Holiday Spritz
For a boozy twist, add a teaspoon of peppermint schnapps or vanilla liqueur to the melted chocolate. The alcohol will evaporate, leaving a subtle kick.
Vegan Version
Use dairy‑free white chocolate chips and dairy‑free candy melts. The texture and flavor remain the same, making this bark inclusive for everyone.
Storing and Bringing It Back to Life
Fridge Storage
Keep the bark in an airtight container at room temperature for up to 14 days. The airtight seal prevents moisture from softening the chocolate, keeping each bite crisp.
Freezer Friendly
Wrap the bark tightly in plastic wrap and place it in the freezer. It can stay fresh for up to 3 months. When you’re ready to eat, let it thaw at room temperature for 10 minutes before slicing.
Best Reheating Method
To restore a slightly soft bark, microwave it in 10‑second bursts, stirring after each burst. Add a tiny splash of water to the chocolate before reheating; this steams it back to perfection and prevents it from becoming too hard.