Picture this: a quiet Sunday afternoon, the kitchen lights dimming, and a sudden craving for something sweet, savory, and utterly addictive. I was rummaging through my pantry, half‑expecting to discover the missing ingredient that would transform a mediocre chicken dinner into a headline‑worthy dish. The moment I tossed a handful of honey into a bowl, the kitchen filled with a caramelized aroma that made my taste buds tingle even before the first bite. That instant, I knew I had stumbled upon something special—an explosive marriage of crunch, glaze, and garlic that could turn any ordinary meal into a showstopper. If you’re ready for a flavor adventure that will have you begging for seconds, let me walk you through every single step—by the end, you’ll wonder how you ever made it any other way.
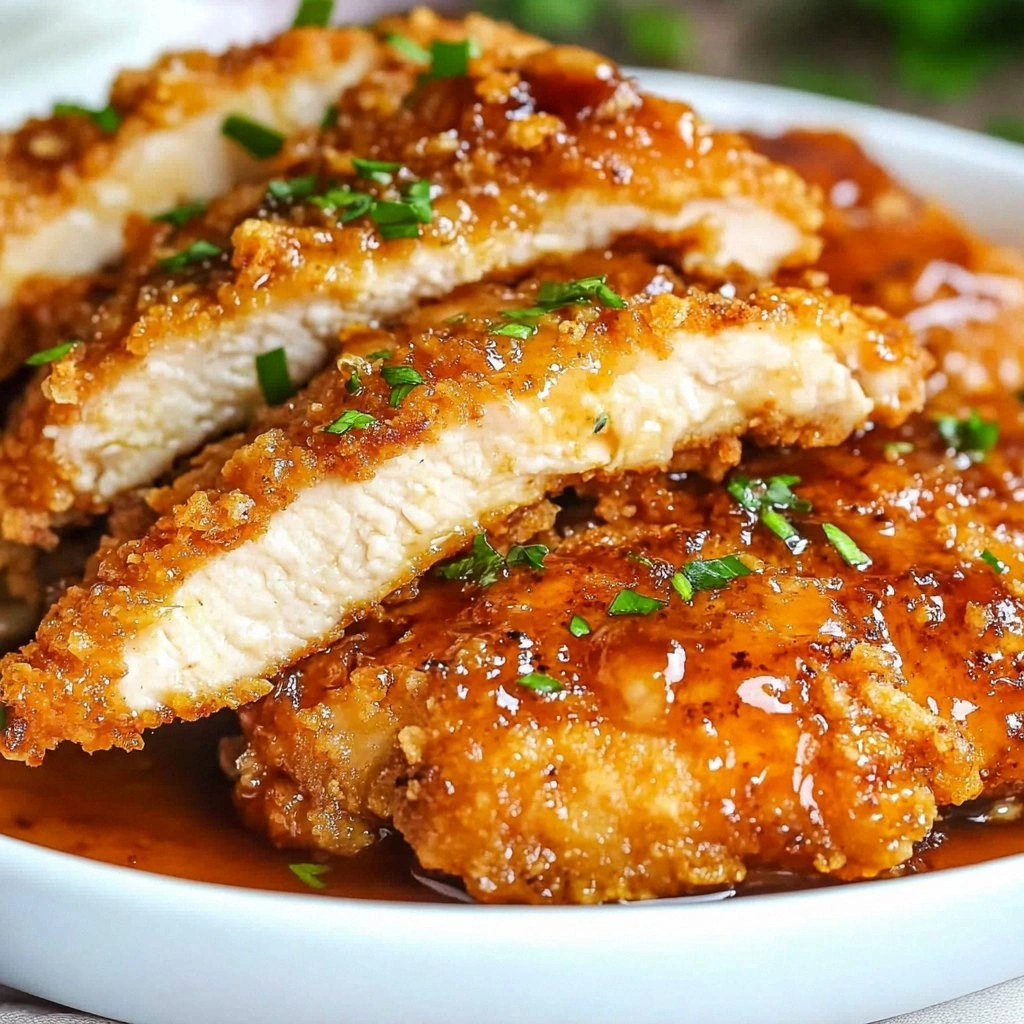
I dare you to taste this and not go back for seconds. The moment the first bite hits your tongue, the honey coats the chicken like velvet, the garlic pops with a bright, almost citrusy zing, and the crunch—oh, the crunch—shatters like thin ice, releasing a burst of savory goodness. Most recipes get this completely wrong; they either overcook the meat, under‑season the coating, or forget the final glaze that seals the deal. The secret lies in the double‑crunch coating that I’ll show you, the precise timing of the honey glaze, and the subtle balance of heat and sweetness that makes this dish unforgettable. Picture yourself pulling this out of the oven, the whole kitchen smelling incredible, and your friends asking for the recipe—only to find out you’re the culinary wizard behind it.
I’ll be honest—before I perfected this version, I ate half the batch before anyone else got to try it. The first time I tried a standard honey‑garlic chicken, the coating was soggy, the sauce was too thick, and the flavor was flat. That failure taught me that the key is in the double coating and the timing of the glaze. This recipe is hands down the best version you’ll ever make at home because it balances crunch, caramel, and umami in a single bite. If you’ve ever struggled with getting that perfect crispy exterior, you’re not alone—and I’ve got the fix.
What makes this version stand out? It’s a symphony of textures, flavors, and techniques that elevate a simple chicken dish into a culinary masterpiece. The double‑crunch coating gives you that satisfying snap that keeps you coming back. The honey glaze is infused with garlic and ginger, creating a depth that lingers on the palate. The method is straightforward yet precise, ensuring that every step delivers maximum flavor without extra fuss. This dish is crowd‑pleasing, easy to scale, and can be prepped ahead of time for busy weeknights. Ready to discover why this recipe is a game‑changer? Let’s break down exactly what goes into this masterpiece.
What Makes This Version Stand Out
- Crunch: The double coating—flour and cornstarch—creates a two‑layered crisp that shatters with each bite, delivering a texture that’s both satisfying and indulgent.
- Sweetness: A generous splash of honey caramelizes to a glossy glaze, giving the dish a luscious sheen and a sweet finish that balances the savory.
- Garlic & Ginger: Freshly minced garlic and grated ginger infuse the sauce with aromatic heat, elevating the flavor profile beyond ordinary.
- Speed: The entire process takes under an hour, making it perfect for busy evenings without sacrificing quality.
- Versatility: Swap chicken thighs for breasts or add a splash of lime for a citrus twist—this recipe adapts effortlessly.
- Make‑Ahead: The chicken can be marinated and coated a day ahead, then frozen; just bake when you’re ready to serve.
- Visual Appeal: The glossy glaze and bright scallion garnish make the dish Instagram‑ready, turning a simple plate into a showpiece.
- Health‑Friendly: While indulgent, the dish is still balanced, with lean protein, healthy fats from sesame oil, and natural sugars from honey.
Inside the Ingredient List
The Flavor Base
The honey and soy sauce form the backbone of this dish, creating a sweet‑savory glaze that clings to every morsel. The honey, with its natural caramelization, brings depth and a glossy sheen that is both appetizing and aromatic. Soy sauce adds umami and saltiness, balancing the sweetness and giving the sauce a rich, complex flavor. If you skip the soy sauce, the glaze will taste flat and overly sweet, lacking the savory undertone that makes each bite memorable. For a gluten‑free version, swap regular soy sauce for tamari, which provides the same depth without the wheat.
The garlic, freshly minced, injects a punch of sharpness that cuts through the sweetness, preventing the dish from becoming cloying. Ginger, grated, adds a subtle warmth and a hint of citrus that brightens the overall profile. Together, these aromatics elevate the sauce from simple to sophisticated. If you’re allergic to garlic, you can replace it with garlic powder, but be mindful that the flavor will be more subdued and less fresh.
The sesame oil, a small but mighty component, lends a nutty aroma that enriches the glaze. A teaspoon is enough to impart that distinctive toasted flavor without overpowering the other ingredients. If you’re watching calories, you can reduce the oil, but the texture will be slightly less glossy. For a richer taste, consider using toasted sesame oil, which has a deeper nutty profile.
The Texture Crew
The first layer of coating—all‑purpose flour—provides a neutral base that absorbs moisture and sets the stage for the second, more flavorful layer. Flour also helps the sauce adhere to the chicken, ensuring every bite is coated. If you skip the flour, the cornstarch layer will cling poorly, resulting in a soggy exterior. For a gluten‑free alternative, use a blend of rice flour and cornstarch.
Cornstarch is the star of the double coating. Its fine texture creates a light, airy crisp that breaks apart beautifully. The cornstarch also thickens the glaze slightly, giving it that silky finish. If you prefer a crunchier bite, increase the cornstarch by a tablespoon; if you want a lighter coating, reduce it by a tablespoon.
Eggs bind the coating together, ensuring the flour and cornstarch adhere firmly to the chicken. The beaten eggs create a smooth batter that traps the coating, preventing it from falling off during frying. If you’re vegan, you can replace eggs with a ¼ cup of aquafaba or a flaxseed‑egg mixture.
The Unexpected Star
Scallions add a fresh, mild onion flavor that cuts through the richness of the glaze, providing a bright counterpoint. Their green tops also give the dish a vibrant visual appeal, making it look as good as it tastes. If you’re allergic to scallions, you can substitute with chives or thinly sliced green onions.
Sesame seeds are the final flourish, adding a subtle nutty crunch that lingers on the palate. They also lend a pop of color, making the dish more inviting. For a nut‑free version, simply omit the sesame seeds; the flavor profile will remain intact.
The Final Flourish
Salt and pepper are the unsung heroes that elevate every other ingredient to its fullest potential. They’re essential for balancing the sweetness of honey and the saltiness of soy sauce. A pinch of salt is enough; too much can make the glaze taste overly briny. If you’re on a low‑sodium diet, reduce the soy sauce and add a splash of rice vinegar for acidity.
Everything's prepped? Good. Let's get into the real action.
The Method — Step by Step
- Marinate the Chicken: In a large bowl, combine the chicken pieces with soy sauce, minced garlic, grated ginger, and a splash of honey. Toss until every piece is evenly coated. Cover and refrigerate for at least 30 minutes; this allows the flavors to seep deep into the meat. I’ve found that a 1‑hour marination yields the best results, but even a quick 15 minutes works wonders. While the chicken marinates, you can start preparing the coating.
- Prepare the Double Coating: In one shallow dish, whisk the eggs. In a second dish, mix flour and cornstarch until well combined. In a third dish, set aside the beaten eggs for dipping. This three‑step process ensures each piece gets a crisp, flavorful crust. The cornstarch layer will create a light, airy crunch that contrasts with the honey glaze.
- Coat the Chicken: Remove each marinated piece from the bowl, letting excess drip off. First, dredge the chicken in the flour‑cornstarch mixture, tapping off any excess. Next, dip it into the beaten eggs, then back into the flour mixture again for the double layer. The result is a thick, golden shell that will stay intact during frying. This step is crucial; skipping it will leave the chicken soggy.
- Fry the Chicken: Heat 2 tablespoons of sesame oil in a deep skillet over medium‑high heat until it shimmers. Add the coated chicken pieces in a single layer, being careful not to overcrowd. Fry for 3–4 minutes on each side, or until the coating is golden brown and the internal temperature reaches 165°F (74°C). The sizzle is the soundtrack to a delicious meal—listen for that satisfying crackle. Flip only once to maintain the crispness.
- Watch Out: If the oil temperature drops too low, the coating will absorb oil and become greasy. Conversely, if the heat is too high, the exterior will burn before the interior cooks. Keep the temperature steady by adjusting the flame and using a thermometer if you have one. Remember, a steady medium‑high heat is your best friend here.
- Prepare the Honey Glaze: While the chicken rests, combine honey, remaining soy sauce, garlic, ginger, and a splash of water in a small saucepan. Bring to a gentle simmer over medium heat, stirring constantly until the mixture thickens to a syrupy consistency. This glaze will coat the chicken in a glossy, caramelized coat. The water prevents the honey from burning by diluting the sugar concentration slightly.
- Toss in the Glaze: Transfer the fried chicken to a large bowl and pour the honey glaze over it. Toss gently until every piece is coated in the glossy sauce. Sprinkle scallions, sesame seeds, and a final pinch of salt to finish. Serve immediately for maximum crunch; if you wait, the coating may soften. The aroma at this point is irresistible—trust me, you’ll want to eat before it cools.
- Serve and Enjoy: Plate the chicken on a warm dish, drizzle any remaining glaze, and garnish with extra scallions and sesame seeds if desired. Pair with steamed jasmine rice or a crisp cucumber salad to cut through the richness. The contrast of textures and flavors will leave your guests asking for the recipe. Remember to keep the sauce on the side for those who like an extra saucy bite. This dish is a crowd‑pleaser—no doubt about it.
That's it — you did it. But hold on, I've got a few more tricks that'll take this to another level. These insider tips will help you avoid common pitfalls, maximize flavor, and keep your kitchen smelling like a five‑star restaurant.
Insider Tricks for Flawless Results
The Temperature Rule Nobody Follows
Heat is the silent hero of this recipe. Many cooks underestimate the importance of maintaining a steady medium‑high temperature during frying. Too low, and the coating swallows oil; too high, and the exterior burns before the interior cooks. I recommend using a deep‑dish thermometer—aim for 350°F (175°C). If you don’t have a thermometer, test the oil by dropping a small crumb; if it sizzles and rises to the surface, you’re good to go.
Why Your Nose Knows Best
Before you even taste the dish, your nose can tell you if something is off. A faint, burnt aroma is a red flag that the oil is too hot. A sweet, caramel scent indicates the glaze is cooking properly. If you smell a raw, metallic tang, the chicken might be undercooked. Trust your senses—your nose is a reliable guide to culinary perfection.
The 5‑Minute Rest That Changes Everything
After frying, let the chicken rest on a rack for 5 minutes. This step allows the juices to redistribute, ensuring a moist interior while the coating remains crisp. I’ve seen dishes that sit on a cutting board and lose their crunch—resting on a rack keeps the bottom from steaming. The rest also gives the glaze time to set, creating a glossy, firm coating that doesn’t run off.
The Quick Sauce Fix
If your glaze thickens too quickly, add a tablespoon of water or rice vinegar to loosen it. Conversely, if it’s too thin, let it simmer longer or add a teaspoon of cornstarch mixed with water. The goal is a silky, glossy consistency that clings without dripping.
The Secret to Even Coating
To avoid uneven coating, toss the chicken in the flour mixture twice—first for a light dusting, then for a thicker crust. This double‑dip technique ensures each piece is coated evenly, preventing any gaps that could lead to soggy spots. If you’re short on time, skip the first dip, but the result will be noticeably less crisp.
Creative Twists and Variations
This recipe is a playground. Here are some of my favorite ways to switch things up:
Spicy Sriracha Twist
Swap the honey for a mix of honey and sriracha to introduce a spicy kick that balances the sweetness. Add a splash of lime juice for extra brightness. This version is perfect for those who love a little heat.
Thai Peanut Crunch
Replace the honey glaze with a peanut sauce made from peanut butter, soy sauce, lime juice, and a touch of honey. The nutty flavor pairs wonderfully with the crunchy coating. Serve over rice noodles for a complete Thai-inspired meal.
Citrus Zest Variation
Incorporate orange zest into the glaze to add a citrusy aroma that brightens the dish. Finish with a drizzle of orange glaze for a glossy, flavorful finish. This version is especially refreshing during the summer.
Vegetarian Version
Use firm tofu instead of chicken, pressing it to remove excess moisture. Coat the tofu in the same double‑crunch mixture and fry until golden. The tofu absorbs the honey glaze beautifully, creating a plant‑based alternative that still delivers the crunch.
Gluten‑Free Adaptation
Swap the all‑purpose flour with a gluten‑free flour blend and use tamari instead of soy sauce. The flavor stays the same, but the dish becomes safe for gluten‑sensitive diners. This tweak is simple yet effective.
Storing and Bringing It Back to Life
Fridge Storage
Cool the cooked chicken to room temperature, then store it in an airtight container in the refrigerator for up to 3 days. To preserve the crunch, place a paper towel under the chicken to absorb excess moisture. Reheat in a preheated oven at 375°F (190°C) for 10 minutes before serving. The oven will revive the crispness better than a microwave.
Freezer Friendly
Freeze individual portions in a single layer on a parchment‑lined tray before transferring to a freezer bag. This method prevents the pieces from sticking together. When ready to eat, thaw overnight in the refrigerator and reheat in the oven as described above. The texture remains delightful.
Best Reheating Method
The secret to reheated perfection is a quick blast in a hot oven or a splash of water in the pan to steam the coating. Add a tiny splash of water before reheating, then cover the pan for 5 minutes; the steam will restore moisture without compromising crunch. Finish with a quick drizzle of honey glaze to bring back the glossy finish.