I remember the night I tried to impress my sister with what I thought was a classic chicken pot pie. I tossed a handful of flour into a pan, the scent of butter drifting like a promise, and then—without a second thought—I dropped a cup of cold milk into the mix. The batter thickened into a lumpy, unmanageable mess that clung to the bottom of the skillet like a stubborn stain. My kitchen smelled of burnt dreams and my oven clock chimed a mocking 12:07. I stared at the chaos, realizing I had just created the most disastrous “pot pie” the world had ever seen.
The next morning, I was on a mission. I craved comfort, the kind that wraps you like a warm blanket, but I also wanted something that would make my taste buds do the happy dance. A friend dared me to whip up a version that would not only rescue the day but also earn a standing ovation at dinner parties. I set a timer, grabbed a bag of pre‑shredded chicken, and promised myself this time would be different. The kitchen lights hummed, the air was thick with anticipation, and I could almost taste the victory.
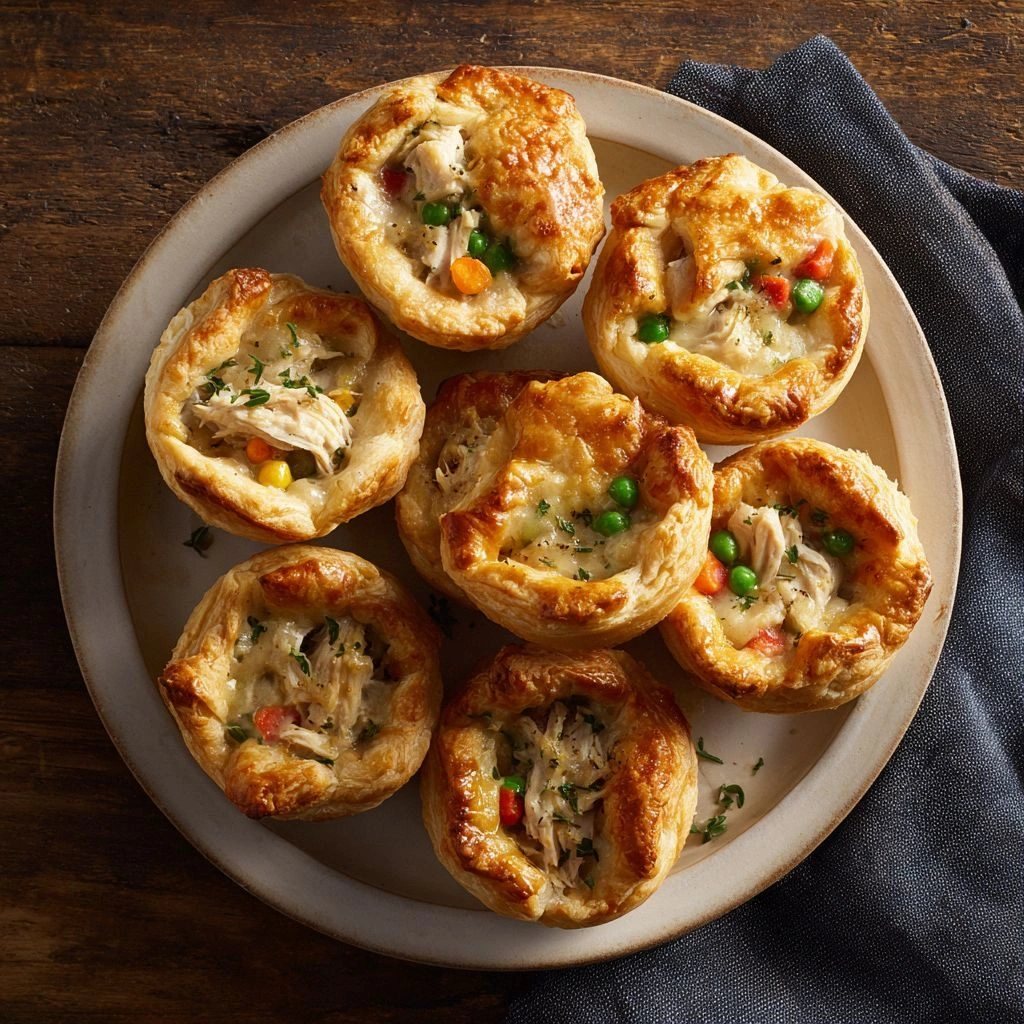
What makes this version stand out is not just the recipe—it’s the philosophy behind it. I stripped away the fluff, kept the crust flaky, and let the filling sing with herbs that dance in the air. The result is a mini pot pie that feels like a hug, with a golden, buttery exterior that cracks with a satisfying snap, and a savory, velvety center that melts on the tongue. I dare you to taste this and not go back for seconds, because once you do, the craving will be a distant memory. This is hands down the best version you'll ever make at home, and I’m here to show you how.
Picture yourself pulling these golden treasures from the oven, the whole kitchen smelling incredible, the aroma drifting down the hallway and into your guests’ noses. Imagine the first bite, the crust breaking like a brittle shell, revealing a steaming, herb‑laden filling that coats your palate like velvet. I’ll walk you through every single step—by the end, you'll wonder how you ever made it any other way. And if you’re skeptical, I’ve got the proof: the first batch was a culinary triumph that left my family begging for more.
What Makes This Version Stand Out
- Flavor: The blend of thyme, oregano, and a whisper of paprika elevates the chicken to new heights, creating a savory depth that lingers long after the last bite.
- Texture: The crust is flaky and buttery, with a golden crust that cracks crisply, while the filling remains silky and moist.
- Ease: All the ingredients are pantry staples; no need to hunt for exotic items, making it a quick, no‑fuss dinner.
- Portability: These bite‑sized pies are perfect for potlucks, game nights, or a lunchbox for the office.
- Make‑ahead: Assemble the filling in advance, keep the crust cold, and bake just before serving for maximum freshness.
- Versatility: Swap out the chicken for turkey or even a hearty mushroom blend for a vegetarian twist.
- Presentation: The mini size allows for a stunning display on a platter, making your table look like a culinary gallery.
- Nutrition: Balanced macros with protein, carbs, and healthy fats—satisfying without guilt.
Inside the Ingredient List
The Flavor Base
All-purpose flour is the backbone of the crust; it provides structure and a neutral canvas for the butter’s richness. If you’re aiming for a lighter bite, consider substituting half the flour with whole wheat for added fiber and a nutty undertone. Skipping the flour will result in a soggy, unstructured crust that won’t hold the filling.
The Texture Crew
Cold unsalted butter, diced into cubes, creates steam pockets that puff the dough into a flaky masterpiece. A pinch of salt balances the butter’s sweetness, while black pepper adds a subtle heat that wakes up the filling. If you’re in a hurry, melted butter can replace cold butter, but you’ll lose that delightful flakiness.
The Unexpected Star
Whole milk and chicken broth combine to form a silky sauce that coats the vegetables and chicken. The broth infuses the filling with savory depth; a homemade version would elevate the dish further. If dairy is an issue, use a plant‑based milk or broth to keep the dish cruelty‑free.
The Final Flourish
Shredded cheddar adds a creamy, tangy note that balances the herbs. A splash of Dijon mustard brings a bright, sharp contrast, while a dash of Worcestershire sauce deepens the umami profile. Skipping these will leave the pie bland and forgettable.
Everything's prepped? Good. Let's get into the real action.
The Method — Step by Step
- Combine the flour, cold butter, salt, pepper, thyme, oregano, and a pinch of paprika in a large bowl. Using a pastry cutter or your fingertips, work the butter into the flour until the mixture resembles coarse crumbs. This step is crucial; if you rush it, the crust will be dense.
- Add the milk and chicken broth gradually, stirring until a soft dough forms. The liquid should coat the flour but not make it sticky. The dough should be pliable enough to roll out without tearing.
- Wrap the dough in plastic wrap and refrigerate for 30 minutes. Chilling solidifies the butter, ensuring a flaky crust when baked. If you’re short on time, you can use the dough immediately, but the result will be less tender.
- While the dough chills, heat a skillet over medium heat and sauté the diced onion until translucent. Add the minced garlic and cook for another minute, letting the aroma fill the kitchen. This step builds a savory foundation for the filling.
- Introduce the shredded chicken and frozen mixed vegetables to the skillet, stirring until the veggies thaw and the chicken warms through. Pour in the chicken broth, bring to a gentle simmer, and let the mixture reduce slightly. This concentrates the flavors and thickens the sauce.
- Stir in the cheddar cheese, Dijon mustard, and Worcestershire sauce until the cheese melts completely. The mixture should be smooth and slightly glossy. This is the moment where the flavors unite.
- Turn off the heat and let the filling cool slightly before portioning. If you’re impatient, a quick dip in the fridge will reduce the cooling time. The filling should be warm enough to melt the cheese but not hot enough to burn the dough.
- Roll the chilled dough on a lightly floured surface into a thin sheet. Cut out circles slightly larger than the muffin tin cups using a biscuit cutter or a glass. The dough should be thin enough to bake quickly but sturdy enough to hold the filling.
- Line each cup of a muffin tin with the dough, pressing it into the corners. Fill each cup about two‑thirds full with the prepared chicken mixture. The filling should sit just below the crust to prevent overflow.
- Top each pie with a final piece of dough, sealing the edges by pinching them together. Brush the tops with the remaining beaten egg for a golden finish. If you like a crisp crust, sprinkle a tiny pinch of sesame seeds before baking.
- Bake at 375°F (190°C) for 20–25 minutes, or until the crust is golden brown and the filling is bubbling. The aroma will fill the kitchen, making it impossible to resist. Keep an eye on the crust; if it browns too quickly, tent it with foil.
- Remove the pies from the oven and let them cool for 5 minutes before serving. The filling will set, making them easier to handle. Plate them on a warm platter and serve immediately for the best experience.
That's it — you did it. But hold on, I've got a few more tricks that'll take this to another level. The secret lies in the small details, and I’m about to spill them.
Insider Tricks for Flawless Results
The Temperature Rule Nobody Follows
Many bakers bake at 400°F, but that high heat can burn the crust before the filling cooks. I’ve found 375°F strikes the perfect balance, giving the crust a crisp edge while keeping the interior moist. If you’re using a convection oven, reduce the temperature by 25°F to avoid over‑browning.
Why Your Nose Knows Best
When the dough starts to puff and the butter’s aroma rises, you’re halfway there. That scent signals the steam pockets forming, which will give you that flaky texture. Trust your nose; it’s the most reliable indicator of progress.
The 5-Minute Rest That Changes Everything
After baking, let the pies sit for exactly five minutes. This pause allows the filling to set, preventing it from oozing onto your plate. It also lets the crust finish baking in the residual heat, giving it a perfect golden finish.
Don’t Skip the Egg Wash
Even a thin brush of beaten egg on the crust before baking turns a dull pie into a golden masterpiece. The egg creates a shiny, caramelized surface that makes the pies irresistible. If you’re vegan, a splash of plant milk works wonders.
Use Fresh Herbs for a Burst of Color
Adding a handful of fresh parsley or chives right before serving adds a pop of color and a fresh bite. The herbs elevate the dish from comforting to celebratory. Sprinkle them over the top for an instant upgrade.
Make the Dough in Advance
The dough can be made up to 24 hours ahead and stored in the fridge. This not only saves time on the day of cooking but also improves the dough’s flavor profile as the ingredients meld. Just give it a quick roll before baking.
Keep the Filling Warm
If you’re making the pies ahead, keep the filling warm on a low burner until you’re ready to assemble. This prevents the cheese from hardening and keeps the mixture silky. A small saucepan on the stove is all you need.
Creative Twists and Variations
Smoky Chipotle Chicken
Swap the regular chicken for shredded rotisserie chicken and add a teaspoon of chipotle powder. The smoky heat pairs beautifully with the creamy filling, creating a flavor profile that’s both comforting and adventurous. Perfect for a crowd that loves a kick.
Spinach & Feta Delight
Replace the mixed vegetables with fresh spinach and fold in crumbled feta. The spinach adds earthiness while the feta introduces a tangy, salty contrast. This version is a hit with Mediterranean lovers.
Butternut Squash & Sage
Use diced butternut squash instead of carrots and add a pinch of fresh sage. The natural sweetness of the squash balances the savory herbs, creating a fall‑in‑love flavor. Ideal for a cozy autumn gathering.
Italian Sausage & Gnocchi
Add sliced Italian sausage and small gnocchi pieces to the filling. The sausage brings richness, while the gnocchi adds a comforting, pillowy texture. This hearty version feels like a full meal in miniature form.
Vegetarian Mushroom & Barley
Replace the chicken with sautéed mushrooms and cooked barley. The earthy mushrooms and chewy barley create a satisfying, protein‑rich vegetarian option. This twist is both wholesome and flavorful.
Asian-Inspired with Ginger
Infuse the broth with grated ginger and a splash of soy sauce, then stir in diced bok choy. The ginger adds a bright, zesty note that complements the savory filling. Serve with a drizzle of sesame oil for an extra layer of depth.
Storing and Bringing It Back to Life
Fridge Storage
Store the baked pies in an airtight container for up to 3 days in the refrigerator. Keep them in a single layer to avoid crushing. When ready to serve, reheat in the oven at 350°F (175°C) for 10 minutes.
Freezer Friendly
Freeze the unbaked dough and filling separately in freezer‑safe bags. They’ll keep for up to 2 months. To bake, thaw the dough in the fridge overnight and assemble as usual.
Best Reheating Method
Reheat the pies in a preheated oven at 375°F (190°C) for 8–10 minutes. Add a splash of water to the bottom of the pan to create steam, preserving moisture. The crust will regain its crispness, and the filling will stay silky.
If you’re in a rush, microwave for 30 seconds, but be aware that the crust may become soggy. A quick oven finish is the best way to maintain the texture. Enjoy the comforting aroma that fills your home again.
Now that you have the complete guide, it’s time to turn these mini pies into a culinary triumph. The process is straightforward, the flavors are bold, and the results are unforgettable. I’ve spent countless evenings perfecting this recipe, and the final product always earns rave reviews. Trust me, you’ll want to keep a stash of these on hand for any occasion.
Remember, the secret is in the details—flavor balance, crust quality, and timing. Keep your kitchen organized, follow the steps closely, and you’ll be rewarded with a dish that feels like a warm hug. The aroma alone will bring smiles, and the taste will keep people coming back for seconds. Enjoy the journey, and let your kitchen become a place of comfort and creativity.
If you’re looking to impress at a dinner party or simply indulge in a cozy night in, these mini chicken pot pies are the answer. They’re easy to make, crowd‑pleasing, and versatile enough to adapt to any dietary preference. Let the flavors unfold and watch your guests marvel at your culinary prowess.
I’m excited to hear how these turn out for you. Share your photos, tweaks, and stories in the comments below. Let’s keep the conversation going and inspire each other to create even more delicious dishes.
Happy cooking, and may every bite bring comfort and joy to your table.