I was in the middle of a frantic Friday night, juggling a half‑finished spreadsheet and a craving that had been gnawing at me all day. I opened the fridge, stared at a lonely carton of fresh oysters, and thought, “If I don’t do something with these, they’ll end up as a sad, salty snack on the counter.” That moment of culinary desperation turned into a dare: could I create a West Coast‑inspired oyster dish that would make even the most skeptical seafood skeptic swoon? I tossed a splash of miso, a dollop of Japanese mayo, and a handful of spinach onto the table, and the kitchen instantly transformed into a bustling Japanese‑American fusion lab.
The first thing that hit me was the aroma—an umami‑rich perfume that seemed to wrap the whole house in a warm, salty hug. The oysters themselves glistened like tiny pearls, their shells reflecting the kitchen light while the miso‑maiden sauce bubbled gently, turning a buttery gold at the edges. I could hear the faint crackle of the broiler, a sound that promised a crispy finish, and I felt the cool metal of the baking sheet under my fingertips, a reassuring weight that told me this was going to be serious business. When the first bite hit my tongue, the briny ocean met a silky, slightly sweet miso glaze, and a whisper of lemon cut through the richness like a cool breeze off the Pacific.
Most oyster recipes I’ve tried either drown the delicate flavor in butter or over‑complicate things with too many steps. This version, however, embraces the natural brine and simply amplifies it with a few bold, well‑chosen accents. The Japanese mayo adds a luxurious creaminess that coats the oyster like velvet, while the miso and mirin bring a depth that feels almost buttery without the heaviness. The spinach and cheese melt together into a green‑gold blanket that holds everything in place, and a dash of hot sauce adds just enough heat to make your taste buds sit up and take notice.
And now for the twist you didn’t see coming: a quick flash‑broil at the end that gives the top a caramelized, almost caramel‑popcorn crunch. I dare you to taste this and not go back for seconds. Let me walk you through every single step — by the end, you’ll wonder how you ever made it any other way.
What Makes This Version Stand Out
- Umami Explosion: The miso paste and Japanese mayo create a depth that transforms the oyster from a simple sea snack into a flavor powerhouse.
- Texture Contrast: Creamy interior meets a crisp, caramelized top, delivering a bite that’s both tender and satisfyingly crunchy.
- Simplicity: Fewer than ten ingredients and a single pan mean you can pull this off even after a long day at work.
- West Coast Vibe: Fresh Pacific oysters paired with a Japanese twist capture the breezy, innovative spirit of the West Coast culinary scene.
- Crowd‑Pleaser: Serve these at a party and watch the line form—people will be fighting for the last wedge of lemon.
- Ingredient Quality: Using fresh, sustainably sourced oysters and authentic Japanese mayo makes every bite sing.
- Quick Finish: The final broil takes only two minutes, giving you that restaurant‑style finish without the wait.
- Make‑Ahead Friendly: You can prep the topping ahead of time and pop it in the oven when guests arrive.
Inside the Ingredient List
The Flavor Base
Japanese mayonnaise is the secret hero here. Its subtle tang and buttery texture coat the oysters like a silk scarf, ensuring every bite feels luxuriously smooth. If you skip it, you’ll lose that creamy backbone, and the miso will sit too sharply against the brine. Look for a mayo that lists rice vinegar and egg yolk—those give it that authentic Japanese tang.
Miso paste, the umami king, adds a deep, fermented richness that pairs perfectly with the oceanic taste of the oysters. A light miso (like white or yellow) keeps the flavor bright, while a darker miso would dominate and mask the delicate sea notes. I recommend a 2‑tablespoon amount for a balanced punch; any more and you’ll start feeling like you’re eating a miso soup bowl.
The Texture Crew
Fresh spinach isn’t just a garnish—it’s the green that adds a slight bite and a pop of color that makes the dish look as good as it tastes. When wilted, it releases a gentle earthiness that rounds out the salty oyster. If you can’t find fresh spinach, baby kale works, but the flavor will be a bit more bitter.
Cheddar or Mozzarella cheese provides the melty, golden crust that turns the topping into a caramelized blanket. Cheddar brings a sharper bite, while mozzarella offers a milder, stretchier melt. Either works, but I lean toward a mild cheddar for that subtle tang that doesn’t overpower the miso.
The Unexpected Star
A splash of mirin adds a whisper of sweetness that balances the salt and heat, turning the glaze into a glossy, almost caramel‑like sheen. If you don’t have mirin, a teaspoon of honey diluted in a tablespoon of water does the trick, though the flavor will be slightly different.
Five dashes of hot sauce give a gentle heat that wakes up the palate without stealing the spotlight. Choose a sauce you love—Sriracha, a Korean gochujang, or a simple chili oil. The key is to keep it modest; you want the oyster’s natural brine to still shine.
The Final Flourish
Fresh lemon juice and extra lemon wedges add that bright citrus snap that cuts through the richness, much like a fresh sea breeze on a hot day. If you’re allergic to citrus, a splash of rice vinegar can mimic the acidity without the flavor shift.
A pinch of parsley and a dusting of paprika aren’t just for color; parsley adds a herbaceous freshness, while paprika contributes a subtle smoky undertone. Feel free to swap paprika for smoked salt if you want a deeper smoky flavor.
Everything's prepped? Good. Let's get into the real action...
The Method — Step by Step
Preheat your broiler to high and line a baking sheet with a sturdy metal rack. This setup ensures the heat circulates evenly around each oyster, preventing any soggy bottoms. Place the oysters on the rack, shell side down, and give them a quick rinse under cold water to remove any grit. Pat them dry with a paper towel; the drier they are, the better the crust will form.
Kitchen Hack: If you don’t have a rack, create a makeshift one with a crumpled piece of foil shaped into a shallow bowl; it lifts the oysters just enough for airflow.In a medium bowl, combine the Japanese mayonnaise, miso paste, mirin, hot sauce, and fresh lemon juice. Whisk vigorously until the mixture is smooth and glossy—think of it as a luxurious, thickened glaze that will cling to the oysters like a second skin. Taste and adjust the heat; this is your moment to be bold—add another dash of hot sauce if you like a kick.
Gently fold in the fresh spinach, letting it wilt just enough to become pliable but still retain its vibrant green hue. The spinach will shrink dramatically, so don’t be surprised when the bowl looks almost empty. This step is where the dish gets its subtle earthiness, balancing the briny oyster and salty miso.
Sprinkle the cheese over the spinach mixture, then fold everything together until you have a cohesive, slightly chunky topping. The cheese will melt into the spinach, creating little pockets of gooey goodness that will caramelize under the broiler. If you’re using cheddar, the sharpness will mingle with the miso for a delightful contrast.
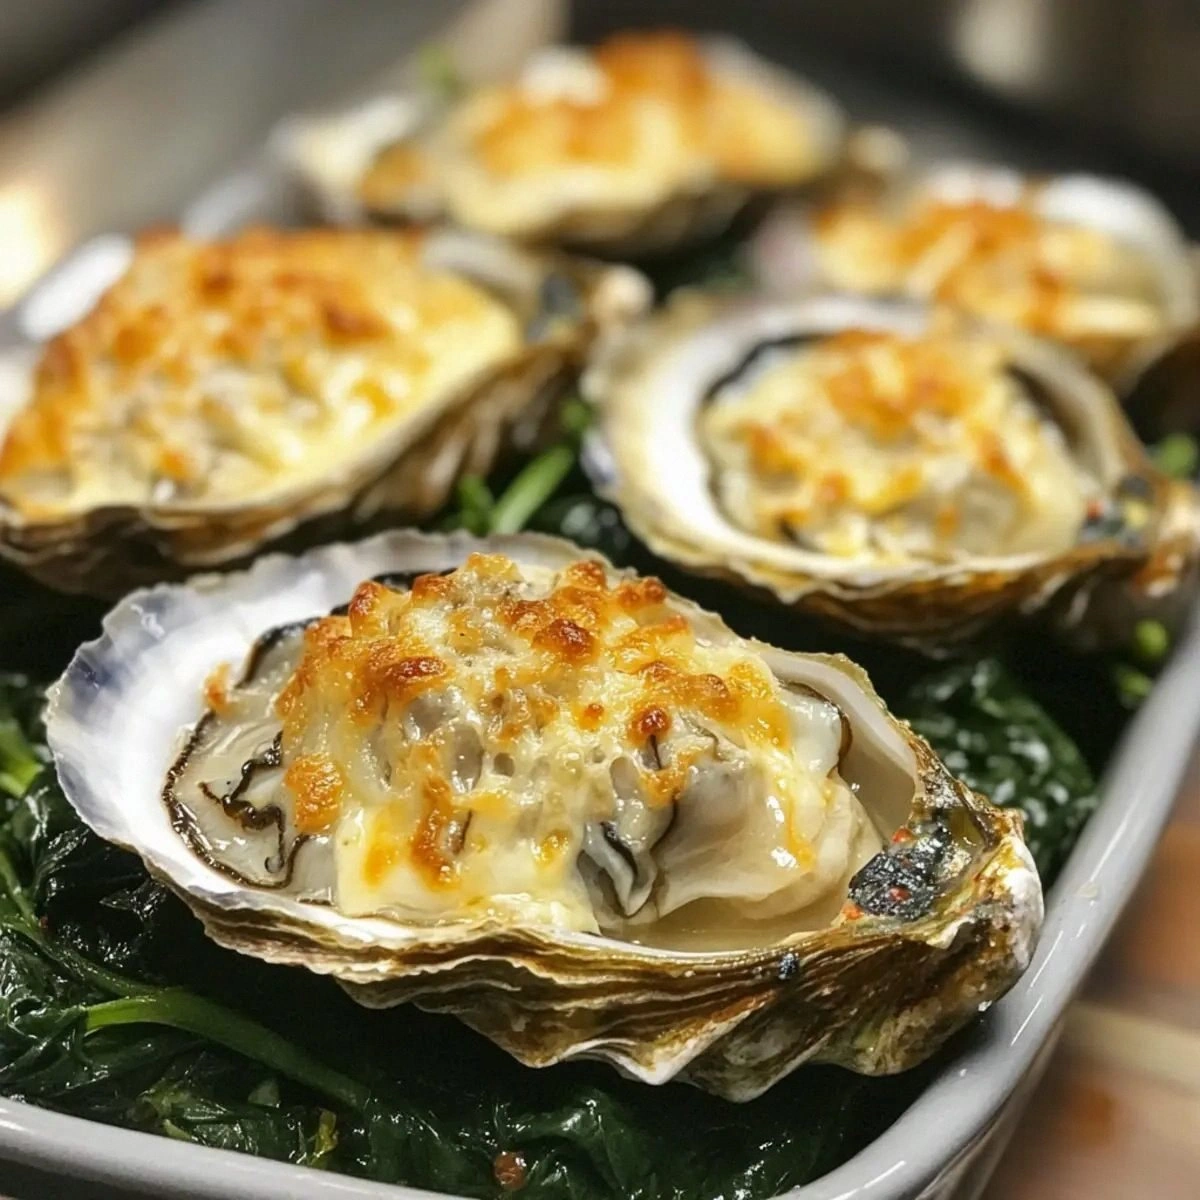
Spoon a generous dollop of the miso‑maiden topping onto each oyster, making sure the sauce reaches the edges of the shell. The goal is to cover the oyster fully but leave a tiny gap at the top so the broth can escape without flooding the oven. This is the moment where the flavors start to marry—watch the sauce settle like a glossy blanket.
Watch Out: Over‑filling the oysters can cause the sauce to spill over and burn on the rack, so keep each dollop to about a tablespoon.Slide the baking sheet under the broiler and watch closely. In just 90 seconds to 2 minutes, the cheese will melt, the edges will turn golden, and the miso glaze will develop a caramelized crust that smells like toasted sesame. The visual cue? Tiny bubbles forming and the top beginning to pull away from the shell—this is the sign you’re about to achieve that coveted crunch.
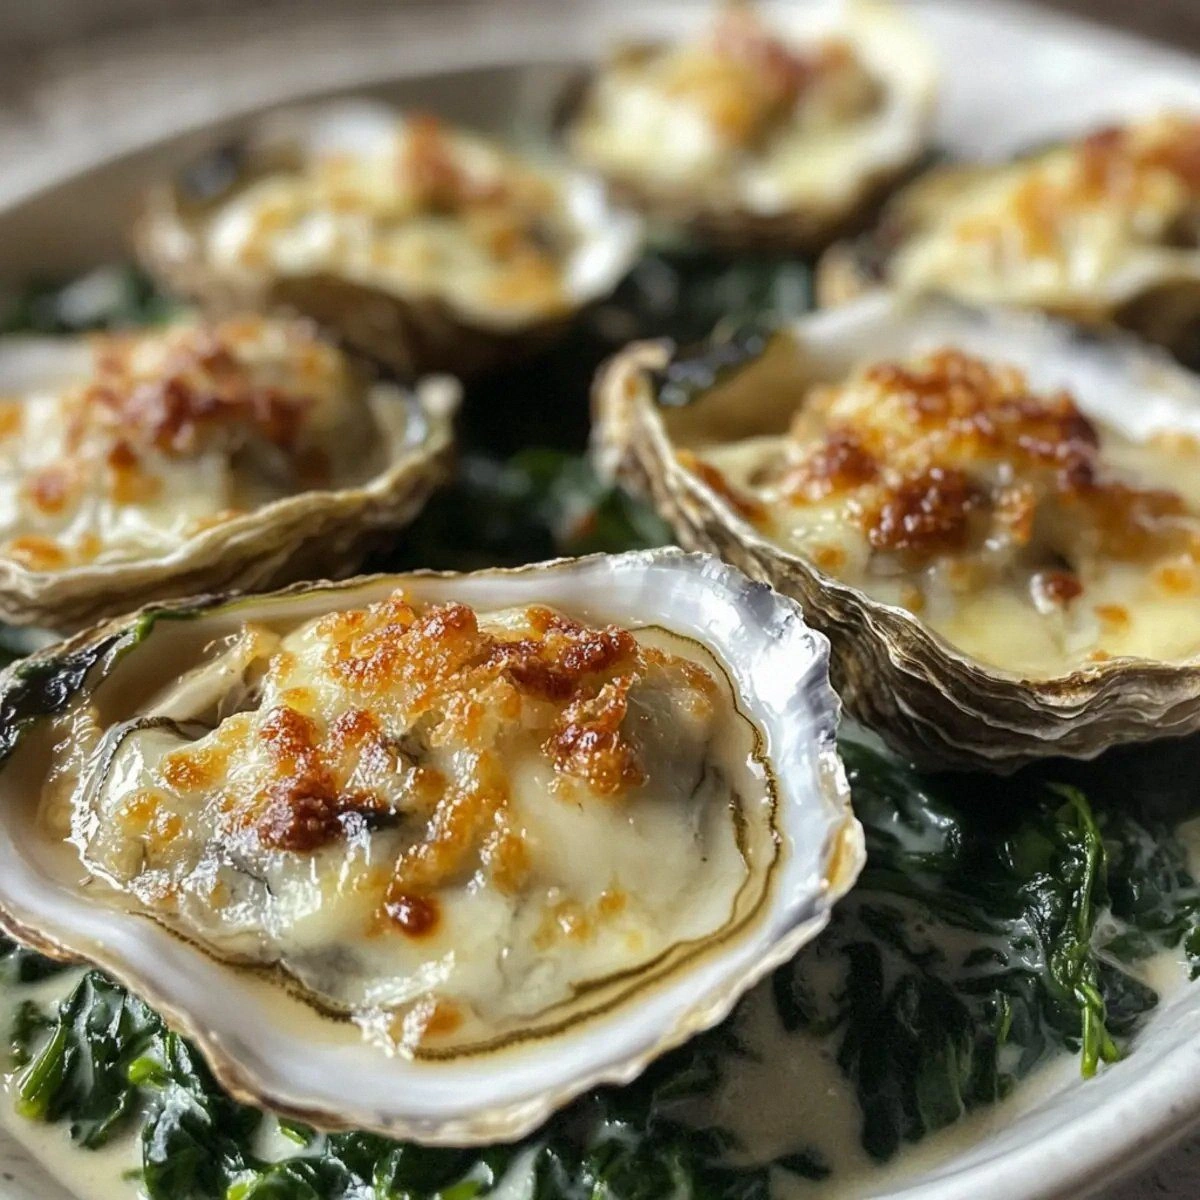
Once the crust is a deep amber, remove the sheet and let the oysters rest for a minute. This brief rest lets the heat settle, preventing the sauce from seeping out when you pick them up. Sprinkle a pinch of paprika over each oyster for a pop of color and a whisper of smokiness.
Finish with a final flourish: a drizzle of fresh lemon juice, a few extra lemon wedges on the side, and a scattering of chopped parsley. The citrus brightens the whole dish, while the parsley adds a fresh herbaceous note that lifts the richness.
Serve immediately, still warm, and watch your guests’ eyes widen as they take that first bite. That sizzle when it hits the pan? Absolute perfection. And now the fun part—pair with a crisp, chilled Sauvignon Blanc or a light Japanese lager, and you’ve got a West Coast soirée that feels both upscale and down‑to‑earth.
Insider Tricks for Flawless Results
The Temperature Rule Nobody Follows
Never start with a cold oven; preheat your broiler at least 10 minutes before the oysters go in. The high heat shock creates that instant caramelization on the cheese and miso. I once tried a “slow‑bake” method and ended up with soggy tops—lesson learned. Keep the broiler screaming hot and you’ll get that perfect crust every time.
Why Your Nose Knows Best
Your sense of smell is the secret timer. When the aroma shifts from buttery to nutty and a hint of toasted sesame appears, you’re at the golden moment. Trust that nose cue more than the clock; ovens can vary by a few degrees, and the scent won’t lie.
The 5‑Minute Rest That Changes Everything
After broiling, let the oysters sit for exactly five minutes before serving. This short rest allows the interior heat to redistribute, preventing the sauce from spilling out when you pick them up. It also lets the cheese set just enough to stay on the oyster when you bite, rather than sliding off.
The “Shell‑First” Flip
If you’re daring enough, give the oysters a quick flip—shell side up, then back down—right before the final broil. This creates a tiny “sear” on the shell that adds a surprising crunch. I tried it once and my friends thought I’d added a secret ingredient. It’s optional, but it’s a fun trick to impress.
The Citrus Balance Act
Never drizzle lemon juice directly onto the hot oysters; instead, wait until they’re off the heat. The acid will otherwise “cook” the delicate flesh, making it rubbery. A light squeeze right before serving keeps the brightness without compromising texture.
Creative Twists and Variations
This recipe is a playground. Here are some of my favorite ways to switch things up:
Spicy Sriracha Inferno
Swap the hot sauce for a generous drizzle of Sriracha and add a teaspoon of toasted sesame oil to the topping. The result is a fiery, nutty bite that will make heat‑lovers cheer.
Garlic‑Butter Bliss
Melt a tablespoon of butter with minced garlic and stir it into the miso‑maiden mixture. The garlic adds a fragrant depth, while the butter enriches the sauce, turning it into a luxurious glaze.
Asian‑Style Panko Crunch
Before broiling, sprinkle a thin layer of panko breadcrumbs mixed with a dash of soy sauce over each oyster. The panko turns golden and ultra‑crunchy, adding a textural surprise that pairs beautifully with the soft interior.
Herbaceous Basil Burst
Finely chop fresh basil and fold it into the spinach‑cheese mixture. Basil’s sweet, peppery notes lift the dish into a fresh, summer‑ready version that pairs well with a light rosé.
Vegan Friendly
Replace the Japanese mayo with a vegan mayo, use miso that’s free of animal products, and swap the cheese for a dairy‑free meltable cheese. The flavor profile stays intact, and you’ll have a plant‑based version that still dazzles.
Storing and Bringing It Back to Life
Fridge Storage
Place any leftovers in an airtight container and store them in the refrigerator for up to 2 days. Keep the oysters in a single layer to avoid crushing; a shallow dish works best. Before reheating, let them come to room temperature for 15 minutes.
Freezer Friendly
If you anticipate a larger batch, freeze the prepared oysters (without the topping) on a baking sheet, then transfer to a zip‑lock bag. They’ll keep for up to 3 months. When ready, thaw overnight in the fridge, add fresh topping, and broil as usual.
Best Reheating Method
To revive the crispness, preheat your broiler and place the oysters on a rack. Add a tiny splash of water (about a teaspoon) to the bottom of the pan; the steam helps the oyster warm evenly while the broiler re‑crispes the cheese. In 2‑3 minutes you’ll have a dish that tastes almost fresh‑out‑of‑the‑oven.