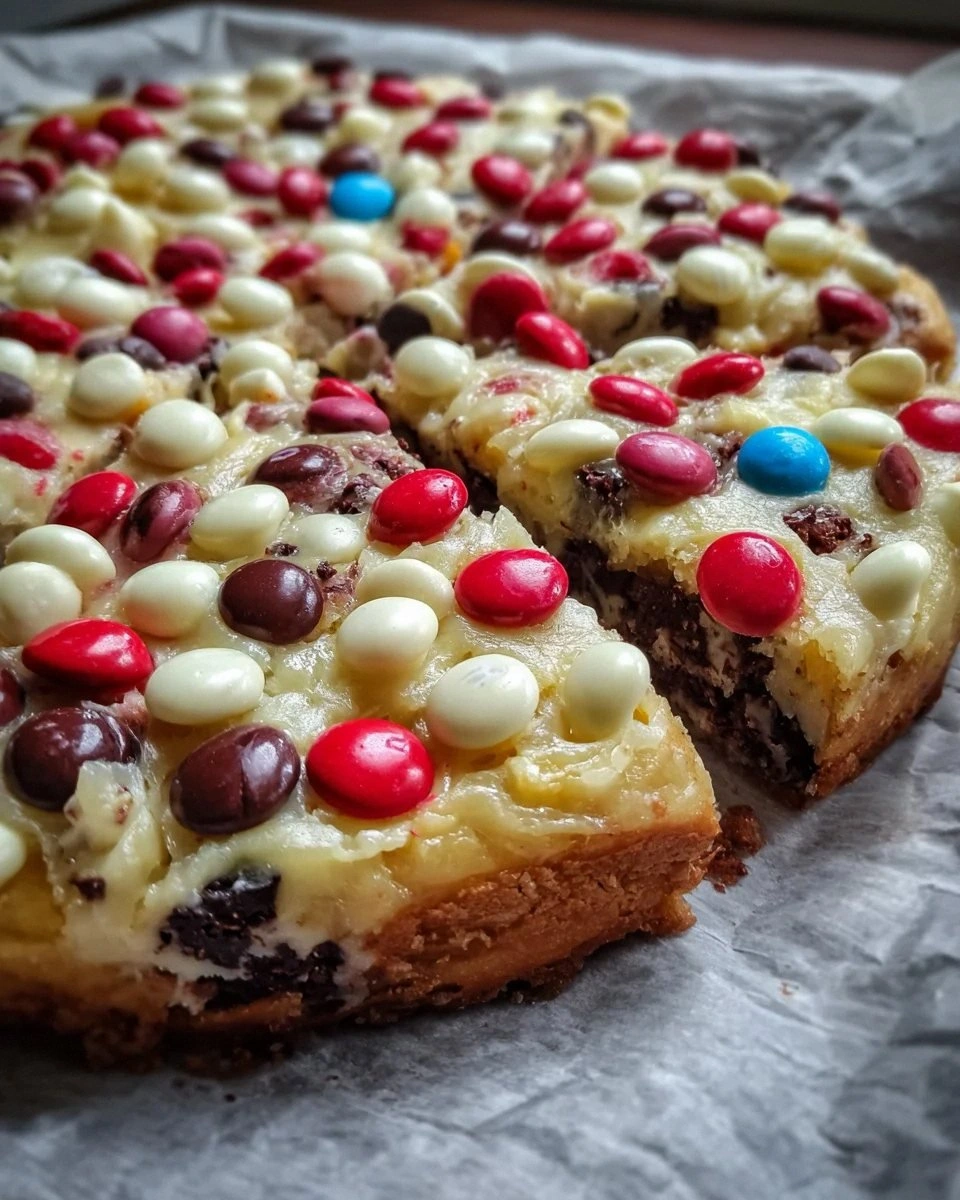
I was in the middle of a Saturday night binge‑watching my favorite sitcom when a sudden craving hit me like a plot twist: I needed something that felt like dessert, but also had the drama of a main course. I raided the pantry, found a half‑melted block of white chocolate, a bag of M&M’s, and a lone pan that had seen better days. The oven was already pre‑heated, the butter was soft, and I thought, “What if I treat a brownie like a pizza?” The idea was half‑joke, half‑mad scientist, and the result turned out to be the most addictive sweet‑savory hybrid I’ve ever made. I dare you to taste this and not go back for seconds.
Picture this: the kitchen fills with the buttery aroma of melted chocolate, the sizzle of sugar caramelizing on the pan, and a faint vanilla perfume that makes you feel like you’re walking through a bakery in Paris. The batter spreads across the pan like a glossy, pale dough, and when it hits the heat, you hear that satisfying pop‑pop‑pop of tiny bubbles racing to the surface. As the edges turn a deep amber, they pull away from the pan with a gentle crack, promising that perfect crisp‑on‑the‑outside, fudgy‑in‑the‑middle texture that only a true brownie can deliver. When you finally pull the “pizza” out, the white chocolate chips melt into glossy pools, and the M&M’s sit like colorful jewels, each bite a burst of crunch and creamy sweetness.
Most brownie‑pizza attempts fall flat because they either over‑mix, turning the batter into a dry cake, or under‑bake, leaving a gummy center that clings to the fork. I’ve tried the “no‑mix” shortcuts, the “add‑oil” hacks, and even the “use‑microwave” shortcuts, and every single one missed the mark. This version, however, balances the chemistry of a classic brownie with the structural confidence of a pizza crust, thanks to a precise butter‑sugar creaming method and a carefully timed bake. The secret? A splash of pure vanilla that adds depth, and a quick chill of the batter before it hits the oven, which locks in that fudgy core while giving the edges a caramelized snap.
Okay, ready for the game‑changer? I’m going to walk you through every single step — from selecting the perfect butter to the final drizzle of melted white chocolate. By the end, you’ll wonder how you ever made any other dessert without this sweet bliss. Stay with me here — this is worth it.
What Makes This Version Stand Out
- Texture: The crust is crisp enough to hold up under a fork, while the center stays molten‑fudgy, creating a contrast that feels like biting into a dessert‑filled dream.
- Flavor Depth: A double‑dose of vanilla and the buttery richness of white chocolate elevate the sweetness without making it cloying.
- Simplicity: Only eight pantry staples are required, and the technique is straightforward enough for a beginner yet refined enough for a seasoned baker.
- Visual Impact: The colorful M&M’s turn the top into a festive mosaic, making it perfect for parties, birthdays, or any excuse to impress.
- Versatility: Serve it warm with a scoop of vanilla ice cream, or let it cool and slice it like a pizza for a portable treat.
- Make‑Ahead Potential: You can bake it a day ahead, store it, and reheat with a splash of water for that fresh‑out‑of‑the‑oven feel.
Inside the Ingredient List
The Flavor Base
Unsalted butter is the silent hero of this recipe. Its high fat content gives the brownie its melt‑in‑your‑mouth richness, and because it’s unsalted, you have full control over the final salt level. If you skimp on butter, you’ll end up with a dry, crumbly crust that feels more like a biscuit than a brownie. For the best flavor, use European‑style butter that contains at least 82% butterfat; it adds a subtle nutty note that pairs beautifully with white chocolate.
Granulated sugar does more than just sweeten; it caramelizes during baking, creating those coveted crispy edges that shatter like thin ice. A coarse sugar would leave a grainy texture, while powdered sugar would dissolve too quickly, preventing that caramel snap. If you’re watching sugar, you can swap half of it for coconut sugar, but expect a slightly darker color and a faint caramel‑like undertone.
The Texture Crew
Large eggs are the binding agents that turn a liquid batter into a cohesive “pizza” dough. Room‑temperature eggs incorporate more easily, giving the batter a glossy sheen and preventing a curdled texture. Skipping the eggs or using only yolks will make the brownie too dense, while using only whites will give it a cake‑like fluffiness that defeats the purpose.
All‑purpose flour provides the necessary structure without making the crumb cakey. The gluten development should be minimal; over‑mixing will toughen the crust. If you’re gluten‑intolerant, a 1‑to‑1 gluten‑free flour blend works fine, though you might lose a touch of chewiness.
The Unexpected Star
White chocolate chips melt into glossy rivers of sweetness, turning each bite into a silky experience. Choose a high‑quality brand that contains real cocoa butter; cheap versions often use vegetable fats, which can result in a waxy mouthfeel. If you love extra decadence, add a tablespoon of heavy cream to the chips before folding them in.
M&M’s are the fun factor. Their candy‑shell crunch contrasts the soft brownie, while the colored coating adds visual excitement. Feel free to swap for peanut‑butter cups, chopped nuts, or even dried cranberries for a tart twist.
The Final Flourish
Fine salt is the quiet enhancer that balances the sweetness and amplifies the buttery notes. Just a pinch—about ½ teaspoon—does the trick. If you’re using sea salt flakes, sprinkle them on top just before baking for a subtle crunch that surprises the palate.
Pure vanilla extract is the aromatic glue that ties all flavors together. A splash (roughly 2 teaspoons) adds warmth and depth, turning a simple sweet into a sophisticated dessert. If you have vanilla bean, split one and scrape the seeds into the batter for an even richer profile.
Everything's prepped? Good. Let’s get into the real action…
The Method — Step by Step
Preheat your oven to 350°F (175°C) and line a 12‑inch cast‑iron skillet with parchment paper, leaving enough overhang to lift the brownie later. The skillet’s heavy walls conduct heat evenly, giving you that coveted crispy edge. As the oven warms, the butter will begin to melt in the next step, and you’ll hear that comforting sizzle that signals good things are coming.
In a medium saucepan, melt 1 cup of unsalted butter over medium heat. Once it’s fully liquid, add 1 cup of granulated sugar and stir continuously for about 2 minutes; the mixture should turn a light amber and give off a fragrant caramel scent. This is the moment of truth: if the sugar starts to smoke, lower the heat—burnt sugar will give the whole pizza a bitter aftertaste.
Remove the pan from heat and let the butter‑sugar mixture cool for about 2 minutes. Then whisk in 2 large eggs, one at a time, making sure each is fully incorporated before adding the next. The batter should look glossy and thick, like a glossy cake batter that clings to the spoon.
Stir in 2 teaspoons of pure vanilla extract, followed by a pinch (½ tsp) of fine salt. This is where the flavor base really starts to sing, and the aroma will fill the kitchen, making your neighbors wonder what you’re cooking.
Sift 1 cup of all‑purpose flour over the batter and gently fold it in with a rubber spatula. Avoid over‑mixing; you want just enough to incorporate the flour, leaving a few streaks for a tender crumb. This next part? Pure magic.
Fold in 1 cup of white chocolate chips and ½ cup of M&M’s, reserving a small handful of M&M’s for topping. The chips will melt into creamy pockets, while the M&M’s stay intact, providing that satisfying crunch.
Pour the batter into the prepared skillet, spreading it evenly with the spatula. Sprinkle the reserved M&M’s on top, pressing them lightly so they stick. The batter should be about ½‑inch thick; if it’s too thick, the center may stay under‑cooked.
Watch Out: Place the skillet on the middle rack of the oven. If you position it too low, the bottom will burn before the top sets; too high, and the top will dry out. Bake for 25‑30 minutes, or until the edges pull away and a toothpick inserted near the center comes out with just a few moist crumbs.
When the timer dings, turn off the oven and let the brownie pizza sit inside for 5 minutes. This gentle carry‑over cooking finishes the center without over‑drying the edges. Then, using the parchment overhang, lift the brownie out onto a cutting board.
While it’s still warm, drizzle an extra handful of melted white chocolate over the top for a glossy finish, and sprinkle a pinch of flaky sea salt if you like that sweet‑salty contrast. Slice into generous wedges—think pizza slices—and serve immediately, perhaps with a scoop of vanilla ice cream or a drizzle of raspberry coulis.
Insider Tricks for Flawless Results
The Temperature Rule Nobody Follows
Never bake a brownie at a temperature lower than 350°F. Lower temps give the batter more time to spread, resulting in a thin, cakey texture. By keeping the oven hot, the batter sets quickly, preserving that coveted fudgy center while the edges caramelize beautifully. I once tried 325°F on a whim and ended up with a soggy mess that stuck to the pan.
Why Your Nose Knows Best
Your sense of smell is a more reliable indicator than a timer. When the edges start to smell like toasted marshmallows and the top releases a buttery, caramel perfume, you’re within a minute of perfection. If you’re unsure, open the oven a crack and let the aroma guide you.
The 5‑Minute Rest That Changes Everything
Allowing the brownie to rest for five minutes after baking lets the steam redistribute, preventing a dry crust. During this brief pause, the interior continues to set, making slicing cleaner and reducing crumbly fallout. Skipping this step is the reason many people end up with shattered pieces.
Melt‑In‑Your‑Mouth White Chocolate
If you love an extra glossy finish, melt an additional ¼ cup of white chocolate with a teaspoon of butter over a double boiler. The butter adds shine and a silkier mouthfeel. Drizzle it in a lazy swirl right before serving for that restaurant‑quality look.
The “Cool‑Then‑Warm” Slice Hack
For the cleanest slices, let the brownie cool completely, then pop it back in a 200°F oven for 5 minutes before cutting. The brief reheating firms the crust without drying the center, giving you neat wedges that hold together.
Creative Twists and Variations
This recipe is a playground. Here are some of my favorite ways to switch things up:
Nutty Crunch Pizza
Swap half of the M&M’s for toasted pecans or hazelnuts. The nutty oil adds a subtle earthiness that balances the sweet white chocolate, and the extra crunch makes each bite feel like a surprise.
Berry Bliss Version
Fold in a cup of fresh raspberries or blueberries before baking. The berries burst during baking, creating pockets of tartness that cut through the richness, perfect for a summer gathering.
Coffee‑Infused Delight
Add 1 tablespoon of instant espresso powder to the batter and replace half the white chocolate chips with dark chocolate chips. The coffee deepens the flavor profile, turning the dessert into an after‑dinner treat for caffeine lovers.
Salted Caramel Swirl
Swirl in ¼ cup of store‑bought salted caramel sauce just before baking. The caramel pools create ribbons of gooey goodness that contrast the white chocolate, and a sprinkle of flaky sea salt on top amplifies the sweet‑salty magic.
Vegan Dream
Replace butter with coconut oil, use flax‑egg (1 tbsp ground flaxseed + 3 tbsp water per egg), and choose dairy‑free white chocolate chips. The texture remains indulgent, and the flavor stays true to the original.
Storing and Bringing It Back to Life
Fridge Storage
Allow the brownie pizza to cool completely, then wrap it tightly in plastic wrap or store in an airtight container. It will stay fresh for up to 4 days. When you’re ready to serve, reheat a slice in the microwave for 20‑30 seconds, or warm the whole pan in a 300°F oven for 10 minutes.
Freezer Friendly
Slice the cooled brownie into wedges, place a sheet of parchment between each slice, and freeze on a tray for 1 hour. Transfer the frozen slices to a zip‑top bag; they’ll keep for up to 2 months. To revive, let a slice thaw at room temperature for 10 minutes, then microwave for 15 seconds or bake at 325°F for 8 minutes.
Best Reheating Method
Add a tiny splash (about 1 tablespoon) of water to the pan before reheating in the oven; the steam restores moisture, making the crust crisp again while the interior becomes fudgy once more. This trick works whether you’re reheating a single slice or the whole pizza.