I was standing in my kitchen, staring at a half‑finished batch of brownies that had turned into a sad, crumbly mess, when my roommate dared me to create something that would make even the most skeptical sweet‑tooth believers weep with joy. The air was thick with the burnt‑sugar scent of failure, and I could hear the clock ticking like a metronome reminding me that my snack cravings were getting louder by the second. I grabbed a jar of maraschino cherries, a tub of condensed milk, and a bag of shredded coconut, thinking, “What if I combine the chewy goodness of a bar with the bright pop of cherries?” That moment sparked a wild idea that has since become my go‑to indulgence.
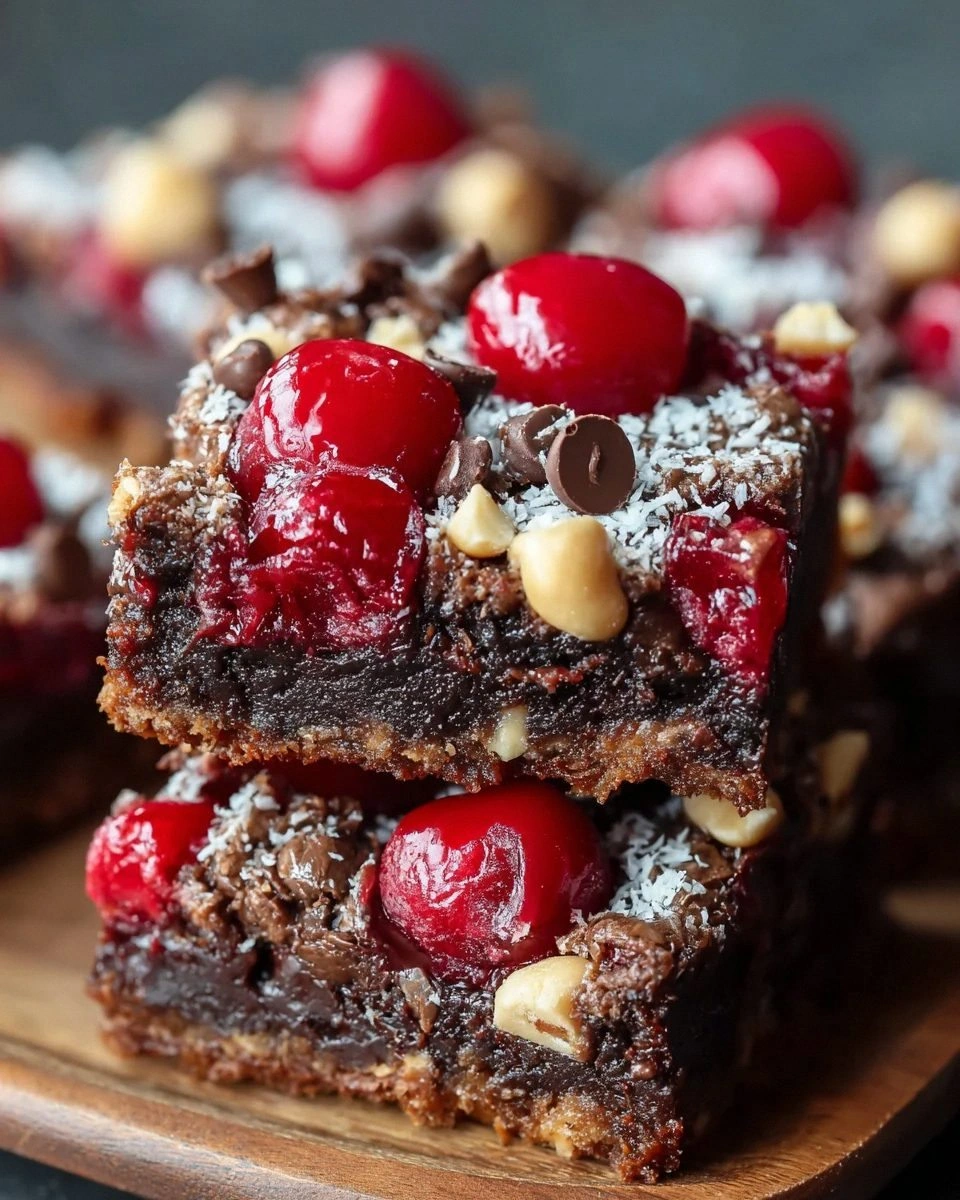
Picture yourself pulling a pan of glossy, chocolate‑kissed bars out of the oven, the whole kitchen smelling like a cozy café on a rainy day. The surface glistens with melted chocolate chips, while the interior is a soft, almost fudgy tapestry dotted with plump, ruby‑red cherries that burst with a sweet‑tart surprise in every bite. You hear the faint crackle as the bars settle, a sound that promises a perfect balance between a crisp edge and a melt‑in‑your‑mouth center. The aroma alone could convince a skeptical friend to abandon their diet for a few minutes, and I dare you to taste this and not go back for seconds.
Most recipes for chocolate‑cherry bars either drown the fruit in chocolate or forget the crucial texture that makes a bar feel like a decadent hug. I’ve tried the “quick fix” versions that use canned pie filling and end up soggy, and the “over‑the‑top” versions that drown everything in a sea of butter. This is hands down the best version you’ll ever make at home because it respects each component: the cocoa gives depth, the coconut adds a subtle tropical whisper, and the peanuts provide that satisfying crunch that makes you say, “Wow, this is a masterpiece!” I’m being honest — I ate half the batch before anyone else got a chance to try it.
Okay, ready for the game‑changer? The secret isn’t a hidden spice or a fancy kitchen gadget; it’s the inclusion of sweetened condensed milk, which locks in moisture and creates a luscious, caramel‑kissed crumb that stays soft for days. And there’s a tiny twist that most bakers overlook: a pinch of baking powder, just enough to give the bars a feather‑light lift without turning them into a cake. Let me walk you through every single step — by the end, you’ll wonder how you ever made it any other way.
What Makes This Version Stand Out
- Flavor Fusion: The marriage of rich cocoa, sweet cherries, and buttery condensed milk creates a taste that feels both nostalgic and brand‑new, like discovering your favorite song in a new key.
- Texture Symphony: You get a chewy, fudgy interior, a crisp edge that shatters like thin ice, and a crunchy surprise from peanuts and coconut that keeps every bite interesting.
- Simplicity: Only twelve pantry staples are needed, and the method uses one‑pan baking, meaning fewer dishes and more time to admire your creation.
- Unique Ingredient: Sweetened condensed milk is the unsung hero, delivering moisture and a caramel‑like richness that typical sugar‑only recipes miss.
- Crowd Reaction: These bars have a reputation for clearing plates in seconds; I’ve watched strangers line up for a second serving before the first bite even hits the table.
- Ingredient Quality: Using high‑quality cocoa powder and semi‑sweet chocolate chips ensures a deep, authentic chocolate flavor without bitterness.
- Cooking Method: Baking at a moderate temperature creates a uniform crumb while allowing the cherries to stay juicy, avoiding the dreaded soggy middle.
- Make‑Ahead Potential: Store them in an airtight container, and they stay fresh for up to a week, making them perfect for meal‑prep or a quick dessert.
Inside the Ingredient List
The Flavor Base
Granulated sugar is the backbone of sweetness, but it also plays a crucial role in tenderizing the crumb by breaking down the gluten in the flour. If you skimp on sugar, the bars will feel dry and lack that glossy finish that makes them look bakery‑worthy. You can swap white sugar for coconut sugar for a subtle caramel note, but be prepared for a slightly darker color.
All‑purpose flour provides structure; without enough flour, the bars would spread into a flat, cookie‑like sheet. I always sift the flour with the cocoa powder to avoid clumps and to ensure a light, airy batter. For a gluten‑free version, use a 1‑to‑1 gluten‑free flour blend, but add a teaspoon of xanthan gum to mimic the elasticity of wheat.
Unsweetened cocoa powder is where the deep, velvety chocolate flavor lives. Choose a Dutch‑process cocoa for a smoother, less acidic profile, or go with natural cocoa if you want a brighter chocolate punch. Skipping cocoa would turn these into plain cherry bars, which is a missed opportunity for that chocolate‑cherry duet.
The Texture Crew
Shredded coconut adds a tropical whisper and a chew that contrasts beautifully with the smooth chocolate. It also helps to absorb a tiny bit of excess moisture, keeping the bars from becoming soggy. If you’re allergic to coconut, replace it with toasted oat flakes for a similar bite.
Chopped peanuts bring a salty crunch that cuts through the sweetness, preventing the bars from feeling cloying. You can substitute walnuts or almonds if you prefer a milder nut flavor. Toast the nuts lightly before adding them to amplify their aroma.
Salt, though just a pinch, is the flavor amplifier that balances the sugar and chocolate, ensuring the final taste isn’t one‑dimensional. Sea salt flakes sprinkled on top just before baking add a pop of flavor and a pretty speckled finish.
The Unexpected Star
Unsalted butter, melted, is the moisture‑rich hero that binds everything together while adding a luxurious mouthfeel. Using melted butter, rather than softened, ensures a smooth batter without pockets of air, which could lead to uneven baking. If you want a richer flavor, swap half the butter for coconut oil, but keep an eye on the texture.
Vanilla extract, though used sparingly, lifts the entire flavor profile, giving the bars a warm, aromatic backdrop that feels like a hug. Real vanilla bean paste can be used for an even more intense flavor, but a good quality extract works just fine.
Large eggs act as the binder, providing structure and adding richness. Over‑beating the eggs can incorporate too much air, leading to a cakey texture, so whisk them just until combined with the butter and sugar.
Sweetened condensed milk is the secret weapon that keeps the bars moist for days, adding a caramel‑like depth that plain sugar can’t achieve. It also helps the chocolate chips melt into a glossy glaze as the bars bake.
The Final Flourish
Semi‑sweet chocolate chips are the finishing touch, creating pockets of molten chocolate that ooze out when the bar is cut. If you crave a darker, more intense chocolate flavor, use dark chocolate chips with at least 70% cacao.
Maraschino cherries are the star of the show, providing bursts of sweet‑tart juiciness that contrast the rich chocolate. Drain them well and pat them dry to avoid excess liquid, which could make the batter too wet. For a fresher twist, use frozen dark cherries, thawed and patted dry.
Everything's prepped? Good. Let's get into the real action…
The Method — Step by Step
-
Preheat your oven to 350°F (175°C) and line a 9×13‑inch baking pan with parchment paper, allowing some overhang for easy removal later. While the oven warms, melt the unsalted butter in a saucepan over low heat, stirring until it’s a glossy liquid. The moment the butter starts to shimmer, you know it’s ready for the next step.
Kitchen Hack: Add a splash of olive oil to the melted butter; it raises the smoke point and prevents the butter from browning too quickly. -
In a large mixing bowl, whisk together granulated sugar, flour, cocoa powder, baking powder, and salt. The dry mixture should look like a dark, speckled snowstorm—no clumps, just perfect harmony. This step is crucial because any lumps of cocoa will turn into bitter pockets in the final bar.
-
Create a well in the center of the dry ingredients and pour in the melted butter, vanilla extract, and eggs. Beat gently with a wooden spoon until the batter is just combined; you’ll see a glossy, thick batter that pulls away from the sides of the bowl. Over‑mixing at this stage would develop gluten, making the bars tough.
-
Stir in the sweetened condensed milk, shredded coconut, and chopped peanuts. The batter should now have a slightly looser consistency, almost like a thick brownie batter. This is the moment of truth—the aroma of butter, coconut, and toasted nuts should start to fill the kitchen.
Watch Out: If you add the cherries before the condensed milk, they can release extra juice, making the batter too wet. Add them later as instructed. -
Gently fold in the semi‑sweet chocolate chips and the drained, patted‑dry maraschino cherries. Use a rubber spatula and turn the batter over a few times until the chips and cherries are evenly distributed. The batter should now be studded with ruby‑red gems and dark chocolate flecks.
-
Spread the batter evenly in the prepared pan, using the spatula to smooth the top. For a professional finish, tap the pan lightly on the counter three times; this releases any trapped air bubbles and helps the surface level out. The batter should look glossy and thick, with a slight sheen from the butter.
-
Bake for 28‑32 minutes, or until a toothpick inserted into the center comes out with a few moist crumbs but no wet batter. Around the 20‑minute mark, you’ll hear a faint crackle as the edges start pulling away from the pan—this is your cue that the bars are forming a perfect crust.
Kitchen Hack: Rotate the pan halfway through baking to ensure an even golden top, especially if your oven has hot spots. -
Allow the bars to cool in the pan for 15 minutes, then lift them out using the parchment overhang and transfer to a wire rack. While still warm, sprinkle a light dusting of sea salt over the top for an extra flavor pop. Let them cool completely before cutting; this helps the bars set and prevents them from crumbling.
That's it — you did it. But hold on, I've got a few more tricks that'll take this to another level, ensuring every bite feels like a celebration.
Insider Tricks for Flawless Results
The Temperature Rule Nobody Follows
Never bake at a temperature lower than 350°F for these bars. Lower temps cause the butter to pool at the bottom, leading to a soggy center. By keeping the oven hot enough, the butter emulsifies quickly, creating a uniform crumb. A friend once tried 325°F and ended up with a gummy mess—lesson learned.
Why Your Nose Knows Best
Your sense of smell is a more reliable indicator than a timer. When the edges start to turn a deep, caramel‑brown and you catch that toasted nut aroma, the bars are ready for a quick check. Trust that nose; it’s often more accurate than a digital timer, especially if your oven runs hot.
The 5‑Minute Rest That Changes Everything
After removing the pan from the oven, let the bars rest, uncovered, for five minutes before covering them with foil. This short pause allows the steam to escape, preventing a soggy top layer. The result is a glossy surface that snaps when you bite into it, delivering that perfect contrast.
The Peanut‑Coconut Ratio Secret
A 1:1 ratio of chopped peanuts to shredded coconut creates a balanced texture. Too many peanuts make the bars overly crunchy, while too much coconut can become chewy. Adjust the ratio to suit your palate, but keep the total volume consistent for even baking.
Chocolate Chip Distribution
Fold the chocolate chips in thirds, letting the batter rest for a minute between each addition. This technique prevents the chips from sinking to the bottom and ensures they’re evenly spaced, so every bite delivers that melt‑in‑your‑mouth chocolate burst.
Creative Twists and Variations
This recipe is a playground. Here are some of my favorite ways to switch things up:
White Chocolate Raspberry Remix
Swap the semi‑sweet chocolate chips for white chocolate chips and replace maraschino cherries with fresh raspberries. The tartness of raspberries pairs beautifully with the creamy white chocolate, creating a summer‑time dessert that feels light yet indulgent.
Espresso Mocha Boost
Add a tablespoon of instant espresso powder to the dry ingredients and use dark chocolate chips. The coffee note deepens the chocolate flavor, making the bars perfect for an afternoon pick‑me‑up.
Nut‑Free Coconut Delight
Omit the peanuts and increase the shredded coconut to 3/4 cup. Add toasted sunflower seeds for crunch. This variation is ideal for those with nut allergies while still delivering that satisfying texture.
Spiced Autumn Version
Introduce a teaspoon of pumpkin spice and swap the cherries for dried cranberries. The warm spices and tart cranberries evoke a cozy fall feeling, perfect for holiday gatherings.
Gluten‑Free Almond Flour Base
Replace the all‑purpose flour with an equal amount of almond flour, and add a teaspoon of xanthan gum. The bars become denser and more buttery, with a subtle nutty flavor that complements the chocolate and cherries.
Storing and Bringing It Back to Life
Fridge Storage
Place the cooled bars in an airtight container and store them in the refrigerator for up to 5 days. The chilled environment keeps the moisture locked in, ensuring each slice stays soft and chewy. Before serving, let them sit at room temperature for 10 minutes for optimal texture.
Freezer Friendly
Wrap individual portions in parchment paper, then seal them in a zip‑top freezer bag. They’ll freeze beautifully for up to 3 months. When you’re ready to enjoy, thaw overnight in the fridge and then warm gently in a 300°F oven for 5‑7 minutes.
Best Reheating Method
To revive a chilled bar, place it on a microwave‑safe plate, splash a tiny drop of water around the edges, and heat for 15‑20 seconds. The steam created by that splash restores the bar’s softness, making it taste as if it just came out of the oven.