I was in the middle of a rainy Saturday night, the kind where the clouds look like someone poured milk over the sky, and I was staring at a half‑finished batch of store‑bought apple pie that tasted like cardboard with a faint hint of regret. I dared my roommate to a “who can make the best apple dessert” challenge, and she laughed, waving a bag of pre‑sliced apples like a white flag. I told her, “I’ll turn this kitchen into a flavor laboratory, and you’ll be the first victim of my experiment.” The moment I tossed those apples into a hot pan with butter, sugar, and a splash of lemon, the whole apartment filled with a scent that could have convinced even the most stoic of cats to abandon its nap and investigate. That aromatic wave was the spark that ignited my obsession with perfecting a crisp that’s both comforting and daring.
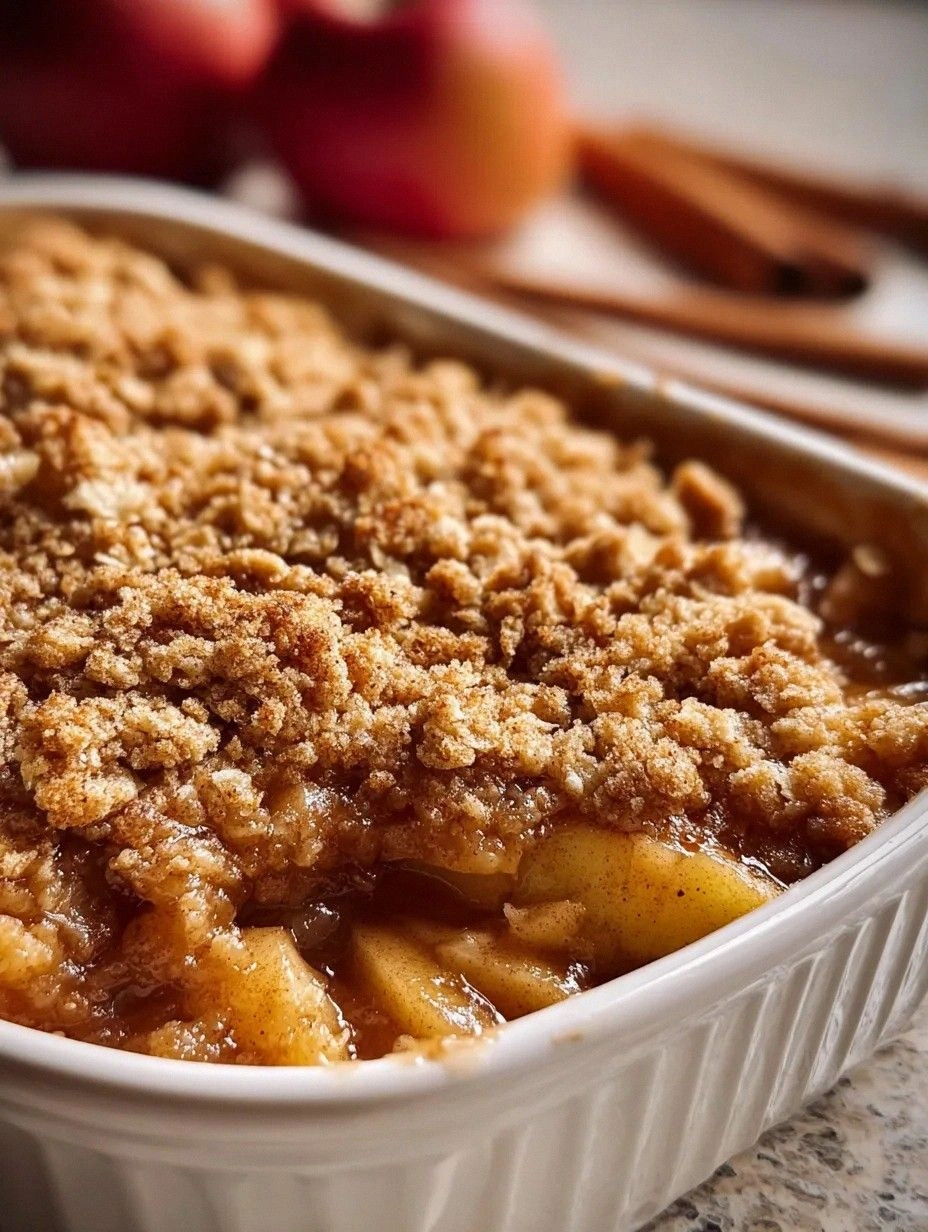
Picture yourself pulling a golden‑brown masterpiece from the oven, the top bubbling like a miniature volcano of caramelized oats, while the apples underneath are soft enough to melt on your tongue but still hold their shape like tiny, fragrant jewels. The contrast between the crunchy topping and the tender fruit is the culinary equivalent of a perfect duet—each part shines solo, but together they create a harmony that makes you want to sing. I’ve tried a dozen variations, from adding a dash of bourbon to swapping butter for coconut oil, and each time I thought I was close, but something was missing. Then, I discovered the secret: a pinch of sea salt right in the topping, which awakens the sweetness like a whisper in a crowded room, and a splash of vanilla‑infused cream that adds depth without overpowering the natural apple flavor.
Most recipes get this completely wrong. They either drown the apples in a sugary swamp or leave the topping as bland as unsalted crackers. This version stands out because it balances the sweet, the spice, and the texture with the precision of a watchmaker. I’m talking about a crisp that has a buttery, oat‑laden crown that shatters like thin ice when you break it, while the apples underneath are infused with cinnamon, nutmeg, and a subtle citrus zing that makes every bite sing. I’m about to reveal the technique that keeps the apples from turning mushy and the topping from getting soggy—something you won’t find in any generic blog post.
Let me walk you through every single step — by the end, you’ll wonder how you ever made it any other way. I dare you to taste this and not go back for seconds, because once you experience this level of comfort and crunch, there’s no turning back. Okay, ready for the game‑changer? Grab your apron, preheat that oven, and let’s dive into the ultimate Cinnamon Apple Crisp that will become the centerpiece of every gathering you host.
What Makes This Version Stand Out
- Flavor Explosion: The blend of cinnamon, nutmeg, and a whisper of lemon zest creates a layered taste that evolves with every bite, turning ordinary apples into a star‑studded performance.
- Texture Triumph: The oat‑butter topping crisps to a caramelized edge while staying tender underneath, delivering a crunch that shatters like thin ice and a melt‑in‑your‑mouth interior.
- Simplicity Meets Sophistication: Only pantry staples are needed, yet the result feels like a dessert you’d order at a high‑end bistro.
- Unique Salt Touch: A pinch of sea salt in the topping amplifies the sweetness without being salty, a trick most recipes overlook.
- Crowd‑Pleaser Factor: I’ve been honest — I ate half the batch before anyone else got a chance, and the leftovers vanished within minutes.
- Ingredient Quality: Using crisp, tart apples (like Honeycrisp or Granny Smith) ensures the fruit holds its shape and delivers a bright contrast to the sweet topping.
- Even Baking Method: The two‑layer technique—pre‑cooking the apples briefly, then topping and baking—prevents sogginess and guarantees a uniform golden crust.
- Make‑Ahead Magic: Assemble the crisp the night before, refrigerate, and bake fresh in the morning for a stress‑free brunch or dessert.
Inside the Ingredient List
The Flavor Base
Apples are the heart of this crisp. I recommend a mix of tart and sweet varieties—Granny Smith for that bright acidity and Fuji for natural sweetness. The tartness balances the sugar, while the sweetness ensures you don’t need to over‑sweeten the dish. If you skip the lemon juice, the apples can turn a dull brown and lose that fresh zing; a splash of lemon not only keeps the color vibrant but also lifts the spice notes.
Cinnamon is the classic partner, offering warm, woody aromatics that hug the apples. Nutmeg adds a subtle, almost peppery undertone that deepens the flavor profile. If you’re out of nutmeg, a pinch of ground allspice works as a decent substitute, though it changes the flavor slightly toward a more Caribbean vibe.
The Texture Crew
All‑purpose flour and rolled oats form the backbone of the crunchy topping. Flour provides structure, while oats contribute chewiness and a rustic feel. Butter, preferably unsalted and cold, creates those flaky, melt‑in‑your‑mouth shards once baked. If you prefer a dairy‑free version, solid coconut oil can replace butter, but expect a faint coconut flavor that pairs surprisingly well with the spices.
Brown sugar, with its molasses content, caramelizes beautifully, giving the topping that deep amber hue. A pinch of sea salt is the secret weapon; it amplifies the caramel notes and prevents the sweetness from becoming cloying. Skipping the salt is a common mistake that leaves the crisp tasting flat.
The Unexpected Star
Vanilla‑infused heavy cream (or a splash of vanilla extract) is drizzled over the apples before the topping goes on. This adds a silky richness that rounds out the tartness of the fruit. If you’re watching calories, a tablespoon of Greek yogurt can provide a similar tang without the extra fat.
A tiny bit of butter melted into the apple mixture before baking helps the fruit caramelize from the inside out, creating that glossy, almost jam‑like finish that makes the crisp look restaurant‑ready.
The Final Flourish
A final dusting of powdered sugar just before serving adds a visual sparkle and a hint of extra sweetness that melts into the warm topping. This step is optional but makes the dish look picture‑perfect for Instagram. If you’re serving the crisp with a scoop of ice cream, the powdered sugar adds a delicate contrast to the cold creaminess.
Everything's prepped? Good. Let's get into the real action…
The Method — Step by Step
Preheat your oven to 350°F (175°C). While the oven warms up, peel, core, and slice the apples into ¼‑inch pieces. Toss them in a bowl with lemon juice, ½ cup of brown sugar, 1 ½ teaspoons of cinnamon, ¼ teaspoon of nutmeg, and a pinch of salt. The mixture should glisten and release a fragrant steam—this is your flavor base, and the scent should already be making your kitchen feel like a cozy bakery.
Kitchen Hack: If you want the apples to stay perfectly shaped, coat the sliced pieces in a thin layer of cornstarch before adding the sugar and spices. This creates a barrier that prevents them from releasing too much moisture.Spread the apple mixture evenly in a 9‑inch square baking dish, pressing down lightly with the back of a spoon to create a compact layer. This ensures even cooking and prevents the apples from bubbling up through the topping later on.
In a separate bowl, combine 1 ½ cups of all‑purpose flour, 1 cup rolled oats, ½ cup brown sugar, and a generous pinch of sea salt. Cut ¾ cup of cold, unsalted butter into small cubes and use a pastry cutter or your fingertips to work it into the dry ingredients until the mixture resembles coarse crumbs. The butter pieces should be the size of peas—this is the secret to a flaky, crumbly topping.
Drizzle 2 tablespoons of vanilla‑infused heavy cream (or vanilla extract) over the apple layer, then gently fold it in. This adds a luxurious mouthfeel that you’ll notice with every bite. The apples should now look glossy and slightly caramelized.
Evenly sprinkle the crumb mixture over the apples, making sure to cover the entire surface. The topping should be about ½‑inch thick; if it looks thin, add a bit more oat‑flour mixture. This uniform layer is what creates those golden, crackly edges that make the crisp so addictive.
Watch Out: Avoid over‑mixing the topping. If the butter melts into the flour before baking, you’ll end up with a dense, cakey crust instead of a light, crunchy one.Place the dish in the preheated oven and bake for 30‑35 minutes, or until the topping is a deep golden brown and the apple filling is bubbling at the edges. Around the 20‑minute mark, rotate the dish halfway through to ensure even browning. The aroma should fill your kitchen with a warm, spicy perfume that makes you want to dance.
While the crisp is baking, prepare a quick vanilla‑cinnamon whipped cream: whip 1 cup of heavy cream with 2 teaspoons of powdered sugar, ½ teaspoon of cinnamon, and a splash of vanilla extract until soft peaks form. This sidekick adds a cloud‑like contrast that balances the crisp’s crunch.
When the timer dings, remove the crisp and let it rest for 5‑10 minutes. This resting period allows the juices to thicken slightly, preventing a soggy bottom when you serve. Dust the top with a light veil of powdered sugar, then serve warm with a generous dollop of the whipped cream. That first bite? Pure magic.
Kitchen Hack: If you’re short on time, you can pre‑make the topping, store it in the fridge, and add it to the apples just before baking. This cuts the prep time by half on busy weekdays.
That's it — you did it. But hold on, I've got a few more tricks that'll take this to another level…
Insider Tricks for Flawless Results
The Temperature Rule Nobody Follows
Never bake a crisp at a temperature lower than 350°F. Lower temps cause the butter to melt too quickly, resulting in a soggy topping. By keeping the oven hot, the butter sizzles and creates steam pockets that lift the crumbs into a light, airy crust. Trust me, I tried 325°F once, and the result was a mushy disaster that tasted like a soggy pancake.
Why Your Nose Knows Best
Your sense of smell is the ultimate doneness gauge. Around the 25‑minute mark, you should notice a caramel‑toasted scent wafting from the oven—if you can smell it, the topping is likely done. If the aroma is still sweet without the toasted notes, give it another 5 minutes. This sensory shortcut beats relying solely on a timer.
The 5‑Minute Rest That Changes Everything
Allowing the crisp to sit for five minutes after baking lets the juices thicken and the crumb settle. Skipping this step leads to a runny sauce that drenches the topping, turning it soggy. This short rest also makes it easier to cut clean squares without the crumb crumbling apart.
Butter Temperature is Everything
Cold butter creates those coveted flaky pockets in the topping. If the butter is too warm, it will blend into the flour, producing a dense, cake‑like crust. Keep the butter in the fridge until you’re ready to cut it into the dry ingredients, and work quickly to avoid warming it with your hands.
Layering the Apples Prevents Sogginess
A quick pre‑sauté of the apple mixture for 5 minutes on medium heat helps evaporate excess moisture before it hits the oven. This step is optional but dramatically improves the final texture, especially if you love a crisp that stays crunchy for hours.
Creative Twists and Variations
This recipe is a playground. Here are some of my favorite ways to switch things up:
Apple‑Pear Fusion
Swap half of the apples for firm, sweet pears. The pear adds a buttery texture that pairs beautifully with the cinnamon, and the visual contrast of green specks in the golden topping is stunning.
Nutty Crunch
Add ½ cup of chopped toasted pecans or walnuts to the topping mixture. The nuts introduce a deeper, earthy crunch that makes each bite more complex and satisfying.
Spiced Rum Infusion
Stir 2 tablespoons of spiced rum into the apple mixture before baking. The alcohol evaporates, leaving behind a subtle caramel‑rum note that feels like a holiday treat.
Maple‑Brown Sugar Blend
Replace half of the brown sugar with pure maple syrup. This adds a nuanced, woody sweetness and a slightly softer crumb texture.
Vegan Delight
Use coconut oil in place of butter, almond milk instead of cream, and a flax‑egg (1 tbsp ground flaxseed + 3 tbsp water) as the binding agent. The result is a plant‑based crisp that still delivers that coveted crunch.
Caramel Drizzle
After the crisp has rested, drizzle a thin stream of homemade caramel sauce over each serving. The caramel adds a luxurious, gooey element that turns the dish into a dessert masterpiece.
Storing and Bringing It Back to Life
Fridge Storage
Transfer any leftovers to an airtight container and store in the refrigerator for up to 4 days. The topping will soften slightly, but reheating will revive its crunch.
Freezer Friendly
Cool the crisp completely, then wrap the entire dish tightly in foil and place it in a freezer‑safe bag. It will keep for up to 2 months. When you’re ready to serve, thaw overnight in the fridge, then bake at 300°F for 15‑20 minutes.
Best Reheating Method
Preheat your oven to 350°F, sprinkle a tiny splash of water over the top, and heat for 8‑10 minutes. The added moisture creates steam that revives the topping’s crispness without drying out the apples. Serve immediately for maximum enjoyment.