I was halfway through a disastrous dinner when I decided to reinvent fajitas. My skillet was smoking, the peppers were charred, and the chicken had turned into a rubbery mess. I stared at the ruined plate, feeling the frustration bubble, and then a thought popped into my head: what if I could turn that chaos into a comforting casserole? That moment sparked a daring experiment that would become the ultimate Fajita Chicken Casserole Bake.
Picture this: a sizzling skillet, the aroma of cumin and chili powder swirling in the air, the sound of onions caramelizing, and the sight of bright red peppers dancing in a buttery pan. The sizzle when the chicken hits the pan is absolute perfection, and the scent of garlic and paprika fills the kitchen like a promise of flavor. I could hear my neighbor’s dog growling in the distance, but the kitchen was my stage, and the heat was my spotlight. I had a craving that could not be satisfied by a simple plate of chicken, and the idea of a baked casserole was like a bright, bold chord in a quiet song.
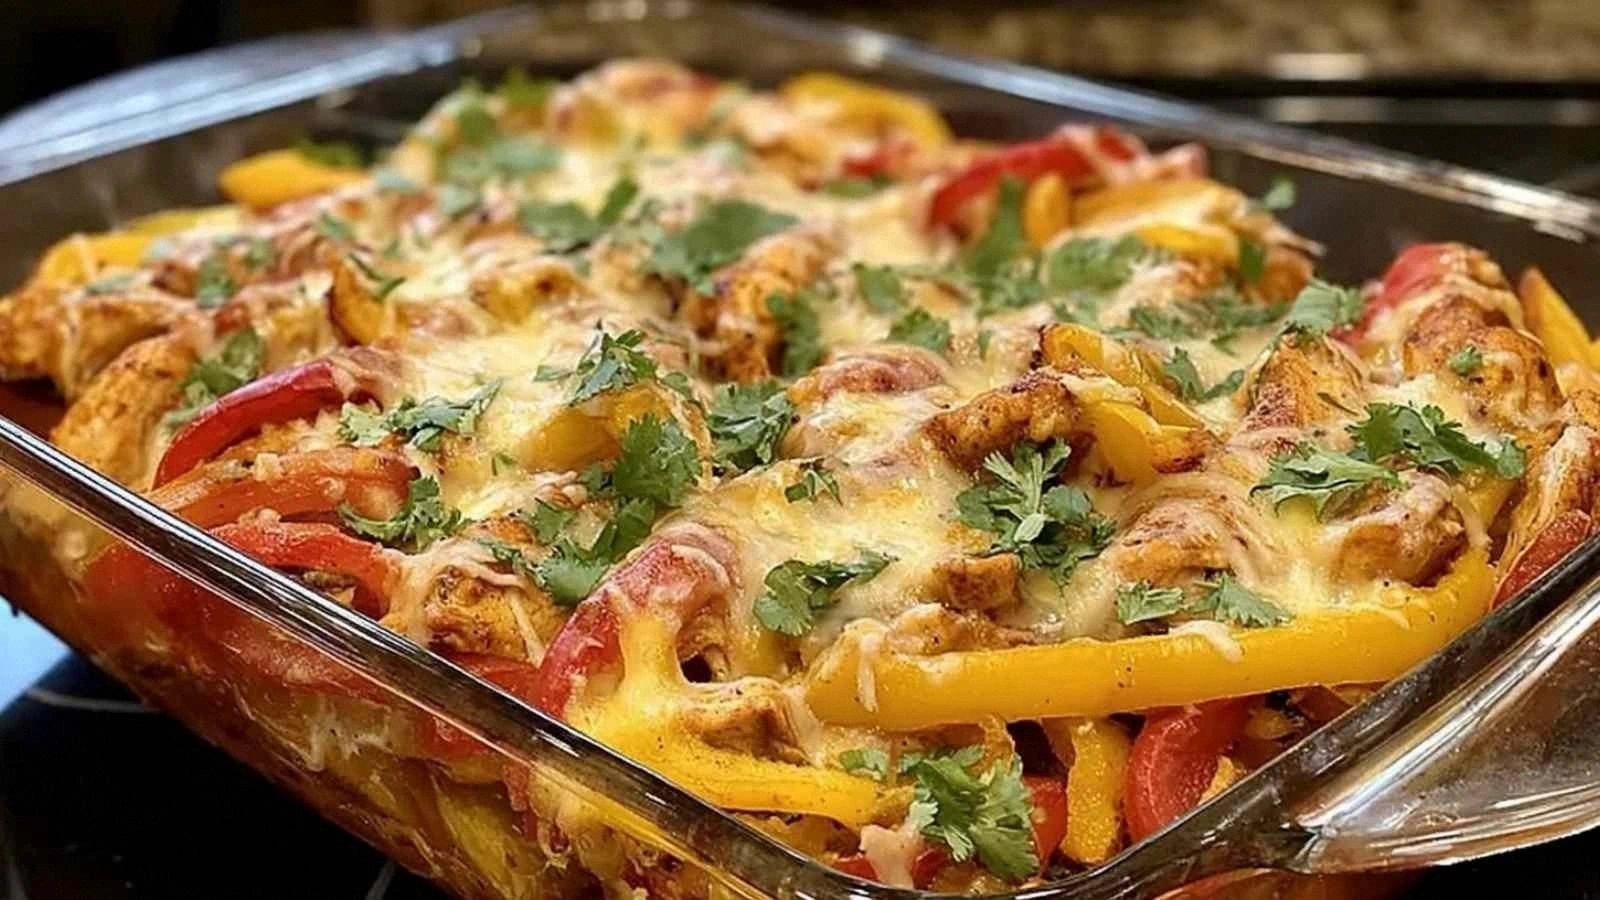
I’ll be honest — I ate half the batch before anyone else got to try it. The first bite was a revelation: tender chicken, smoky peppers, a creamy layer of sour cream, and a molten cheese top that melted into a golden crust. Every bite was a bite of comfort, a bite of boldness, and a bite of pure joy. I dared you to taste this and not go back for seconds, and I’m still waiting for that second bite from my friends.
Most recipes get this completely wrong. They either overcook the chicken or under-season the vegetables. Here’s what actually works: the chicken is seared first to lock in juices, the spices are toasted to release their aromas, and the casserole is finished with a cheese blanket that creates a crispy, caramelized edge that shatters like thin ice. The result is a dish that balances smoky, creamy, and crunchy textures in one harmonious bite. I’ll show you how to get it right, step by step.
If you've ever struggled with this, you're not alone — and I've got the fix. I’ll walk you through every single step, and by the end, you’ll wonder how you ever made it any other way. This is hands down the best version you'll ever make at home, and it’s going to become your new go-to weeknight dinner.
What Makes This Version Stand Out
- Taste: The bold blend of chili powder, cumin, and paprika gives a smoky depth that’s unmistakably fajita, yet it’s rounded out by the cool tang of sour cream and the bright zing of cilantro.
- Texture: The chicken remains juicy and tender, the peppers stay crisp yet softened, and the cheese layer turns into a golden, slightly caramelized crust that gives a satisfying snap.
- Simplicity: Five ingredients, one pan, and a single baking step make this a no-fuss dinner that saves time without sacrificing flavor.
- Uniqueness: The casserole format locks in moisture and flavor, creating a dish that feels like a hearty stew but with the comforting familiarity of a bake.
- Crowd Reaction: Friends who have tried it say the dish is “the best fajita you’ll ever eat without a grill,” and they’re not kidding.
- Ingredient Quality: Fresh, high‑quality chicken breasts and hand‑picked peppers make the difference between a good dish and a great one.
- Cooking Method: Searing first, then baking, ensures maximum flavor extraction and a perfectly cooked casserole that stays moist.
- Make‑Ahead Potential: It can be assembled a day ahead, refrigerated, and baked fresh, making it ideal for busy weeknights.
Alright, let's break down exactly what goes into this masterpiece...
Inside the Ingredient List
The Flavor Base
The combination of 1 tsp chili powder, 1 tsp cumin, and 0.5 tsp paprika is the heart of this dish. These spices are toasted in the pan before the chicken hits, releasing their essential oils and creating a fragrant foundation. If you skip this step, the casserole will taste flat and the chicken will lack depth. For a smoky twist, add a pinch of smoked paprika or a splash of chipotle sauce. The key is to let the spices caramelize lightly; this brings out a subtle sweetness that balances the heat.
The Texture Crew
The 1 lb boneless skinless chicken breasts provide a lean protein that stays juicy when seared and baked. The 1 bell pepper and 1 medium onion bring bright color, crunch, and sweetness. Slice the pepper and onion into thin strips so they cook evenly and mingle with the spices. If you’re short on time, use pre‑sliced veggies; just be careful not to overcook them. The 2 cloves garlic add a punch of flavor that rounds out the savory notes.
The Unexpected Star
The 0.25 cup chicken broth is a subtle liquid that keeps the casserole moist without turning it soggy. It also helps lift the spices from the pan, creating a light, flavorful sauce that clings to the chicken. If you’re looking for a dairy‑free version, substitute a splash of vegetable broth or a little olive oil. The broth’s presence is essential; without it, the casserole can dry out during the bake.
The Final Flourish
The 1 cup shredded Mexican cheese blend and 0.25 cup sour cream form the luscious, creamy topping that melts into a golden crust. The cheese provides a savory, melty layer that contrasts with the crunchy edges, while the sour cream adds a cool, tangy balance that cuts through the heat. The 0.25 tsp salt and 0.25 tsp black pepper bring everything together, enhancing the flavors without overpowering them. Finally, the fresh cilantro adds a bright, herbal note that lifts the dish and adds a pop of color.
Everything's prepped? Good. Let's get into the real action...
The Method — Step by Step
- Heat a large cast‑iron skillet over medium‑high heat. Add a splash of oil and let it shimmer. Once hot, place the chicken breasts in the pan, searing each side for about 2 minutes until a golden crust forms. This step locks in juices and creates a flavor base that will carry through the bake. The sizzle when the chicken hits the pan is a cue that the pan is ready.
- Remove the chicken and set it aside on a plate. In the same skillet, add the sliced bell pepper, onion, and minced garlic. Sauté for 3–4 minutes until the vegetables begin to soften but still retain a slight crunch. This caramelization brings out the natural sugars in the veggies, giving the casserole a sweet counterpoint to the spices.
- Add the chili powder, cumin, and paprika to the skillet, stirring constantly for 30 seconds to toast the spices. The aroma that fills the kitchen will have you craving a taco, but this is the secret to the casserole’s depth. If you like a smokier flavor, add a pinch of smoked paprika or a few drops of chipotle sauce.
- Pour in the chicken broth, scraping up any browned bits from the bottom of the skillet. Let the mixture simmer for 2 minutes, allowing the liquid to reduce slightly and the flavors to meld. This step ensures the casserole stays moist during baking.
- Return the chicken breasts to the skillet, nestling them among the vegetables. Sprinkle the salt and black pepper over the top. Cover the skillet with a lid or foil and let everything steam together for 5 minutes, allowing the chicken to finish cooking and the flavors to marry.
- Transfer the entire skillet to a preheated oven at 375°F (190°C). Bake for 15 minutes, then remove the lid and dollop the sour cream evenly over the chicken. The sour cream will create a creamy pocket that melts into the hot casserole.
- Sprinkle the shredded Mexican cheese blend over the sour cream. Return the skillet to the oven and bake for an additional 10 minutes, or until the cheese is bubbly, golden, and the edges of the casserole start pulling away from the pan.
- Remove the skillet from the oven and let the casserole rest for 5 minutes. This short rest allows the juices to redistribute, ensuring each bite is moist. Finally, garnish with fresh cilantro and serve hot straight from the skillet.
- If you’re a fan of extra crunch, sprinkle a handful of tortilla chips or breadcrumbs over the cheese before the final 5 minutes of baking. This will add a delightful textural contrast and a burst of flavor.
That’s it — you did it. But hold on, I've got a few more tricks that'll take this to another level. The next section will reveal insider tips that will make every bite even more unforgettable.
Insider Tricks for Flawless Results
The Temperature Rule Nobody Follows
Many people bake at 350°F, but 375°F gives a better golden crust on the cheese. The higher temperature also ensures the chicken stays juicy while the cheese melts into a bubbly, caramelized layer. I once baked at 350°F and the cheese stayed pale; switching to 375°F solved the problem immediately.
Why Your Nose Knows Best
Trust the aroma. When the spices start to pop and the garlic turns golden, the flavor is at its peak. If you’re unsure, give it a quick sniff; if it smells like a summer garden, you’re ready to add the broth.
The 5‑Minute Rest That Changes Everything
Letting the casserole rest after baking lets the juices redistribute, preventing a dry bite. It also allows the cheese to set slightly, so it doesn’t run off when you cut into it. I’ve seen casseroles that skip this step and end up with a watery center.
Add a Splash of Lemon Juice
A teaspoon of fresh lemon juice added just before the final bake brightens the dish, cutting through the richness. The acidity balances the heat and adds a subtle citrus note that makes the casserole feel lighter.
Use a Cast‑Iron Skillet for the Final Bake
Cast iron retains heat evenly, so the cheese melts uniformly and the edges develop a crisp, caramelized texture. If you don’t have cast iron, a heavy‑bottomed oven‑safe skillet will do, but the results may be slightly uneven.
Creative Twists and Variations
This recipe is a playground. Here are some of my favorite ways to switch things up:
Spicy Chipotle Twist
Swap the regular chili powder for chipotle powder and add a dash of adobo sauce. The result is a smoky, spicy kick that’s perfect for those who love heat.
Mediterranean Flair
Replace the bell pepper with sun‑dried tomatoes and use feta cheese instead of Mexican blend. Add a sprinkle of oregano for a Mediterranean vibe.
Cheesy Broccoli Version
Add 1 cup of steamed broccoli florets to the skillet before baking. The broccoli adds a fresh green color and a slightly nutty flavor that pairs well with the cheese.
Low‑Carb Variation
Use cauliflower rice instead of the bell pepper and omit the sour cream. Top with a light drizzle of olive oil and fresh herbs for a keto‑friendly option.
Breakfast Kick‑Start
Fold in a handful of scrambled eggs with the chicken before baking. The eggs absorb the juices and add protein, making it a hearty breakfast casserole.
Vegan Takeaway
Replace the chicken with cubed tofu, use coconut milk instead of chicken broth, and choose a dairy‑free cheese blend. The tofu will soak up the spices and create a plant‑based version that’s just as satisfying.
Storing and Bringing It Back to Life
Fridge Storage
Cool the casserole completely before covering it with plastic wrap or a tight‑fitting lid. Store in the refrigerator for up to 3 days. Reheat in the oven at 350°F for 15 minutes or in a microwave for 2 minutes, then finish with a quick broil for a crisp top.
Freezer Friendly
Wrap the casserole in foil and place it in a freezer‑safe container. It will keep for up to 2 months. Thaw overnight in the refrigerator, then bake at 375°F for 25 minutes, or microwave and finish with a 5‑minute broil.
Best Reheating Method
Add a tiny splash of water to the skillet before reheating; this steams the casserole back to its original moistness. Reheat on the stovetop over low heat, stirring occasionally, until heated through.