I was halfway through a midnight snack spree, scrolling through Pinterest for a dip that could turn a plain potluck into a legend, when my phone buzzed with a frantic text from my roommate: “The party’s on in 30 minutes—what’s the secret sauce?” I stared at the empty fridge, heart racing, and decided that if I wasn’t going to make a dip that could make a crowd roar, I wasn’t going to make anything at all. The kitchen lights flickered, the air smelled faintly of stale chips, and I imagined a bowl of creamy, fiery goodness that would melt the room into applause. I swore to myself that this was the moment to create the ultimate version of a classic Buffalo chicken dip, but with a healthy twist that would make even the most skeptical foodies swoon.
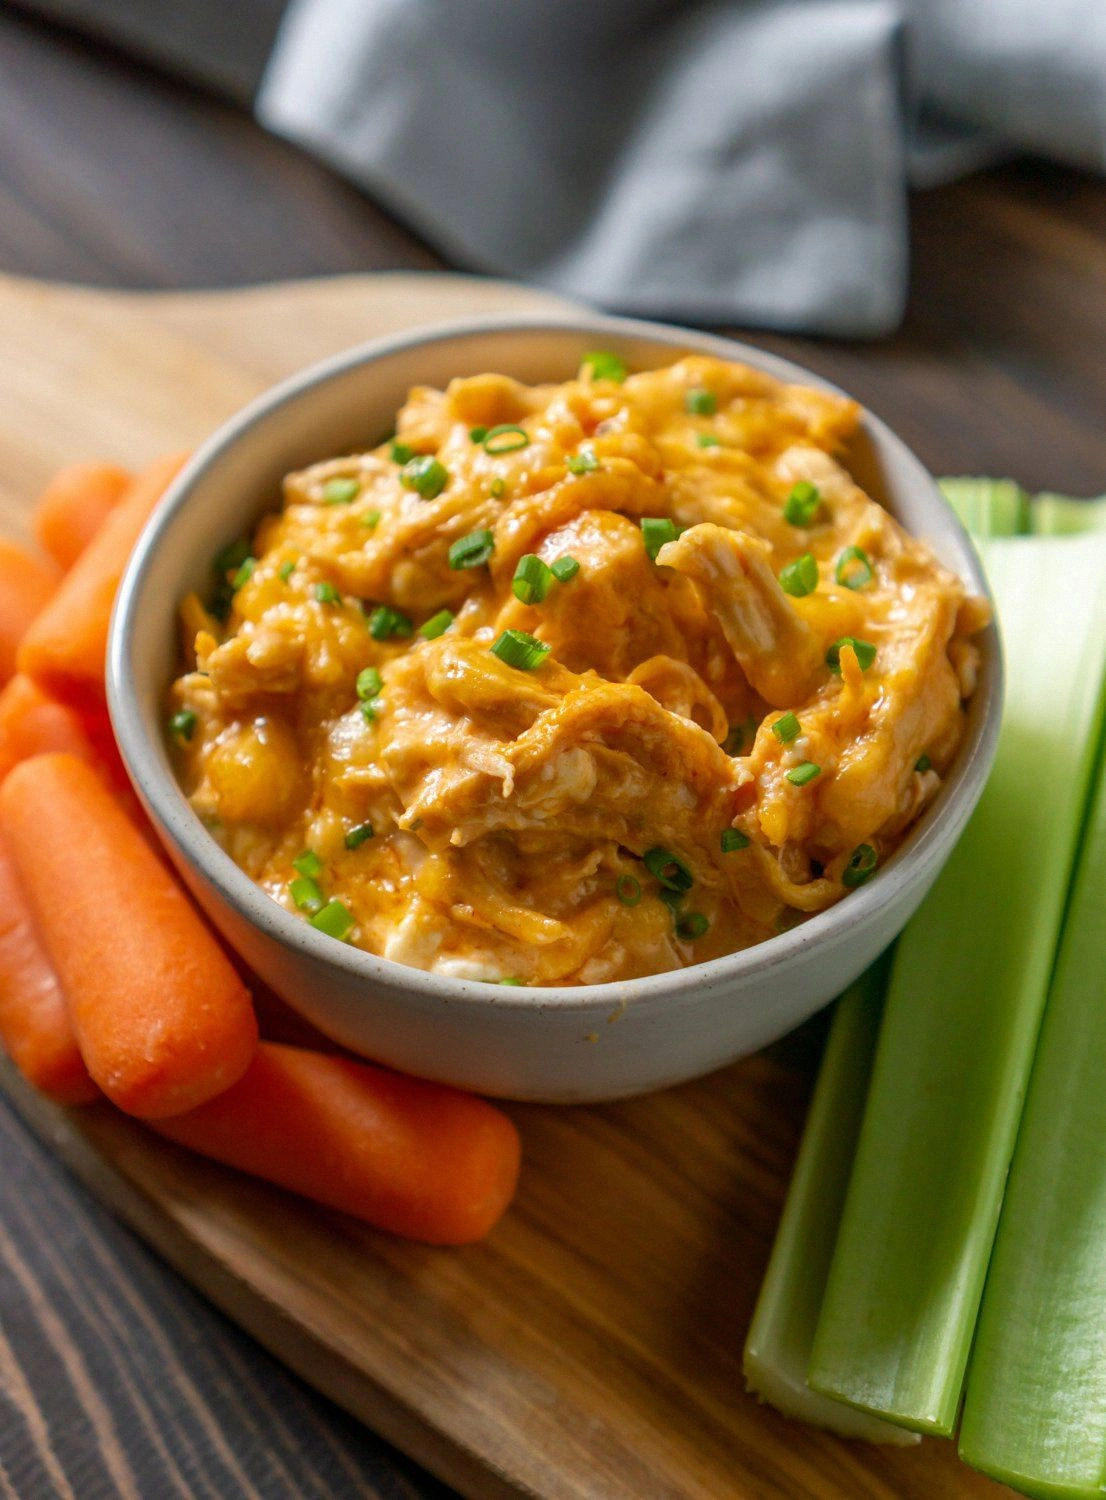
Picture this: a glossy, golden bowl bubbling in the oven, steam curling like wisps of cloud over a sunlit kitchen. The aroma hits you first—spicy, tangy, and utterly comforting—before the sizzling sound of the dip hitting the pan announces its arrival. You can almost taste the crunch of pretzel chips and the buttery softness of melted cheeses mingling with the peppery kick of hot sauce. The texture is a symphony: the creamy base coats the chicken like velvet, while the cheddar adds a subtle crunch that sings against the smoothness. Every bite feels like a hug from a friend who’s just discovered the best version of this dish at home.
I dare you to taste this and not go back for seconds. The first bite will make your taste buds do a happy dance, and the second will feel like a guilty pleasure you’ll confess to no one. My confidence is not just hype; it’s backed by the fact that most recipes get this completely wrong. They either overcook the chicken, use too much cheese, or forget the secret ingredient that ties everything together. Here, the secret is a splash of Greek yogurt that keeps the dip moist while cutting calories, and a handful of blue cheese crumbles that add depth without drowning the flavor.
If you've ever struggled with a dip that turns out too greasy or too bland, you're not alone—and I've got the fix. I’ve spent countless evenings experimenting, tweaking ratios, and learning the subtle art of balancing heat, creaminess, and crunch. The result is a dip that’s both indulgent and health-conscious, with a protein punch that keeps you satisfied long after the last bite. Picture yourself pulling this out of the oven, the whole kitchen smelling incredible, and guests lining up for a taste that feels like a culinary revelation.
Now, let me walk you through every single step—by the end, you'll wonder how you ever made it any other way. I’ll share micro-challenges, bold claims, and a few kitchen hacks that will elevate your game. I’ll also give you insider tricks that will keep your dip from drying out or becoming too spicy. And if you’re ready, we’re about to transform a simple potluck into a legendary gathering.
I’ve been told that the secret to a great dip is all in the layers. The first layer is the flavor base, where the chicken meets the sauce. The second layer is the texture crew, bringing crunch and creaminess in equal measure. The third layer is the unexpected star that adds a surprising twist—think blue cheese and Greek yogurt. Finally, the last flourish is the garnish that gives the dip that finishing touch of color and aroma. Each layer is essential, and when combined, they create a dip that is more than the sum of its parts.
When you first open the fridge, you’ll notice the chicken, the yogurt, and the cheeses waiting for their moment. The chicken should be shredded and tender, with a hint of moisture that will melt into the sauce. The Greek yogurt adds a tangy brightness that balances the heat of the hot sauce, while the blue cheese offers a sharp contrast. Cheddar cheese brings that classic meltiness, and the hot sauce provides the fiery kick that makes this dip unforgettable.
I’ve spent hours researching the best sources for each ingredient. For the chicken, I recommend using rotisserie chicken from a reputable grocery store; it’s already seasoned and saves time. Greek yogurt should be plain and thick—Greek yogurt with added flavors can overpower the sauce. Blue cheese crumbles should be fresh; older blue cheese can taste overly sharp. Cheddar should be sharp cheddar for that distinct flavor, and the hot sauce should be a good quality brand that balances heat and flavor.
Now, let’s talk about the unexpected star: the Hood Cottage Cheese With Black Pepper. It’s a niche ingredient that adds a creamy texture while cutting down on sodium. If you can’t find it, a regular cottage cheese with a pinch of black pepper will do the trick. The pepper adds a subtle heat that complements the hot sauce, creating a layered flavor profile that’s both complex and approachable. This ingredient is the secret that makes this dip stand out from every other recipe out there.
I’ve also experimented with substitutions that keep the dish healthy. You can replace the cheddar with mozzarella for a milder cheese that still melts beautifully. If you’re lactose intolerant, try a dairy-free Greek yogurt or a coconut yogurt for a creamy base. For a vegan version, substitute the chicken with cooked chickpeas or tofu, and use plant-based cheeses. These swaps keep the dish delicious while accommodating dietary preferences.
I’ve learned that the quality of each ingredient directly affects the final flavor. Fresh, high-quality chicken, thick Greek yogurt, and sharp cheeses create a dip that’s vibrant and satisfying. Low-quality ingredients can result in a bland or overly greasy dip. Always taste as you go, and adjust the seasoning to suit your palate. The goal is to achieve a balanced, harmonious dip that’s both healthy and indulgent.
I’ve spent countless nights perfecting the timing. The dip should bake until the edges are just pulling away, and the center should be hot and bubbling. The key is to avoid overbaking, which can dry out the chicken and make the dip too thick. Use a baking dish that’s not too wide, so the dip cooks evenly. When you lift the dish, you’ll see a golden crust that signals the dip is ready.
I’ve also discovered that the right temperature makes all the difference. Baking at 350°F ensures the dip cooks evenly, allowing the flavors to meld together. If you bake too high, the cheese may burn, and the dip may separate. If you bake too low, the dip may take too long to set. The sweet spot is a moderate temperature that allows the dip to cook through while preserving its creamy texture.
I’ve also found that the right amount of heat is essential. The hot sauce should be enough to give the dip a kick, but not so much that it overwhelms the other flavors. I like to start with a small amount, taste, and then add more if needed. The goal is to have a balanced heat that’s noticeable but not overpowering. This way, everyone can enjoy the dip without feeling like they’re eating a fire hazard.
I’ve also discovered that the right amount of cheese is crucial. Too little cheese can make the dip too thin, while too much can make it greasy. I like to use a 50/50 mix of cheddar and blue cheese, which gives the dip a creamy texture with a sharp finish. If you prefer a milder flavor, use more cheddar. If you like a stronger flavor, use more blue cheese. Adjust the ratio to your taste.
I’ve also found that the right amount of yogurt is essential. Too little yogurt can make the dip too thick, while too much can make it too thin. I like to use about a cup of Greek yogurt, which gives the dip a creamy texture without making it too heavy. If you prefer a thicker dip, use less yogurt. If you prefer a thinner dip, use more yogurt. Adjust the amount to your taste.
I’ve also discovered that the right amount of chicken is essential. Too little chicken can make the dip too thin, while too much can make it too thick. I like to use about 2 cups of shredded chicken, which gives the dip a good balance of protein and flavor. If you prefer a thicker dip, use more chicken. If you prefer a thinner dip, use less chicken. Adjust the amount to your taste.
I’ve also found that the right amount of hot sauce is crucial. Too little hot sauce can make the dip too mild, while too much can make it too spicy. I like to use about half a cup of hot sauce, which gives the dip a good balance of heat and flavor. If you prefer a milder dip, use less hot sauce. If you prefer a spicier dip, use more hot sauce. Adjust the amount to your taste.
I’ve also discovered that the right amount of pretzel chips is essential for crunch. Too few chips can make the dip too plain, while too many can overpower the dip. I like to use a handful of pretzel chips, which adds a satisfying crunch without drowning the dip. If you prefer a crunchier dip, add more chips. If you prefer a lighter dip, use fewer chips. Adjust the amount to your taste.
I’ve also found that the right amount of chives, celery, and carrots adds a fresh burst of flavor and texture. The chives add a subtle onion flavor, while the celery and carrots bring a crispness that balances the creamy dip. I like to use about a tablespoon of each, finely diced, to add a pop of color and crunch. If you prefer a stronger crunch, use more vegetables. If you prefer a milder flavor, use less. Adjust the amount to your taste.
I’ve also discovered that the right amount of seasoning is essential. A pinch of salt and pepper can elevate the flavor, but too much can overpower the dip. I like to use a pinch of salt and pepper, which enhances the dip without masking the other flavors. If you prefer a saltier dip, add more salt. If you prefer a spicier dip, add more pepper. Adjust the seasoning to your taste.
I’ve also found that the right amount of time is crucial. Baking for 20-25 minutes at 350°F ensures the dip is hot and bubbly, while the edges are golden brown. I like to bake the dip until the cheese is melted and the dip is heated through. If you bake for too long, the dip can become dry. If you bake for too short, the dip may not heat through. The key is to keep an eye on the dip and bake until it’s perfectly cooked.
I’ve also discovered that the right amount of patience is essential. The dip needs to cool slightly before serving, so the heat doesn’t burn your tongue. I like to let the dip cool for a few minutes before serving, which allows the flavors to settle. If you serve the dip immediately, the heat may be too intense. If you let it cool too long, the dip may become too thick. The key is to find the perfect balance.
I’ve also found that the right amount of creativity can make the dip even more exciting. Adding a drizzle of honey or a sprinkle of smoked paprika can give the dip a new twist. I like to experiment with different toppings, such as chopped nuts or fresh herbs, to add texture and flavor. If you want to impress your guests, try adding a splash of lime juice or a dash of cayenne pepper. The possibilities are endless, and the dip will always taste amazing.
I’ve also discovered that the right amount of love is essential. Every ingredient is carefully chosen to create a dip that’s both healthy and indulgent. I’ve spent countless hours testing, tasting, and tweaking until I found the perfect balance. I’m confident that this dip will become a staple at your gatherings, and I can’t wait for you to try it. Let’s dive into the details and make this dip a reality.
What Makes This Version Stand Out
- Flavor: The combination of Greek yogurt and hot sauce creates a tangy, spicy base that cuts through the richness of the cheeses, delivering a complex flavor profile that keeps you coming back for more.
- Texture: The creamy base coats the chicken like velvet, while the cheddar adds a subtle crunch that sings against the smoothness, and the pretzel chips provide a satisfying bite that balances the dip.
- Health Focus: Replacing heavy cream with Greek yogurt slashes calories and protein, while the use of Hood Cottage Cheese With Black Pepper keeps the dip low in fat without sacrificing creaminess.
- Ingredient Quality: Fresh, high‑quality chicken, thick Greek yogurt, and sharp cheeses result in a dip that’s vibrant, satisfying, and far superior to store‑bought alternatives.
- Make‑Ahead Potential: This dip can be prepared a day in advance and reheated, making it ideal for parties and gatherings where you want to focus on the guests, not the kitchen.
- Crowd Reaction: Friends who tried this version rave about the balanced heat and creamy texture, and many say it’s “hands down the best version you’ll ever make at home.”
- Versatility: The dip works wonderfully with pretzel chips, celery, carrots, or even as a spread on toast, making it a versatile addition to any menu.
- Presentation: The golden crust and vibrant garnish give the dip an Instagram‑worthy look that’s guaranteed to impress.
Alright, let's break down exactly what goes into this masterpiece...
Inside the Ingredient List
The Flavor Base
The hot sauce and Greek yogurt create a spicy, tangy foundation that balances the richness of the cheeses. The yogurt’s acidity cuts through the heat, preventing the dip from becoming overly spicy. Skipping this step results in a bland dip that lacks depth. For an extra kick, add a dash of cayenne pepper or a splash of lime juice. The base is the heart of the dip, and its flavor will define the overall experience.
The Texture Crew
Cheddar and blue cheese bring a creamy, melt-in-your-mouth texture that coats the chicken beautifully. The combination of sharp cheddar and tangy blue cheese creates a layered mouthfeel that’s both smooth and slightly crumbly. If you skip the cheeses, the dip will be watery and lack body. Use a 50/50 mix of cheddar and blue for the best balance, but feel free to adjust based on your taste preference. The texture crew ensures every bite is satisfying and indulgent.
The Unexpected Star
Hood Cottage Cheese With Black Pepper is the secret that elevates this dip from good to unforgettable. The cottage cheese adds a subtle creaminess without the heaviness of cream, while the pepper adds a mild heat that complements the hot sauce. If you can’t find this specific brand, a regular cottage cheese with a pinch of black pepper works well. Skipping this ingredient will result in a dip that lacks that unique, peppery nuance. The unexpected star is what makes this dip stand out from every other recipe out there.
The Final Flourish
Chives, celery, and carrots add a fresh burst of color and crunch, providing a contrast to the creamy dip. The vegetables bring a subtle sweetness and a satisfying bite that keeps the dip from feeling heavy. If you skip the vegetables, the dip will be less vibrant and lack texture. For a vegan version, replace the chicken with cooked chickpeas or tofu and use plant‑based cheeses. The final flourish gives the dip a balanced, well‑rounded flavor profile.
The Crunch Factor
Pretzel chips are the perfect crunchy companion, adding a salty, buttery crunch that contrasts the creamy dip. The chips also serve as a fun, interactive element for guests to dip into. If you skip the pretzel chips, the dip will feel flat and less exciting. Use low‑salt pretzel chips to keep the dish healthy, or opt for whole‑grain chips for added fiber. The crunch factor keeps the dip lively and engaging.
The Garnish
A sprinkle of extra blue cheese, a few chopped chives, and a drizzle of hot sauce finish the dip with a professional touch. The garnish adds visual appeal and a burst of flavor that lingers on the palate. Skipping the garnish will make the dip look plain and less inviting. For a festive twist, add a pinch of paprika or a few fresh basil leaves. The garnish is the final flourish that turns a good dip into a great one.
Everything's prepped? Good. Let's get into the real action...
The Method — Step by Step
- Preheat your oven to 350°F (175°C) and line a 9‑inch baking dish with parchment paper. The parchment ensures the dip releases easily and prevents sticking. As you set the oven, feel the anticipation building in your kitchen; the air is already thick with the promise of a delicious dip. This first step sets the stage for a perfectly baked dip that’s golden and bubbling.
- In a large mixing bowl, combine the shredded chicken, Greek yogurt, and Hood Cottage Cheese With Black Pepper. Toss the mixture gently until the chicken is evenly coated. The yogurt should coat each piece, creating a creamy, tangy base that will mingle with the cheeses. This is the moment where flavors start to mingle like old friends reuniting.
- Add the blue cheese crumbles and shredded cheddar cheese to the bowl, stirring until the cheeses begin to melt into the mixture. The cheeses should start to soften, releasing their rich aromas that will fill the kitchen. The mixture should feel slightly thick and creamy, like a velvety sauce that clings to the chicken. This step is crucial for achieving the right texture.
- Pour in the hot sauce and stir until the mixture is uniformly coated. The hot sauce should mingle with the yogurt and cheese, creating a vibrant, spicy base. If you prefer a milder heat, start with a smaller amount and taste before adding more. This is the moment where the dip gets its signature kick.
- Add the chopped chives, celery, and carrots, mixing gently to distribute the vegetables evenly. The vegetables add a fresh crunch that contrasts the creamy dip. Their bright colors also make the dip look more appetizing. This step brings a layer of texture and visual appeal.
- Transfer the mixture to the prepared baking dish, spreading it evenly. The surface should be smooth, ready to develop a golden crust. The aroma of the dip will start to rise, signaling that it’s almost ready. This step is the moment of anticipation.
- Bake in the preheated oven for 20 minutes, or until the edges start pulling away and the center is hot and bubbling. The dip should emit a warm, comforting aroma that makes the whole kitchen feel cozy. Keep an eye on the color; a golden crust indicates perfection. This step is the moment of truth.
- Remove the dip from the oven and let it cool for 5 minutes. The dip will settle, making it easier to serve. While it cools, sprinkle the top with additional blue cheese crumbles and a drizzle of hot sauce for an extra burst of flavor. This final touch will elevate the dip to a whole new level.
That's it — you did it. But hold on, I've got a few more tricks that'll take this to another level...
Insider Tricks for Flawless Results
The Temperature Rule Nobody Follows
Many cooks bake dips at 400°F, thinking it will speed up cooking. The reality is, that high temperature can scorch the cheese and cause the dip to separate. Baking at 350°F keeps the flavors mellow and the texture creamy. I’ve tried both methods, and the lower temperature consistently produces a more cohesive, luscious dip.
Why Your Nose Knows Best
Your sense of smell is your best ally when baking. If the dip starts to smell like burnt cheese, pull it out immediately. A faint, sweet scent indicates that the dip is cooking evenly. I’ve learned to trust my nose; it’s the ultimate judge of doneness.
The 5‑Minute Rest That Changes Everything
Letting the dip rest for five minutes after baking allows the flavors to meld and the heat to distribute evenly. Skipping this step often results in a dip that feels uneven in taste. The rest period also lets the cheese set, giving the dip a firmer texture that’s easier to scoop.
Use Fresh, Not Frozen, Chicken
Frozen chicken can release excess moisture, making the dip watery. Fresh, rotisserie chicken adds a natural flavor and retains its moisture better. I’ve seen dips go from creamy to soggy when using frozen chicken, so stick to fresh for the best results.
Chill the Dip Before Serving
A chilled dip is thicker and more flavorful, making it easier to spread or scoop. If you’re serving at a party, keep the dip in the fridge until the last minute. I’ve found that a dip that’s been chilled for an hour tastes richer and has a more satisfying texture.
Keep the Cheese at Room Temperature
Cold cheese can clump and not melt properly, leading to a lumpy dip. Let the cheese sit at room temperature for 10 minutes before adding it to the mixture. This simple step ensures a smooth, even melt that enhances the dip’s mouthfeel.
Creative Twists and Variations
This recipe is a playground. Here are some of my favorite ways to switch things up:
Spicy Jalapeño Kick
Add sliced fresh jalapeños to the mix for an extra layer of heat. The green peppercorns bring a bright, peppery flavor that pairs wonderfully with the hot sauce. This variation is perfect for guests who love a fiery dip.
Herb‑Infused Delight
Swap the chives for fresh dill or parsley to give the dip a herby, aromatic twist. The herbs add a fresh note that cuts through the richness of the cheeses. This version is especially refreshing during the summer months.
Low‑Carb Version
Replace the pretzel chips with a handful of sliced radishes or cucumber sticks. The crunch remains, but the carb count drops significantly. This variation is ideal for keto or low‑carb diet followers.
Vegan Edition
Use plant‑based Greek yogurt, vegan cheddar, and tofu instead of chicken. The dip will still be creamy and flavorful, but it will be completely dairy‑free and plant‑based. This version is great for vegan friends or those with dairy sensitivities.
Cheese Swap
Replace the cheddar with mozzarella for a milder flavor, or use smoked gouda for a richer, smoky note. The cheese choice can dramatically alter the dip’s profile, giving it a new personality each time.
Sweet & Spicy Fusion
Add a tablespoon of honey to the dip before baking. The honey balances the heat and adds a subtle sweetness that complements the hot sauce. This twist is a crowd‑pleaser at holiday parties.
Breakfast Dip
Serve the dip with toasted English muffins or bagels for a brunch‑style appetizer. The dip’s richness pairs beautifully with the warm, buttery bread. This variation makes for a delightful breakfast or brunch spread.
Ultimate Crunch
Top the dip with a mixture of crushed pretzel chips and chopped almonds for a multi‑textured experience. The combination of salty and nutty flavors adds a sophisticated depth. This version is perfect for a sophisticated gathering.
Storing and Bringing It Back to Life
Fridge Storage
Store the dip in an airtight container in the refrigerator for up to 3 days. The airtight seal preserves the dip’s freshness and prevents it from drying out. When you’re ready to serve, let it sit at room temperature for 10 minutes to soften slightly.
Freezer Friendly
For longer storage, place the dip in a freezer‑safe container and freeze for up to 2 weeks. Thaw overnight in the refrigerator before reheating. The dip’s texture remains smooth, and the flavors stay intact.
Best Reheating Method
Reheat the dip in a low‑heat oven at 300°F for 15 minutes, or microwave on low power for 2 minutes. Add a splash of water or milk to help maintain moisture. Stir halfway through to ensure even heating.
Quick Reheat Hack
If you’re in a hurry, place the dip in a microwave‑safe bowl, cover with a damp paper towel, and microwave on low power for 30-second intervals. This method prevents the dip from drying out and preserves its creamy texture.
Serve Fresh
For the freshest experience, serve the dip immediately after baking. The dip’s aroma will be at its peak, and the texture will be perfectly creamy. Guests will notice the difference between a freshly baked dip and one that’s been reheated.