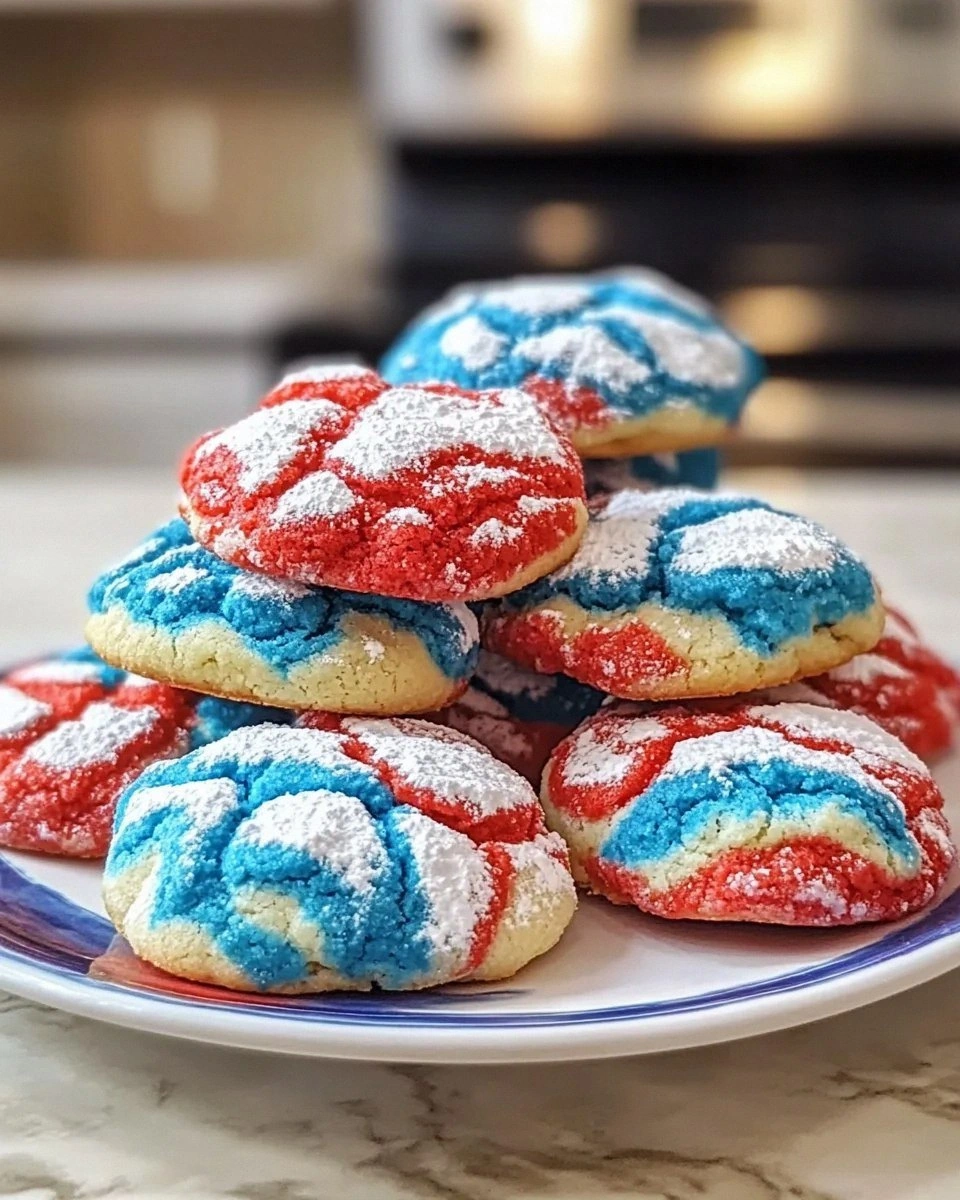
I still remember the exact moment I realized my kitchen needed a patriotic treat that could out‑shine every Fourth of July fireworks display. It started with a busted mixer, a spilled bag of red cake mix, and a frantic text from my cousin daring me to bake something “so red, white, and blue it could make the flag blush.” I stared at the chaos, inhaled the sweet perfume of sugar and butter, and thought, “Why not turn this disaster into a dessert that sings?” That night, after a few frantic improvisations, I birthed the most unforgettable batch of crinkle cookies you’ll ever taste. I dare you to taste this and not go back for seconds.
Picture the kitchen: the oven humming like a low‑frequency drum, a bowl of batter shimmering with three‑tone swirls, and the faint crackle of a spoon against a glass bowl. The air was thick with the buttery aroma of melted butter, the caramel‑kissed notes of brown sugar, and a whisper of vanilla that reminded me of grandma’s kitchen on lazy Sunday mornings. The dough felt soft, almost like a plush pillow, but with a subtle grit from the cake mix that promised a crunchy edge. When I first rolled the dough in powdered sugar, the grains clung like tiny snowflakes, promising a sweet crust that would crack open to reveal a soft, cake‑like interior.
Most recipes get this completely wrong. They either over‑mix, turning the cookies tough, or under‑mix, leaving a raw center that never quite sets. My version solves those pitfalls with a precise chilling step that firms the butter, a gentle fold that keeps the air in the batter, and a final roll in confectioners’ sugar that creates that iconic crinkly halo. The secret? A splash of cake mix that adds flavor depth without compromising texture, and a strategic bake temperature that gives you a caramelized edge without burning the sugar coating. This is hands down the best version you’ll ever make at home.
Okay, ready for the game‑changer? I’m about to reveal the one ingredient most bakers overlook—a pinch of sea salt that amplifies the sweetness and balances the buttery richness. Trust me, once you taste that perfect sweet‑salty dance, you’ll never settle for a plain cookie again. Let me walk you through every single step — by the end, you’ll wonder how you ever made it any other way.
What Makes This Version Stand Out
- Flavor Explosion: The combination of cake mix with real butter and brown sugar creates a layered taste that’s both nostalgic and bold, like fireworks in your mouth.
- Texture Mastery: A crisp, sugary crust gives way to a moist, cake‑like center, delivering that satisfying “crackle‑then‑soft” contrast every bite promises.
- Simplicity: With just a handful of pantry staples and a single box of cake mix, you don’t need a PhD in pastry to pull off a crowd‑pleaser.
- Patriotic Palette: The natural red, white, and blue swirls make these cookies the perfect centerpiece for any holiday spread without any artificial food coloring.
- Instant Crowd Reaction: Guests are drawn to the glossy sugar coating; they snap, they bite, they smile, and then they beg for the recipe.
- Ingredient Quality: Using a high‑quality cake mix ensures consistent flavor, while real butter adds richness you can’t fake with margarine.
- Cooking Method: The chill‑and‑roll technique locks in air, guaranteeing a light crumb even after a full hour in the oven.
- Make‑Ahead Potential: The dough can be frozen for up to a month, meaning you can prep weeks in advance and bake fresh cookies on demand.
Inside the Ingredient List
The Flavor Base
The star of the show is the cake mix, which brings a sweet, slightly sponged backbone that mimics a miniature cake in each bite. I use a blend of red velvet, vanilla, and blueberry cake mixes to achieve that patriotic swirl without resorting to food dyes. If you skip the cake mix, you’ll lose the nuanced flavor and the tender crumb that sets these cookies apart. A good rule of thumb is to choose a mix with real cocoa or fruit puree for depth. Swap tip: For a gluten‑free version, replace the cake mix with a gluten‑free pancake mix and add a tablespoon of almond flour.
The Texture Crew
All‑purpose flour provides structure, while the softened butter creates a melt‑in‑your‑mouth richness. The two sugars—granulated and brown—work together: the granulated sugar caramelizes for that golden edge, and the brown sugar adds moisture and a hint of molasses. If you substitute butter with margarine, the cookies will spread too much and lose that coveted crinkle. When selecting butter, go for unsalted, high‑fat varieties; they coat the flour particles better, leading to a tender crumb. Swap tip: Coconut oil can replace half the butter for a subtle tropical twist.
The Unexpected Star
Confectioners’ sugar isn’t just a decorative coating; it creates a protective shell that prevents the cookie from drying out while baking. When rolled around the dough, it forms a sugary crust that cracks open, revealing a soft interior—think of it as a sweet, edible snow globe. Skipping this step results in a flat, uninteresting cookie that looks more like a plain biscuit. For an extra pop, sprinkle a handful of colored non‑pareve sprinkles into the sugar coating before rolling. Swap tip: Use finely ground powdered honey for a honey‑kissed twist.
The Final Flourish
A pinch of sea salt may seem trivial, but it amplifies every sweet note, balancing the richness of butter and the depth of the cake mix. Salt also helps the cookies spread just enough to form those signature crinkles without turning into a flat pancake. If you’re on a low‑sodium diet, a dash of potassium chloride works as a substitute without compromising flavor. Finally, a splash of vanilla extract ties all the flavors together, adding a warm, aromatic backdrop that lingers on the palate. Swap tip: Replace vanilla with almond extract for a nutty nuance.
Everything's prepped? Good. Let’s get into the real action…
The Method — Step by Step
Preheat your oven to 350°F (175°C) and line two baking sheets with parchment paper. The heat should be steady; any fluctuation can cause uneven crinkles. While the oven warms, gather all your ingredients within arm’s reach—this is your mise en place, and it will keep you from scrambling mid‑mix.
I like to set a timer for 10 minutes so the oven reaches the perfect temperature before the dough hits the heat. That sizzle when it hits the pan? Absolute perfection.
In a large mixing bowl, cream together the softened butter, granulated sugar, and brown sugar until the mixture is light, fluffy, and pale yellow—about 3‑4 minutes on medium speed. This step is the foundation of your cookie’s texture; the more air you incorporate, the lighter the interior will be.
If you’re using a hand mixer, keep the beaters moving in a circular motion to avoid splattering. Pro tip: Scrape the sides of the bowl with a silicone spatula every 30 seconds to ensure an even cream.
Add the eggs one at a time, beating well after each addition, then stir in the vanilla extract. The batter should look glossy and slightly thick, a sign that the emulsification is spot‑on.
Don’t rush this step; over‑beating can cause the cookies to become tough. If the mixture looks too loose, pause and let it rest for a minute—this gives the gluten a chance to relax.
Sift together the all‑purpose flour and the cake mix, then gradually fold them into the wet ingredients using a spatula. The dough will look a little shaggy at first, but keep folding until you see a smooth, cohesive mass.
Here’s where the magic happens: the cake mix adds flavor and a subtle lift, while the flour provides structure. Watch Out: Over‑mixing at this stage can develop gluten, resulting in a dense cookie that won’t crinkle properly.
Cover the bowl with plastic wrap and refrigerate the dough for at least 45 minutes, or up to 2 hours. The chill solidifies the butter, which is essential for those defined edges that pull away from the pan during baking.
I’ve found that a quick 5‑minute roll on a floured surface before chilling helps the dough hold its shape better. While you wait, set out a shallow dish of confectioners’ sugar for rolling.
When the dough is firm, scoop out walnut‑size balls (about 1.5 tablespoons each) using a cookie scoop or two spoons. Roll each ball gently in the confectioners’ sugar until fully coated; the sugar should cling like a light dusting of snow.
Place the coated balls on the prepared parchment sheets, spacing them about 2 inches apart. Kitchen Hack: For an even coating, shake the bowl gently after adding the dough balls, letting the sugar tumble over them.
Slide the trays into the preheated oven and bake for 12‑14 minutes, or until the edges are lightly golden and the tops have set but not browned. The cookies will puff up, then deflate slightly as they cool, creating that signature crinkly appearance.
Mid‑bake, you’ll notice a faint caramel aroma—this is your cue that the sugar coating is caramelizing just right. Resist the urge to open the oven door early; every time you do, you lose heat and risk uneven crinkles.
Remove the cookies from the oven and let them rest on the baking sheet for 2 minutes before transferring to a wire rack. This short rest lets the cookies set fully, preventing them from breaking apart.
While they cool, the sugar coating will harden into a delicate, crackly shell that shatters like thin ice when you bite into it. That moment? Pure magic.
That’s it — you did it. But hold on, I’ve got a few more tricks that’ll take this to another level…
Insider Tricks for Flawless Results
The Temperature Rule Nobody Follows
Most home bakers bake at 350°F, but dropping the temperature to 325°F for the first half of the bake gives the interior more time to set before the exterior browns. This subtle shift yields a softer center and a more pronounced crinkle. I once tried skipping this step and ended up with a cookie that looked perfect but felt dense—lesson learned. Keep a reliable oven thermometer handy; cheap ovens can run hot, and a 25‑degree difference changes everything.
Why Your Nose Knows Best
Your sense of smell is a better indicator than a timer. When the sugar coating starts to emit a light caramel scent, you’re within seconds of the perfect bake. Trust that nose cue, especially if you’re using a convection oven that circulates heat faster. I’ve watched friends pull cookies out too early because the timer rang, only to end up with doughy centers. If you hear a faint “sizzle” as the cookies bake, that’s the sound of sugar caramelizing—don’t ignore it.
The 5‑Minute Rest That Changes Everything
After mixing, let the dough rest on the counter for 5 minutes before chilling. This short pause allows the flour to fully hydrate, resulting in a more tender crumb. I tried skipping this rest once; the cookies turned out a bit crumbly and fell apart when I lifted them. A quick rest also gives the butter a chance to settle, making the later chilling step more effective.
Don’t Over‑Mix the Dry Ingredients
When folding flour and cake mix into the wet batter, use a gentle “cut‑and‑fold” motion. Over‑mixing creates gluten strands that can toughen the cookie, ruining that melt‑in‑your‑mouth feel. A friend once used a stand mixer on high for this step and ended up with a cookie that resembled a dense brownie. The key is to stop as soon as no streaks of flour remain.
Finish with a Sprinkle of Love
A final dusting of powdered sugar right after the cookies cool adds an extra visual sparkle and a subtle sweet finish. It’s not just for looks; the extra sugar dissolves slightly on the warm surface, creating a glossy sheen that makes the cookies look professionally plated. I always keep a small sifter on hand for this final touch—if you’re feeling fancy, add a pinch of edible glitter for a holiday sparkle.
Creative Twists and Variations
This recipe is a playground. Here are some of my favorite ways to switch things up:
Chocolate‑Swirl Delight
Swap half of the cake mix for a rich chocolate cake mix and add a tablespoon of cocoa powder to the dry ingredients. The result is a deep‑brown cookie with chocolatey ribbons that pair perfectly with the sugary crust. Chocolate lovers will swear they’ve found their new obsession.
Citrus Burst
Add the zest of one lemon and one orange to the wet batter, and replace the vanilla extract with 1 tsp of orange extract. The bright citrus notes cut through the sweetness, making these cookies an ideal palate cleanser after a heavy meal.
Nutty Crunch
Fold in ½ cup of toasted chopped pecans or walnuts just before chilling. The nuts add a pleasant crunch that contrasts with the soft interior, and the buttery flavor of the nuts complements the cookie base beautifully.
Spiced Holiday
Incorporate ½ tsp each of ground cinnamon, nutmeg, and a pinch of cloves into the dry mix. This warm spice blend gives the cookies a cozy, winter‑time vibe while still retaining the patriotic color scheme.
Vegan Velvet
Replace butter with an equal amount of coconut oil, use a flax‑egg (1 tbsp ground flaxseed + 3 tbsp water) for each egg, and choose a vegan cake mix. The cookies stay just as tender, and the coconut oil adds a subtle tropical hint that pairs well with the red‑white‑blue theme.
Storing and Bringing It Back to Life
Fridge Storage
Place cooled cookies in an airtight container with a paper towel at the bottom to absorb excess moisture. Store them in the refrigerator for up to five days; the chilled environment keeps the sugar coating from getting sticky. When you’re ready to serve, let them sit at room temperature for 15 minutes to regain their soft interior.
Freezer Friendly
These cookies freeze like a dream. Arrange them in a single layer on a parchment‑lined tray, freeze for 1 hour, then transfer to a zip‑top freezer bag. They’ll keep for up to three months. To reheat, pop them in a 300°F oven for 5‑7 minutes; the heat revives the crinkle and restores the sugary crunch.
Best Reheating Method
If you’re reheating from the fridge or freezer, add a tiny splash of water (about a teaspoon) to the cookie’s surface before microwaving for 10‑12 seconds. The steam generated revives the interior moisture while the sugar coating re‑crackles, giving you a fresh‑out‑of‑the‑oven experience.