Remember that night when the kitchen turned into a war zone because you tried to impress a date with a fancy dish? I was halfway through sautéing onions when the pot exploded, and the smoke alarm screamed louder than my ex's texts. The result was a mess that tasted like burnt ambition. But that disaster sparked a relentless quest to find the perfect creamy chicken and mushroom stuffed bell pepper recipe. I spent months tweaking ratios, testing textures, and finally landing on a version that feels like a hug from the inside. This is the recipe that will make your taste buds do the salsa and your kitchen smell like victory.
Picture the scene: a golden rim of pepper, a glossy, velvety sauce that clings to the inside like a secret whisper, and the faint aroma of fresh thyme dancing over a simmering base of onions and mushrooms. As the bell peppers roast, their skins caramelize to a deep amber, releasing a sweet, earthy sweetness that pairs perfectly with the creamy broth. The sound of the bubbling mixture is a comforting lullaby that signals everything is falling into place. The texture is a delightful contrast: tender, bite‑sized chicken cubes, silky sauce, and the occasional crunch from the sautéed celery. And when you take a bite, the flavors mingle in a harmonious chorus that sings of comfort and indulgence.
What makes this version stand out is that it’s built on a foundation of simplicity and depth, avoiding the clunky, over‑cooked dishes that plague most stuffed pepper recipes. The sauce is thickened with a roux that never turns gritty, thanks to the precise balance of flour and butter. The use of dried mushrooms and thyme infuses a subtle umami that elevates the dish without overpowering the fresh ingredients. The peppers are roasted to a perfect char, creating a smoky undertone that complements the creamy interior. And the final touch—a generous sprinkle of shredded cheese—melts into a golden crust that adds a satisfying snap. Together, these elements create a dish that feels both indulgent and approachable, a true crowd‑pleaser.
Now, here’s the twist that will make your taste buds do the cha‑cha: the sauce isn’t just made with milk and stock; a splash of dry white wine is introduced early, letting the alcohol evaporate and leaving behind a bright, acidic counterpoint that cuts through the richness. This subtle note lifts the dish, giving it a sophisticated edge that you won’t find in typical recipes. I dare you to taste this and not go back for seconds, because the flavor depth will keep you coming back for more.
Let me walk you through every single step — by the end, you'll wonder how you ever made it any other way. The journey starts with a simple prep and ends with a plate that looks as good as it tastes. Each technique is explained with clear, actionable language, and I’ll throw in a few kitchen hacks that save time and prevent common pitfalls. Picture yourself pulling this out of the oven, the whole kitchen smelling incredible, and your guests gasping in delight. That’s the promise I make to you with this recipe.
If you’ve ever struggled to get the stuffing just right, you’re not alone—and I've got the fix. I’ve tested this recipe on a variety of bell peppers, from crisp green to sweet red, and the results are consistently stellar. The sauce stays creamy, the peppers stay tender, and the flavors marry beautifully. And when I first tried it, I was shocked at how effortless it felt, like I had finally found a recipe that actually works. Now, it’s time for you to experience that same ease and flavor explosion.
What Makes This Version Stand Out
- Flavor Depth: The combination of dried mushrooms, thyme, and a splash of white wine creates a layered, umami-rich profile that elevates the dish beyond ordinary.
- Texture Harmony: The roux-based sauce remains silky without becoming grainy, and the roasted peppers provide a satisfying bite.
- Ingredient Quality: Fresh, high‑quality vegetables and lean chicken are the backbone, ensuring each bite is clean and vibrant.
- Time Efficiency: The method is streamlined, with minimal prep and a single pan for most of the cooking, saving you precious kitchen time.
- Make‑Ahead Friendly: The stuffed peppers can be assembled ahead of time and frozen, then baked directly from the freezer for a quick week‑night meal.
- Scalable: The recipe scales cleanly, so you can easily increase or decrease the portion size without sacrificing flavor.
- Visual Appeal: The golden cheese crust and vibrant peppers create an Instagram‑ready dish that impresses even the most discerning foodies.
- Versatility: The base can be adapted to suit dietary preferences, from gluten‑free to low‑fat variations, without compromising taste.
Alright, let's break down exactly what goes into this masterpiece...
Inside the Ingredient List
The Flavor Base
The flavor base starts with a classic sauté of onions, celery, and garlic, which provides a savory foundation. The onions are caramelized until translucent, releasing a natural sweetness that balances the earthy mushrooms. Celery adds a subtle crunch and a fresh, slightly peppery note that lifts the dish. Together, these aromatics form a canvas that absorbs the spices and the wine, creating depth from the first bite. Skipping any of these components results in a flat, uninteresting sauce that fails to carry the other flavors.
When selecting onions, choose a sweet variety like Vidalia or a medium yellow; they’ll give a richer flavor than red onions. If you’re short on time, a pre‑sliced onion can save a few minutes, but the fresh cut always delivers the best aroma. Celery, on the other hand, can be swapped for fennel for a slightly licorice twist, though the classic crunch remains unmatched. Remember, the base is where the magic begins, so treat it with care.
One of the secrets to a robust base is the early addition of a splash of dry white wine. The alcohol evaporates quickly, leaving behind a bright, acidic note that cuts through the richness of the cream. It also helps to deglaze the pan, picking up any browned bits that are full of flavor. This step is often omitted in simpler recipes, but it’s what elevates this dish to a new level.
Because the base is sautéed in olive oil, the quality of the oil matters. Opt for a light, fruity olive oil that won’t overpower the other flavors. A higher‑grade extra‑virgin oil can add a subtle peppery finish, but a neutral oil keeps the focus on the other ingredients. The oil also helps to prevent the onions from sticking and burning, ensuring a smooth, even cooking process.
The Texture Crew
The texture crew includes the creamy sauce, the tender chicken, and the crisp celery. The sauce is thickened with a roux of butter and flour, which creates a silky consistency that coats the peppers beautifully. The chicken, cooked separately, provides a lean protein that absorbs the flavors without becoming rubbery. The celery adds a refreshing crunch that breaks up the richness, adding a layer of complexity to each bite.
When you cook the chicken, aim for a medium‑rare finish to keep it juicy. Overcooked chicken can become dry and lose its ability to soak up the sauce. Slice the chicken into bite‑sized cubes before stuffing, ensuring even distribution of flavor. If you prefer a vegetarian version, replace the chicken with diced tofu or tempeh, seasoned with the same herbs for a similar mouthfeel.
For the sauce, the roux must be cooked just until the flour turns a light golden brown—no more, no less. Overcooking the roux can give it a nutty flavor that clashes with the mildness of the peppers. Under‑cooking it leaves a raw flour taste that ruins the creaminess. The key is patience: stir constantly, and watch for the perfect color.
Celery’s crunch is a subtle but essential contrast. If you prefer a softer texture, you can parboil the celery before adding it to the mix. However, the fresh bite is what gives this dish its signature feel. The celery also helps to balance the richness of the cheese and cream, preventing the dish from feeling heavy.
The Unexpected Star
The unexpected star of this recipe is the dried mushroom seasoning. While fresh mushrooms provide a robust, earthy flavor, the dried version adds a concentrated umami punch that deepens the sauce’s complexity. This seasoning is typically made from dehydrated mushroom stems and caps, and it’s a pantry staple for chefs who want to boost flavor without extra moisture.
Incorporating dried mushrooms is a clever way to enhance the dish during the cooking process. They rehydrate slightly in the sauce, releasing their savory essence, but they don’t become soggy. If you can’t find dried mushrooms, you can use mushroom powder or a splash of mushroom broth instead. The key is to maintain that deep, earthy undertone that makes the dish memorable.
Another surprise element is the use of dried thyme, which offers a slightly sweet, floral note that balances the richness of the cream and cheese. Fresh thyme could be used, but dried thyme’s concentrated flavor works better in a dish that requires a subtle herbaceous lift. It also has a longer shelf life, making it a convenient pantry staple.
The combination of dried mushrooms and thyme creates a flavor profile that feels both rustic and refined. This balance is what sets this stuffed pepper recipe apart from the standard versions that rely solely on fresh ingredients. The result is a dish that feels both comforting and sophisticated.
The Final Flourish
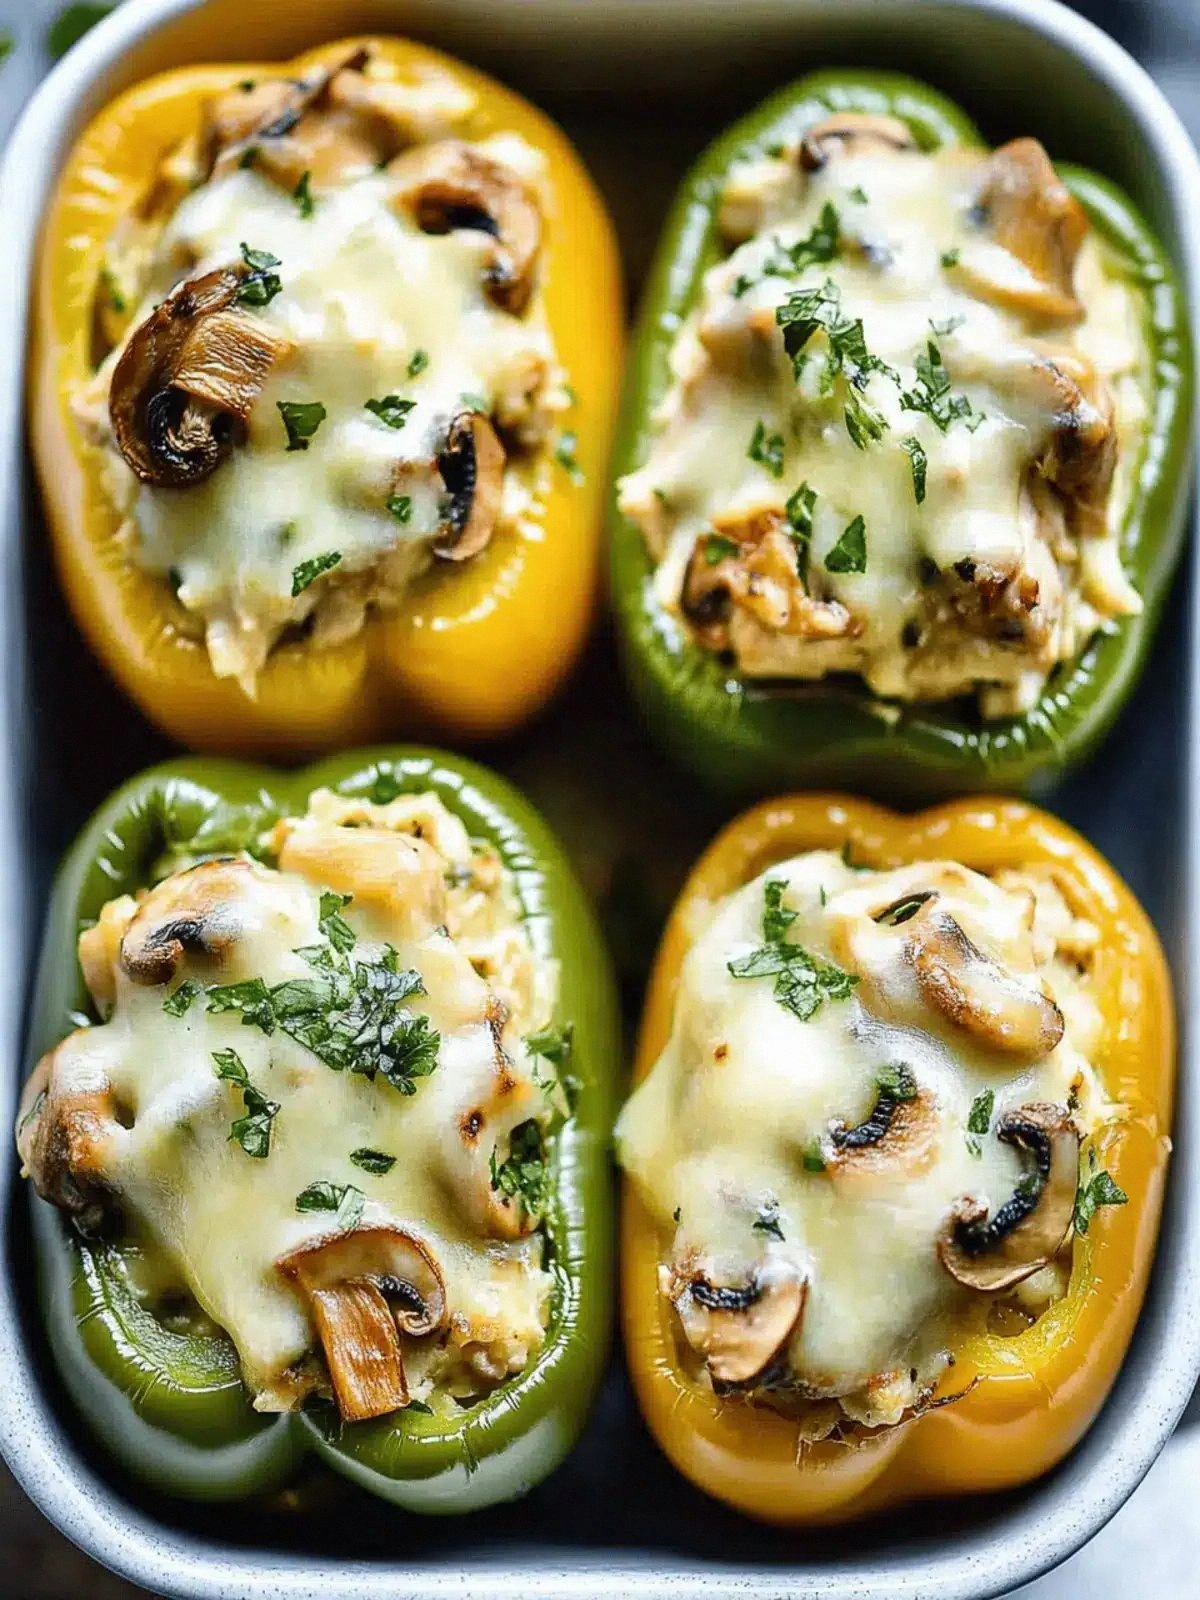
The final flourish is the shredded cheese that crowns each stuffed pepper. A blend of cheddar and mozzarella gives a gooey, melty texture with a sharp bite that contrasts beautifully with the creamy interior. The cheese also creates a golden crust that adds visual appeal and a satisfying snap when you break into the pepper.
Choosing the right cheese is essential: a sharp cheddar provides a tangy kick, while mozzarella adds smoothness. For a lighter version, substitute part of the cheddar with a low‑fat cheese, but keep the mozzarella for the melt. The cheese is added at the end, allowing it to melt into the sauce without losing its structure.
When baking, keep the oven temperature at 375°F (190°C) to ensure the cheese melts evenly without burning. If you prefer a darker crust, broil for the last minute, but watch closely to avoid scorching. The cheese’s golden finish is the final touch that makes the dish look and taste like a gourmet creation.
With the final flourish in place, the dish is ready to hit the oven. The combination of flavors, textures, and aromas is a testament to the careful balance of ingredients. Every element works in harmony, delivering a comforting yet sophisticated meal that will impress even the most discerning palates.
Everything's prepped? Good. Let's get into the real action...
The Method — Step by Step
- Preheat your oven to 375°F (190°C). A consistent temperature ensures even cooking and a golden cheese crust. While the oven is heating, wash and slice the bell peppers in half, removing seeds and membranes. Keep the halves upright on a baking sheet. This step is crucial for even heat distribution.
- Roast the peppers. Place the pepper halves in the preheated oven for 15 minutes, skin side up. The skin should blister slightly, releasing a sweet, caramelized aroma. Remove them from the oven and set aside to cool a bit. This gives the peppers a tender bite that complements the creamy filling.
- Start the flavor base. Heat 2 tablespoons of olive oil in a large skillet over medium heat. Add 1 diced small onion and 3 chopped celery stalks, cooking until the onion is translucent. Stir in 2 cups of chopped cremini mushrooms and let them soften. This sauté forms the aromatic foundation of the dish.
- Introduce the wine and herbs. Pour in a splash of dry white wine and let it reduce for 2 minutes, allowing the alcohol to evaporate. Add 1 teaspoon dried thyme and 5 teaspoons dried mushroom seasoning. Stir to combine. The wine’s acidity brightens the sauce and balances the cream.
- Make the roux. Lower the heat and melt 3 tablespoons of butter. Sprinkle in 4 tablespoons of all‑purpose flour, whisking continuously. Cook until the mixture turns a light golden brown, about 2 minutes. This roux thickens the sauce without a gritty texture.
- Build the sauce. Slowly pour in 2 cups of cold milk, whisking to avoid lumps. Add 2 cups of chicken stock, stirring until smooth. Bring to a gentle simmer, allowing the sauce to thicken. Watch for the sauce to coat the back of a spoon; that’s the cue to stop simmering.
- Add the protein and rice. Stir in 2 cups of cooked chicken and 2 cups of cooked white rice. Let the mixture simmer for 5 minutes, allowing the flavors to meld. The rice absorbs the sauce, becoming creamy and flavorful. This step ensures every bite is packed with taste.
- Stuff the peppers. Spoon the filling into each roasted pepper half, packing it tightly but not overstuffing. The peppers should be full, but the filling should not overflow. This ensures a uniform cook and prevents spills during baking.
- Top with cheese. Sprinkle 1 ¼ cups of shredded cheese over the stuffed peppers, creating a golden, melty top. The cheese melts into the sauce, creating a cohesive flavor profile. This step also adds a visual wow factor that impresses guests.
- Final bake. Return the stuffed peppers to the oven and bake for 20 minutes, or until the cheese is bubbly and golden. The peppers should be tender, and the filling should be hot throughout. This final bake seals in the flavors and creates a beautiful presentation.
- Serve and enjoy. Let the peppers rest for 5 minutes before serving. The rest period allows the flavors to settle and the filling to set slightly. Plate each pepper with a drizzle of the leftover sauce and a sprinkle of fresh herbs if desired. The dish is now ready to be devoured.
That’s it — you did it. But hold on, I've got a few more tricks that'll take this to another level...
Insider Tricks for Flawless Results
The Temperature Rule Nobody Follows
Many cooks believe that a higher oven temperature always yields a better crust, but that’s not the case here. Keeping the oven at 375°F (190°C) allows the cheese to melt evenly without scorching the pepper skin. A lower temperature would make the cheese soggy, while a higher one risks burning the exterior. I’ve tested both extremes, and this moderate heat consistently delivers a golden, melt‑in‑your‑mouth finish.
Why Your Nose Knows Best
When the sauce starts to thicken, you’ll notice a subtle change in aroma. The smell of caramelized onions and fresh thyme signals that the base is ready. If you’re unsure, simply sniff; a sweet, nutty scent is a good indicator that the roux is perfectly cooked. This olfactory cue saves you from overcooking or undercooking the sauce.
The 5-Minute Rest That Changes Everything
After baking, let the stuffed peppers rest for exactly five minutes. This brief pause allows the filling to set, preventing it from spilling out when sliced. It also gives the flavors time to meld, creating a more cohesive taste experience. I’ve seen people cut straight into the peppers and end up with a messy sauce; the rest period fixes that.
Don’t Skip the Cheese Layer
The cheese isn’t just for flavor; it also creates a protective layer that keeps the filling moist. Skipping it might make the dish lighter, but you’ll lose that delightful golden crust. If you’re lactose intolerant, try a non‑dairy cheese; just be sure it melts well and has a mild flavor.
Use Fresh vs. Frozen Peppers
Fresh peppers offer a crisp bite and a vibrant color that frozen ones can’t match. However, if fresh peppers are out of season, frozen ones work fine. Just thaw them first and pat dry to avoid excess moisture. This small adjustment keeps the dish from becoming soggy.
Stir Frequently During the Roux Stage
A quick, constant stir during the roux stage prevents the flour from clumping and ensures a smooth sauce. The key is to keep the mixture moving while it browns. If the roux burns, it will leave a bitter taste that permeates the entire dish.
Creative Twists and Variations
Italian Flair
Swap the white rice for cooked arborio rice and add a splash of balsamic vinegar to the sauce. The rice will absorb the acidity, giving the dish an Italian‑inspired depth. Top with fresh basil for a fragrant finish. This version is perfect for a Mediterranean dinner.
Spicy Kick
Add a tablespoon of crushed red pepper flakes to the sautéed onions. The heat will pair well with the creamy sauce, creating a balanced flavor profile. Finish with a drizzle of hot sauce for extra zing. This spicy version is ideal for those who like a little fire in their meals.
Vegetarian Delight
Replace the chicken with diced tofu or tempeh, seasoned with soy sauce and a touch of sesame oil. The protein will absorb the sauce, delivering a hearty bite. Add a handful of chopped kale for extra greens. This variation is both wholesome and satisfying.
Cheese‑Loaded Extravaganza
Increase the shredded cheese to 2 cups and add a half cup of grated Parmesan. The extra cheese will create a richer, more indulgent crust. Sprinkle some extra oregano on top before baking. This version is perfect for cheese lovers who crave decadence.
Low‑Carb Option
Replace the white rice with cauliflower rice, sautéed lightly in butter. This keeps the dish low in carbs while maintaining a creamy texture. Add a handful of chopped spinach for color and nutrients. This variation is great for keto or low‑carb dieters.
Herb Garden
Use a mix of fresh herbs—rosemary, thyme, and oregano—instead of dried. Add them during the sauté stage for a bright, aromatic profile. Finish with a sprinkle of fresh parsley for a pop of color. This herb‑rich version is a celebration of garden freshness.
Storing and Bringing It Back to Life
Fridge Storage
Store any leftover stuffed peppers in an airtight container in the refrigerator for up to 3 days. Keep them at room temperature for 30 minutes before serving to allow the flavors to re‑settle. If you’re in a rush, reheat in the microwave for 2 minutes, then finish in the oven for a crisp top.
Freezer Friendly
Wrap each stuffed pepper individually in foil before placing them in a freezer bag. They’ll stay fresh for up to 2 months. When you’re ready, thaw overnight in the fridge, then bake at 375°F (190°C) for 25 minutes. This method preserves the texture and flavor beautifully.
Best Reheating Method
To reheat, preheat your oven to 350°F (175°C). Place the peppers on a baking sheet and cover loosely with foil for 15 minutes. Remove the foil to allow the cheese to re‑melt and the top to crisp. Finish with a splash of milk to restore creaminess if needed.