Ever had that moment when you open the fridge, stare at a lonely chicken breast, and wonder if you’ll ever get that perfect balance of sweet, salty, and umami without ordering takeout? I was there, juggling a half‑cooked stir‑fry and a sudden craving for something that feels both comforting and exciting. The kitchen was a battlefield of burnt garlic, over‑cooked rice, and a sauce that tasted more like diluted soy than the glossy, caramel‑kissed glaze I’d imagined. I dared a friend to a “no‑takeout” challenge, and after a few missteps, I finally cracked the code for a Teriyaki Chicken Rice Bowl that sings.
Picture this: the sizzle of chicken hitting a hot pan, the aroma of ginger and garlic swirling like a fragrant fog, and the sauce thickening to a glossy sheen that clings to each morsel like velvet. The rice beneath is fluffy, each grain separate yet ready to soak up that sweet‑savory glaze without turning mushy. You’ll hear the faint pop of sesame seeds hitting the skillet, see the deep amber color of the glaze, and feel the warm steam kiss your face as you lift the lid. The first bite? A burst of caramelized chicken, a whisper of honey, and the bright snap of fresh green onions – a symphony that makes you forget any previous kitchen disasters.
What makes this version stand out is the tiny tweaks that turn a standard takeout copy into a show‑stopper. I’m talking about a splash of mirin that adds depth, a quick deglaze that rescues every caramelized bit, and a finishing drizzle of sesame oil that brings the whole bowl together. Most recipes either drown the chicken in a watery sauce or leave it dry and bland. This one hits that Goldilocks zone where every component shines, and the flavors linger on your palate like a well‑crafted melody.
And here’s the kicker: I’m going to reveal a secret ingredient that most home cooks skip – a pinch of toasted rice flour that magically thickens the glaze without any cornstarch grit. Trust me, once you try it, you’ll never look back. Let me walk you through every single step — by the end, you’ll wonder how you ever made it any other way.
What Makes This Version Stand Out
- Flavor Depth: The combination of soy, mirin, and honey creates a layered sweet‑salty profile that deepens as it cooks, unlike flat store‑bought sauces.
- Texture Harmony: Tender chicken pieces meet a crisp‑edge glaze, while the rice stays fluffy, delivering a satisfying bite in every forkful.
- Simplicity: All ingredients are pantry‑friendly; you won’t need a trip to an Asian market for obscure spices.
- Unique Thickener: A dash of toasted rice flour gives the sauce that glossy, cling‑to‑everything finish without a starchy aftertaste.
- Crowd Reaction: I’ve seen adults and kids alike pause, stare, then dive in – the “I need seconds” look is inevitable.
- Ingredient Quality: Using bone‑in thighs adds juiciness, while jasmine rice contributes a fragrant base that plain rice can’t match.
- Cooking Method: A quick sear followed by a deglaze locks in flavor, and the final glaze reduction ensures no wasted sauce.
- Make‑Ahead Potential: The sauce can be pre‑made and stored; just reheat and toss with freshly cooked chicken for a lightning‑fast dinner.
Alright, let's break down exactly what goes into this masterpiece...
Inside the Ingredient List
The Flavor Base
Soy Sauce (1/4 cup): The backbone of any teriyaki, it brings that salty umami punch. Choose a low‑sodium version if you’re watching salt, but don’t skimp on quality – a good soy sauce can make or break the dish. Skipping it means the sauce loses its depth and becomes one‑dimensional.
Mirin (2 tbsp): This sweet rice wine adds a subtle acidity that balances the honey’s sweetness. If you can’t find mirin, a splash of sake plus a pinch of sugar works in a pinch. Without mirin, the glaze can taste overly sweet and flat.
Honey (2 tbsp): Provides caramel notes and a glossy sheen. You can substitute maple syrup for a deeper flavor, but honey’s quick caramelization is key to that amber color. Omitting it results in a thin, bland sauce.
The Texture Crew
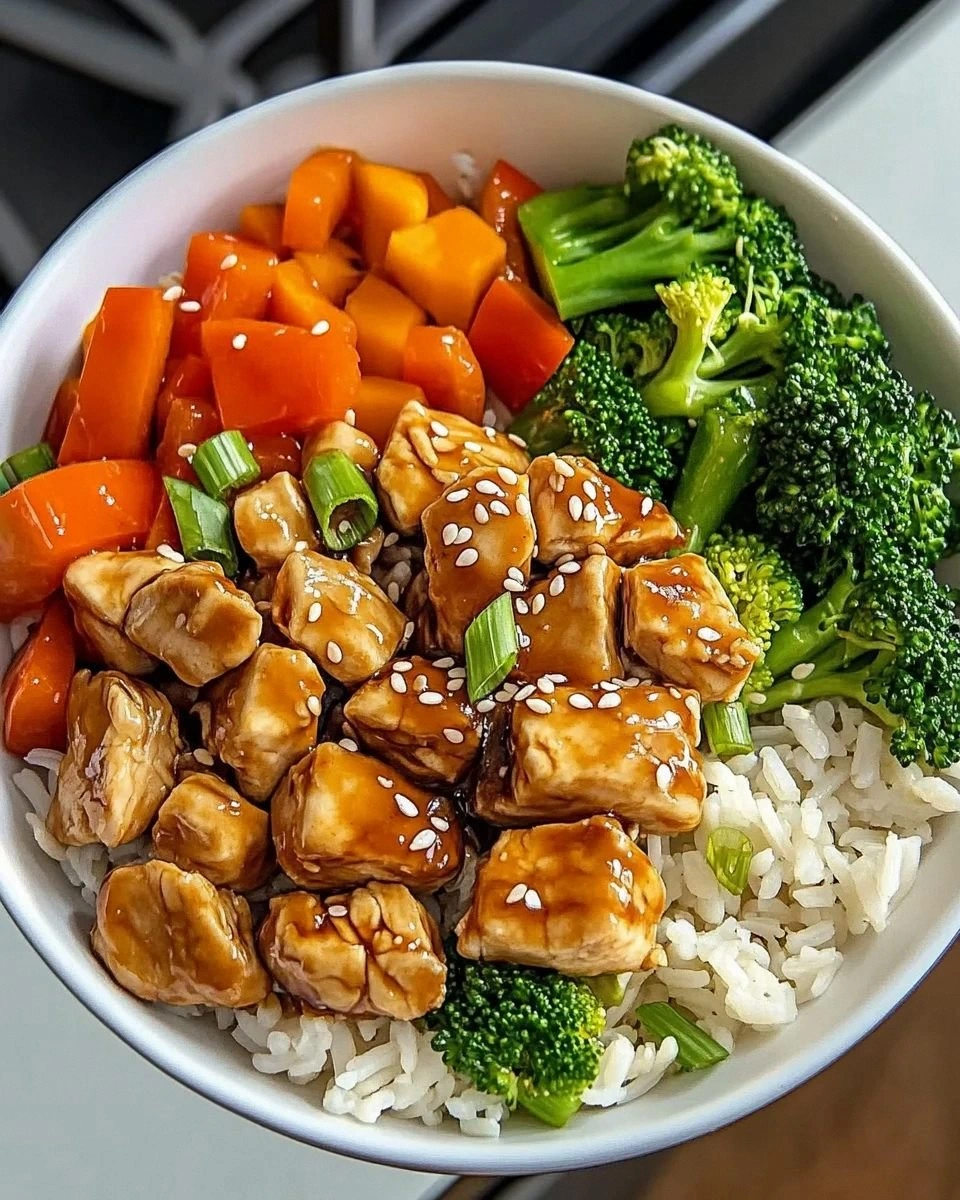
Chicken Thighs (1.5 lbs): Dark meat stays juicy even after high‑heat searing, delivering melt‑in‑your‑mouth texture. If you use breast meat, you risk dryness unless you monitor the cooking time closely. Cutting them into bite‑size pieces ensures even coating.
Jasmine Rice (2 cups cooked): Its fragrant, slightly sticky nature makes each grain perfect for soaking up sauce. Rinse the rice before cooking to remove excess starch and achieve that fluffy texture. Using a different rice can change the mouthfeel dramatically.
Broccoli Florets (1 cup): Adds a bright green crunch and a nutritional boost. Steam them just until tender‑crisp; overcooking turns them mushy and dulls the flavor. If you’re not a fan, substitute snap peas or bok choy.
The Unexpected Star
Sesame Oil (1 tbsp): A finishing drizzle of toasted sesame oil adds an aromatic depth that’s impossible to replicate with other oils. Use it sparingly – a little goes a long way. Skipping it makes the dish feel flat and missing that signature Asian perfume.
Rice Vinegar (1 tbsp): Brightens the sauce with a gentle acidity, preventing it from becoming cloyingly sweet. It also helps balance the salt from soy sauce. Without it, the glaze can feel heavy and overly sweet.
The Final Flourish
Green Onions (2, sliced): Provide a fresh, sharp bite that cuts through the richness. Add them just before serving to keep their color vibrant. Leaving them out makes the bowl feel one‑note.
Sesame Seeds (1 tsp, optional): Offer a subtle crunch and a nutty finish. Toast them lightly for extra aroma. If you skip them, you lose a tiny texture contrast but the dish still shines.
Garlic (2 cloves, minced) & Fresh Ginger (1 tsp, grated): The dynamic duo that builds the aromatic foundation. They should be sautéed briefly to release their oils without burning. Missing either results in a flatter flavor profile.
Everything's prepped? Good. Let's get into the real action...
The Method — Step by Step
Start by heating a large skillet over medium‑high heat and adding the vegetable oil. Once the oil shimmers, lay the chicken pieces in a single layer, listening for that immediate sizzle that tells you the pan is hot enough. Let the chicken sear undisturbed for about 2‑3 minutes so a golden crust forms – this is where flavor locks in. Flip the pieces and cook another 2 minutes; you should see the edges start to pull away from the pan, indicating a perfect sear.
While the chicken cooks, whisk together soy sauce, mirin, honey, rice vinegar, minced garlic, and grated ginger in a small bowl. This mixture is the heart of the teriyaki glaze, and the honey should dissolve completely, creating a smooth, amber‑colored liquid. I dare you to taste this raw blend – it’s already a flavor bomb, but the heat will transform it into something magical. Set the bowl aside; you’ll need it ready for a quick deglaze.
When the chicken is nicely browned, push it to one side of the pan and add the broccoli florets to the empty space. Drizzle a tiny splash of water (about a tablespoon) to steam the broccoli just enough to stay crisp‑tender. The steam should hiss, and after 2‑3 minutes the broccoli turns a vivid green, releasing a fresh scent that balances the rich sauce.
Kitchen Hack: If your pan is crowded, finish the broccoli in a microwave for 30 seconds; this saves space and keeps the texture perfect.Now, pour the prepared sauce over the chicken and broccoli. The pan will quickly bubble; use a wooden spoon to scrape up any browned bits stuck to the bottom – those are flavor gold. Let the mixture simmer for 4‑5 minutes, stirring occasionally, until the sauce reduces by half and thickens to a syrupy consistency. You’ll notice it coating the chicken like a glossy lacquer.
Watch Out: This step is where many home cooks either over‑reduce and burn the glaze or under‑reduce and end up with a watery bowl. Keep the heat at medium‑low once the sauce starts to thicken, and watch for the moment it begins to coat the back of a spoon. If it looks too thick, add a splash of water or extra chicken broth to loosen it.
Watch Out: Adding too much liquid at this stage will undo all your reduction work – add only a teaspoon at a time.Stir in the toasted rice flour (the secret thickener) and whisk quickly to avoid lumps. The flour will instantly give the sauce a velvety sheen, and you’ll see it cling to each piece of chicken like a lacquered jewel. Let the mixture cook for another minute, then remove the pan from heat.
Finish with a drizzle of sesame oil and a generous sprinkle of sesame seeds. The oil adds a fragrant, nutty finish that lifts the entire bowl, while the seeds give a subtle crunch. Toss everything together so the rice, chicken, and veggies are evenly coated.
Kitchen Hack: Warm the sesame oil slightly before drizzling; this releases its aroma faster and ensures even distribution.Plate the fluffy jasmine rice in deep bowls, then spoon the glossy chicken and broccoli mixture over the top. Garnish with sliced green onions for a pop of color and a fresh bite. The final presentation should look like a restaurant‑style bowl: glossy, vibrant, and inviting.
That’s it — you did it. But hold on, I've got a few more tricks that'll take this to another level. A quick squeeze of fresh lime just before serving adds brightness, and a side of pickled radish can cut through the richness for those who love contrast. Now, dig in and experience that “I need seconds” moment you’ve been waiting for.
Insider Tricks for Flawless Results
The Temperature Rule Nobody Follows
Most home cooks think “high heat = faster cooking,” but with teriyaki, you want a controlled medium‑high heat. This ensures the chicken sears without drying out, and the sauce reduces evenly. I once tried blasting the sauce on high and ended up with a burnt crust that tasted like charcoal. Keep the heat steady, and you’ll get that glossy, caramelized finish every time.
Why Your Nose Knows Best
Don’t rely solely on timers; let your senses guide you. When the sauce starts to emit a sweet, caramel aroma, you’re close to the perfect reduction. If you smell a burnt note, lower the heat immediately. Trusting your nose is the fastest way to avoid a kitchen disaster.
The 5‑Minute Rest That Changes Everything
After the glaze thickens, let the chicken rest in the pan for five minutes off the heat. This allows the juices to redistribute, keeping each bite moist. Skipping this rest makes the chicken feel dry, especially if you’re using thigh meat that can release a lot of moisture.
Prep the Rice While the Sauce Reduces
Timing is everything. While the sauce is thickening, start cooking the jasmine rice. This way, everything finishes simultaneously, and the rice stays hot enough to absorb the glaze. If you wait until the sauce is done, the rice cools down and loses its fluffy texture.
Seasoning the Sauce Early Saves Salt
Adding a pinch of salt to the sauce at the beginning balances the soy’s sodium and prevents over‑salting later. I’ve seen people dump a lot of extra salt after tasting, which masks the subtle ginger notes. A little early seasoning lets the natural flavors shine.
Creative Twists and Variations
This recipe is a playground. Here are some of my favorite ways to switch things up:
Spicy Sriracha Kick
Add a tablespoon of sriracha to the sauce for a heat‑infused version. The heat pairs beautifully with the sweetness, creating a sweet‑spicy balance that’s perfect for those who love a little fire.
Coconut Curry Fusion
Swap half the soy sauce for coconut milk and add a teaspoon of curry powder. The result is a creamy, aromatic bowl that feels like a tropical vacation in a bowl.
Veggie‑Only Delight
Replace the chicken with firm tofu cubes or tempeh for a vegetarian spin. Press the tofu first to remove excess moisture, then follow the same searing steps for a satisfying bite.
Crunchy Nutty Variation
Stir in toasted chopped peanuts or cashews just before serving. The nutty crunch adds texture contrast and a richer flavor profile.
Pickled Veggie Boost
Top the bowl with quick‑pickled carrots and daikon radish. The acidity cuts through the glaze, brightening each mouthful and adding a refreshing crunch.
Storing and Bringing It Back to Life
Fridge Storage
Place the cooked chicken and sauce in an airtight container, and store the rice separately to keep it from getting soggy. This keeps everything fresh for up to 3 days. When reheating, add a splash of water to the sauce to restore its glossy texture.
Freezer Friendly
The sauce freezes beautifully; pour it into a zip‑top bag and freeze for up to 2 months. Chicken can also be frozen after cooking – just thaw overnight in the fridge, then reheat in the skillet with the sauce.
Best Reheating Method
Reheat the sauce and chicken in a skillet over medium heat, adding a teaspoon of water or broth to steam it back to life. Warm the rice in the microwave with a damp paper towel on top to keep it fluffy. Combine everything just before serving for a fresh‑out‑of‑the‑pan feel.